Item Creation
New items can be created with the following steps:
Prepare the 3D model variant
The first step to making a weapon is to have a 3D model for your weapon.
It is recommended to make a prefab variant of your 3D model. This will ensure that as you make a changes to your model your model variant will update automatically. You can use the same model variant for the pickup and the weapon.
We use the following format in the demo scene:
- Pistol: The model imported from an FBX or other format.
- PistolModel: The prefab variant of the model containing visuals.
- PistolWeaponModel: Optional. The prefab variant specifically for your weapon that can be used for other objects like the pickup.
Create a new Character Item
The next step is to create the CharacterItem. There are multiple ways to do so.
- Prefab: Create a Prefab for the Character Item such that it can be added to the character dynamically.
- On Character: Spawn the character item inside a character within the scene such that the item is always part of the character.
There are advantages and disadvantages to both approaches.
| Prefab | On Character | |
| Advantage |
|
|
| Disadvantage |
|
|
Item Manager
Open up the Item Manager via Tools -> Opsive -> Ultimate Character Controller -> Item Manager.
![]()
The Item Manager allows you to create an item with the prefab or character method. This guide will go through both options.
Item prefab
The Item field should be set to the item model that you want to use. This will automatically set the Name, First Person Visible Item, and the Third Person Visible Item.
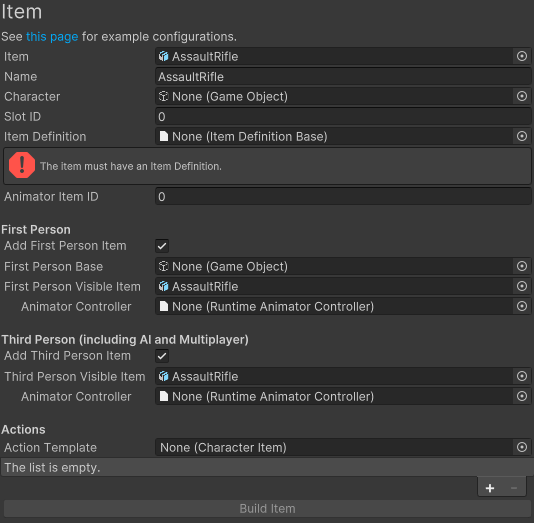
Set the values below. By leaving the Character field blank the item will be made into a prefab.
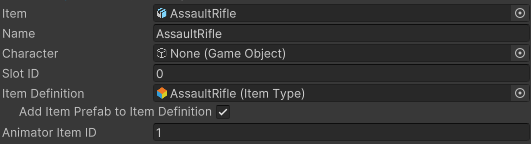
- Item: A reference to the assault rifle. This should reference to model file and not a prefab.
- Name: AssaultRifle
- Item Definition: AssaultRifle. This is the ItemType that was created on this page.
- Character: Empty.
- Animator Item ID: 1. This number matches the ItemID parameter within the Animator Controller. Default values are located on this page.
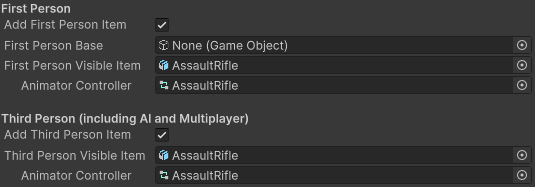
Set the weapon model variant in the Visible Item field of the perspective you want to use. The Animator Controller should also be set if the character uses an Animator Controller. The First Person Base field should be left empty in most cases. It can be used if there is no Visible Item and the item model is one model with the arms.
ItemActions can be set at this stage or they can be added later through the Item Manager.

The item will be positioned correctly but in a first person view the arms will be in the wrong position. This can be solved by modifying the Position Offset on the FirstPersonItemPerspective component. In this case we want to adjust the Position Offset and Position Exist Offset to:
Item attached to the character
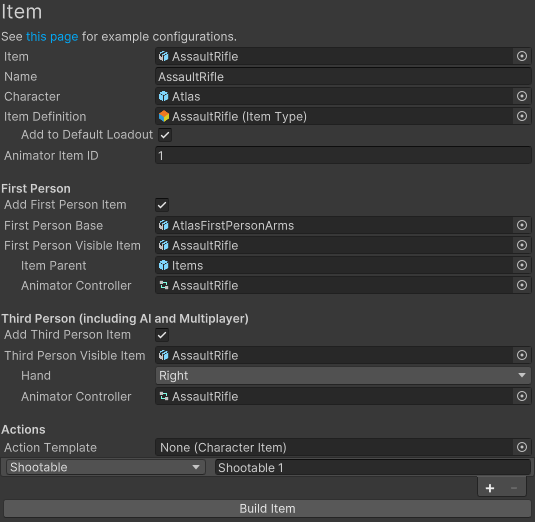
Start to fill in the following fields:
- Item: A reference to the assault rifle. This should reference to model file and not a prefab.
- Name: AssaultRifle
- Item Definition: AssaultRifle. This is the ItemType that was created on this page.
- Character: Atlas. This is the same character that was created on this page.
- Animator Item ID: 1. This number matches the ItemID parameter within the Animator Controller. Default values are located on this page.
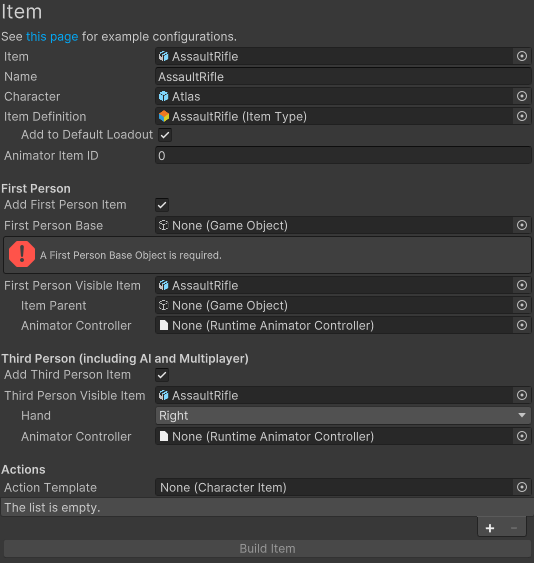
The next step depends on if you are creating a first or third person item. If your character is going to be an AI agent or part of a multiplayer game the Third Person Visible Item field should be specified even if your game is a first person game.
For an item used in the first person perspective the following fields should be filled out:
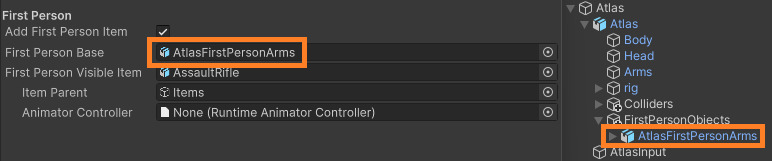
- First Person Base: AtlasFirstPersonArms. This object is rendered on the screen holding the object. This is normally the character’s arms and was specified under the First Person Objects field within the Character Manager. This should be a separate object so it can be activated independently of the base character model.
- First Person Visible Item: AssaultRifle. This is the actual item model.
- Item Parent: Items. This is our character’s right hand, a child of the First Person Object. This is the object that the First Person Visible Item will be parented to.
- Animator Controller: AssaultRifle. This is the Animator Controller that is added to the item and will show the assault rifle being used or reloaded.
Third person items are parented to the actual character model so they are easier to setup:
- Third Person Visible Item: AssaultRifle. This is the actual item model.
- Third Person Hand: Right. This is the object that the Third Person Object is parented to. If the character is not humanoid then the object needs to be manually specified.
- Third Person Animator Controller: AssaultRifle. This is the Animator Controller that is added to the item and will show the assault rifle being used or reloaded. It is optional but adds a nice polish to the third person view.
The last section that needs to be specified relates to the action types. Actions perform the actual interaction with the item, such as firing a bullet or slashing a sword. Multiple actions can be added to a single item but for this example we just want the item to shoot so the following values can be specified:
- Action Type: Shootable. The assault rifle should be able to shoot bullets.
Once you have filled in all of the field values the builder should look like:
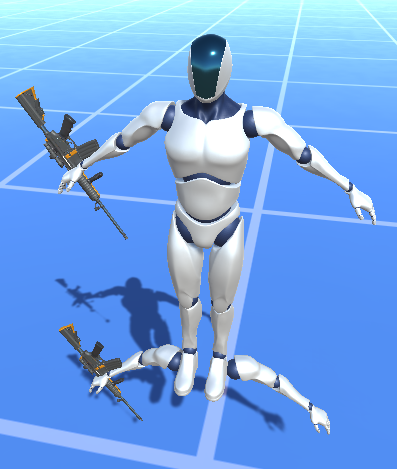
Go ahead and click “Build Item”. You’ll notice that the assault rifle has now been added to the character, but it is positioned incorrectly in both the first and third person character’s hand. In the screenshot below the materials have been assigned to make it easier to see.
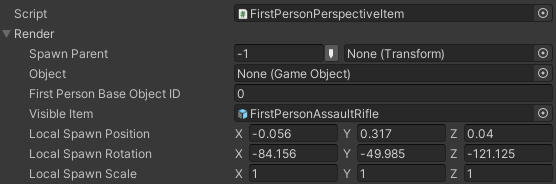
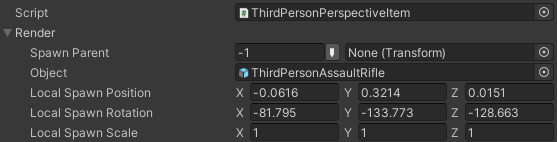
The item position can be adjusted by pressing play within Unity and adjusting the position and rotation of the item’s transform component. Once you stop playing you can then paste the values back into the Transform component. Here are the values that we are using for the assault rifle:
First Person:

Third Person:

This transform is set on the actual Assault Rifle object located underneath the character’s rig or arms hierarchy. The first person assault rifle is located at: Atlas/Atlas/FirstPersonObjects/AtlasFirstPersonArms/rig/ORG-shoulder_R/ORG-upper_arm_R/ORG-forearm_R/ORG-hand_R/Items/AssaultRifle. The third person assault rifle has a similar path: Atlas/Atlas/rig/root/ORG-hips/ORG-spine/ORG-chest/ORG-shoulder_R/ORG-upper_arm_R/ORG-forearm_R/ORG-hand_R/Items/AssaultRifle.
After you hit play the assault rifle will be positioned correctly, but it will be in the incorrect location for the first person view. This is because the new assault rifle item controls the location of the first person arms and the default location probably won’t fit your new item. This can be adjusted within the First Person Perspective Item component of the AssaultRifle object under Atlas/Items/AssaultRifle. Most of the properties that you edit for the assault rifle will be located on this object. In this case we want to adjust the Position Offset and Position Exist Offset to:
Now when you hit play the assault rifle should be positioned correct for both first and third person! See this page for common item errors. The tips & tricks section is also a good resource to go through.
New Item
The options below are available when creating a new item.
Item
A reference to the model file that should be used for the item. This field can be left blank if the item doesn’t have a mesh associated with it (such as the Body item).
Name
Specifies the name of the item. It is recommended that this be a unique name though it is not required.
Item Definition
The Item Definition that the Item should use. Item Definitions are the parent class of Item Types which are used by the character controller. Item Types must first be created within the Item Type Manager and must be unique for each slot. As an example, if you are dual wielding pistols each pistol can use the same Pistol Item Type, but each pistol must be in a different slot.
Character
Specifies the character that the Item should be added to. This field should be empty if the item will be added at runtime.
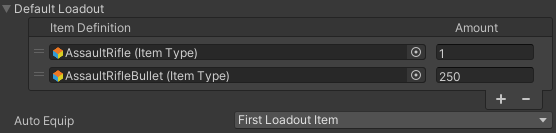
Add To Default Loadout
If a character is specified the Item Type can automatically be added to the Inventory’s Default Loadout.
Slot ID
The ID of the slot that the Item should occupy. The Item will be parented to the Item Slot component for the corresponding perspective. The Slot ID must match for both first and third person perspective.
Animator Item ID
The ID of the Item within the Animator Controller. This ID is used by the SlotXItemID parameter within the Animator Controller and it must be unique for each item. A listing of default Item IDs can be found on this page.
Add First Person Item
Should the first person item perspective be added?
First Person Base
A reference to the base object that should be used by the first person item. This will usually be the character’s separated arms. A single object can be used for multiple Items. If a First Person Visible Item is specified this object should be within the scene so the Item Slot can be specified.
First Person Visible Item
Specifies the Item object that is actually visible and rendered to the screen, such as the assault rifle or sword. This field should be left blank if you are adding an item that is part of the character’s body such as a fist for punching.
First Person Visible Item Parent
Specifies the object that the First Person Visible Item should be parented to
First Person Visible Item Animator Controller
Specifies the Animator Controller that should be used by the First Person Visible Item.
Add Third Person Item
Should the third person item perspective be added?
Third Person Visible Item
Specifies the third person item object. This is the object that will be visible and rendered to the screen, such as the assault rifle or sword.
Third Person Animator Controller
Specifies the Animator Controller that should be used by the Third Person Visible Item.
Action Template
Allows the actions from an existing item to be copied to your new item. See the templates page for more information.
Actions
A list which allows you to specify which Item Action should be added.
Existing Item
The Existing Item options are a subset of the New Item options. These options allow you to easily modify an item which has already been created. To get started you must input the existing item in the Item field. An error will appear within the window if your item isn’t an Ultimate Character Controller character.
After you have made your changes you can click the Update Item button. This will apply the changes to the item.