Use the Control Freak integration when a Control Freak 2 touch rig should provide movement, look, and action input while Ultimate Character Controller continues to run the character, camera, abilities, and items. The integration replaces the character’s Unity input provider with Control Freak Input; it does not replace Player Input Proxy or create separate touch ownership for multiple players.

Before you begin

  • Install and test an Ultimate Character Controller Version 3 character with its existing input before changing providers.
  • Install Control Freak 2 before importing the Ultimate Character Controller integration. The bridge compiles against the ControlFreak2 API.
  • Use the Ultimate Character Controller Control Freak integration package offered for the installed Ultimate Character Controller Version 3 release. The supplied bridge does not declare a minimum or maximum Control Freak version, so retest the isolated scene after upgrading either product.
  • Commit or back up the project. The setup removes the character’s current input provider and any Ultimate Character Controller virtual-control UI that would compete with the Control Freak rig.
  • Plan one input owner. The supplied bridge reads Control Freak’s shared input source and active rig; it does not expose a player or rig assignment for split-screen touch input.

Install and connect the integration

  1. Import Control Freak 2 and allow Unity to compile.
  2. Sign in to Opsive Downloads and download the Control Freak integration. The bridge is not included in the base product’s Integrations folder before this download.
  3. Import the downloaded package and resolve every Console error. Importing it creates the integration files in the project; confirm that Control Freak Input is available from Add Component and that CF2-Opsive-Rig is present.
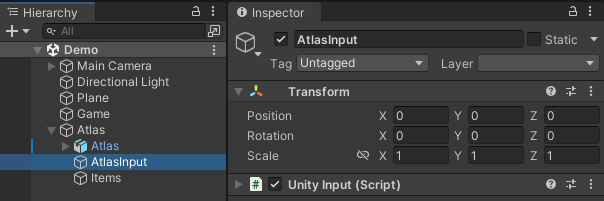
  4. In the Hierarchy, expand the character and select its <CharacterName>Input GameObject, such as AtlasInput.

AtlasInput selected beneath the character with its legacy Unity Input component ready to be replaced

The image shows the legacy Unity Input provider. A character created with Unity’s Input System instead has an Opsive Unity Input System provider on this object.

  1. Remove the current Opsive input provider, either Unity Input or Unity Input System, and add Control Freak Input to the same GameObject. Keep only one enabled Opsive PlayerInput implementation. If no other project code uses Unity’s separate Player Input component, remove that component when replacing the Input System route as well.
  2. Select the character root and assign the new component to Player Input Proxy > Player Input.
  3. Add CF2-Opsive-Rig to the scene, or use a project-owned Control Freak rig with equivalent bindings.
  4. In the rig, make the axis and button names match the names requested by the Ultimate Character Controller character. The supplied rig includes common mappings such as Horizontal, Vertical, Mouse X, Mouse Y, Jump, Fire1, and Reload; add or rename bindings for any custom ability or item input.
  5. Remove the Ultimate Character Controller VirtualControls UI created by Setup Manager. Those controls target Ultimate Character Controller’s Unity Input or Unity Input System providers, not Control Freak Input.
  6. Save the scene and prefab changes, then test this one character before adding the integration to a larger scene.

Configure touch-control behavior

Choice Use it when
Hide All Touch Controls When Not In Gameplay Leave this enabled, its default, when menus or interactions should hide the active Control Freak rig after Ultimate Character Controller disables gameplay input. Disable it only when the rig must remain visible and its own switches decide which controls can be used.
Non Gameplay Switch Name Keep the default Non-Gameplay when the active rig contains a switch with that exact name. The integration turns the switch on while gameplay input is disabled and off when gameplay resumes. Clear the field if the rig does not use this switch.
Horizontal Look Input Name and Vertical Look Input Name Keep Mouse X and Mouse Y when the rig uses the supplied look bindings. Otherwise, change both the rig and these fields to the same names.
Look Vector Mode and Look Sensitivity Start with Ultimate Character Controller’s normal smoothed look and tune sensitivity after movement and action buttons work. The bridge reads Control Freak’s raw axis values; Ultimate Character Controller then applies the selected look-vector behavior.

For a custom rig, bind every visible control to the same name used by the corresponding Ultimate Character Controller ability, item action, movement axis, or camera field. Changing a button’s label does not change the input name it sends.

Understand input ownership

Each playable Ultimate Character Controller character still needs its own Player Input Proxy, and that proxy must reference the Control Freak Input component intended for the character. At runtime the proxy exposes the provider to the character, camera, abilities, and items.

The supplied provider itself reads the static CF2Input source and operates CF2Input.activeRig. It has no serialized player ID or rig reference. This is a clear single-active-rig handoff, but duplicating the provider and prefab does not create isolated touch players. For local multiplayer, use a project-specific adapter that separates Control Freak input and rig ownership, or choose an input route with explicit player/device assignment before following the Split Screen workflow.

When Ultimate Character Controller disables gameplay input for a menu or interaction, Control Freak Input first disables the normal Ultimate Character Controller input path and then updates the active rig. Depending on the two fields above, it hides the touch controls and turns on the Non-Gameplay switch. Closing the menu must re-enable gameplay input so the rig and character recover together.

How input reaches the character

  1. A Control Freak touch control writes a named button or axis to CF2Input.
  2. Control Freak Input reads that value through Ultimate Character Controller’s standard player-input contract.
  3. Player Input Proxy exposes the provider on the character root.
  4. Ultimate Character Controller’s character, camera, ability, and item handlers request their configured input names and produce the visible gameplay result.

This boundary lets the rest of the Ultimate Character Controller setup remain unchanged. If movement works but one action does not, inspect the requested input name before changing the character or ability logic.

Verify in Play Mode

  1. Enter Play Mode and confirm the Console has no missing ControlFreak2 type or unassigned Player Input error.
  2. Drag the movement controls through their full range. The intended character should move in every direction and return to idle when the touch ends.
  3. Drag the look control slowly and quickly. Both look axes should respond with the intended sensitivity and stop when released.
  4. Press Jump, Fire1, Reload, and any project-specific action once. Each control should start only the matching ability or item action.
  5. Open a menu or interaction that disables Ultimate Character Controller gameplay input. With Hide All Touch Controls When Not In Gameplay enabled, gameplay controls should hide; with a configured Non-Gameplay switch, the rig’s menu controls should enter that switch state.
  6. Close the menu. The gameplay controls should return and the character should respond without reloading the scene.
  7. Make a development build for the target mobile device and repeat the test with real multitouch, orientation changes, safe-area placement, pausing, death, and respawn.

Troubleshooting

Symptom Check Fix
Unity reports that ControlFreak2 or CF2Input is missing. Control Freak 2 may be absent, may have been imported after the bridge, or may not compile in the current project. Install and compile Control Freak 2 first, then reimport the matching Ultimate Character Controller Version 3 integration.
The character does not respond. Player Input Proxy > Player Input may be empty or may still reference the removed Unity provider. Assign the character’s enabled Control Freak Input component and keep only one Opsive input provider active.
Movement works but look or an action does not. The Control Freak binding and the Ultimate Character Controller field or ability may use different names. Match the names exactly on both sides, including spaces and capitalization.
One press triggers twice or two control layouts appear. A Unity input provider or Ultimate Character Controller VirtualControls UI may still be active beside the Control Freak setup. Remove the competing provider and generated Ultimate Character Controller virtual controls; keep the intended Control Freak rig.
Touch controls remain visible over a gameplay-blocking menu. Hide All Touch Controls When Not In Gameplay may be disabled, no active rig may exist, or the menu may not disable Ultimate Character Controller gameplay input. Enable the field, confirm the rig is active, and make the menu send the normal Ultimate Character Controller gameplay-input disable and enable flow.
The wrong controls are available while a menu is open. Non Gameplay Switch Name may not match a switch in the active rig. Create the matching Non-Gameplay switch, correct the field, or clear it when the rig does not use switch-based menu controls.
A second local character responds to the same touch controls. Both providers read the shared CF2Input source; the supplied bridge has no per-player assignment. Do not duplicate the stock bridge as a split-screen ownership solution. Add a project-specific isolated provider or use an input system with player/device assignment.
Cursor-position aiming or UI-hover blocking does not work. The stock bridge returns a zero mouse position and reports that the pointer is not over UI. Use touch bindings that do not depend on screen-pointer queries, or extend the provider to return the Control Freak pointer and UI state required by the project.

Developer reference

The integration supplies Opsive.Shared.Input.ControlFreak.ControlFreakInput, which derives from Ultimate Character Controller’s PlayerInput. Button requests delegate to CF2Input.GetButton, GetButtonDown, and GetButtonUp. Both ordinary and raw axis requests begin with CF2Input.GetAxisRaw; the inherited Ultimate Character Controller look settings then determine whether and how the look vector is smoothed.

GetMousePosition returns zero and IsPointerOverUI returns false in the stock bridge. Movement, named buttons, and named look axes do not depend on those methods, but screen-position View Types, cursor-following crosshairs, point-and-click movement, or abilities that block while the pointer is over UI need a project-specific override.

When Ultimate Character Controller changes gameplay-input state, the provider calls the base implementation and then checks CF2Input.activeRig. It can call ShowOrHideTouchControls and set the configured non-gameplay switch, but it does not search for or assign a rig. Keep the intended rig active before this lifecycle runs.