Organization
Organize Ultimate Character Controller content so package updates can replace Opsive-owned files without replacing the characters, items, controllers, presets, or scripts owned by the game. Treat the installed packages and imported sample as sources; keep production customization in a project-owned folder under Assets.
Know who owns each location
| Location | Owner and purpose | Editing guidance |
|---|---|---|
Packages/com.opsive.ultimatecharactercontroller |
The released Version 3 runtime, editor tools, integrations, materials, shaders, and sample source. | Treat as Opsive-owned even when the embedded package is editable. A package update can replace direct changes. |
Packages/com.opsive.shared |
The required Opsive Shared runtime and editor dependency. | Keep its version compatible with the installed controller and do not store game code here. |
Assets/Samples/Opsive Ultimate Character Controller/<version>/Demo |
The optional demo imported through Setup Manager. | Use it as a working reference. Reimporting the sample uses an overwrite operation, so copy anything that will become production content. |
Assets/Opsive/UltimateCharacterController/Integrations/... |
Files imported by a render-pipeline or other packaged integration. | Treat these as integration-owned. Put modified materials, shaders, or derived assets in the game folder. |
Assets/Opsive/ImportStatus.asset |
A generated record used to remember whether Opsive startup and project-settings windows have been shown. | It is not gameplay data. Choose one version-control policy for the team; deleting it lets the tools recreate it and may show setup again. |
The installed package can safely remain a dependency of project-owned assets. Separation does not require copying every runtime script, animation, material, or icon; it means that files you intend to edit have a project-owned location.
Save each asset with the correct owner
Characters and character prefabs
- Put the character model in a scene.
- Open Tools > Opsive > Ultimate Character Controller > Character Manager.
- Assign the scene object to Character, configure it, and select Build Character or Update Character.
- Verify the scene instance in Play Mode.
- Save the verified result as a prefab under
Assets/<ProjectName>/Characters/Prefabs, or deliberately apply the verified changes to an existing project-owned character prefab.
Character Manager cannot add components directly to a prefab asset. It works on a scene object and may modify the connected prefab when structural updates are applied, so create a version-control checkpoint before a substantial Update Character operation and review the resulting prefab changes.
Item data and prefabs
- Open Tools > Opsive > Ultimate Character Controller > Item Type Manager.
- Beside Item Collection, select Create and save the new collection in the project’s item-data folder. This also creates an Individual Item Set Rule beside the collection.
- Use that project Item Collection instead of adding production definitions to
DemoItemCollection. - Open Tools > Opsive > Ultimate Character Controller > Item Manager to build a Character Item.
- When building an item prefab, save it under the project’s item-prefab folder. When building directly on a character, the character scene or prefab owns that item hierarchy.
Use prefab variants for project-owned visual models when changes to the source model should flow into several pickup or equipped-item prefabs. Avoid making production prefabs variants of disposable demo prefabs unless receiving future demo changes is an intentional choice.
Gameplay object prefabs
Open Tools > Opsive > Ultimate Character Controller > Object Manager, choose the supported Object Type, and select Build Object. The Save Object dialog starts under Assets; choose the project’s object-prefab folder. Continue with the Objects documentation because the generated prefab is a configured starting point, not a complete project-specific behavior.
Animator Controllers and animation replacements
The supplied Demo.controller is a working reference and the default humanoid controller found by Character Manager. Duplicate it into the project’s character Animator folder before changing states, transitions, clips, layers, masks, or parameters.
Assign the project copy in Character Manager’s Animator Controller field. Tools > Opsive > Ultimate Character Controller > Animation Replacer changes the selected controller in place, so confirm that Animator Controller points to the project copy before selecting Replace. Follow Replacing Animations for the clip and animation-event workflow.
Presets and other ScriptableObjects
Store State System presets, audio configurations, damage processors, surface data, item rules, and other project-authored ScriptableObjects under the relevant project folder. A reference to a package type is expected; the editable .asset file itself should not be saved inside an Opsive package or imported sample.
Use an upgrade-safe workflow
- Commit or back up the entire working project before changing the controller version.
- Confirm that no unique game asset exists only under
Packages/com.opsive.*,Assets/Samples/.../Demo, or an imported Opsive integration folder. - Record the currently installed Ultimate Character Controller and Opsive Shared versions.
- Update both packages through the team’s licensed installation process and let Unity finish compiling.
- Reimport only the sample or integrations the project actually uses.
- Open Tools > Opsive > Ultimate Character Controller > Setup Manager and review the Project tab before applying layer, input, or render-pipeline changes.
- Inspect the version-control diff before saving unrelated scenes or prefabs.
- Verify one representative character, camera, item, pickup, projectile, and project-specific extension in Play Mode before accepting the update.
For a version 2 project, follow the Version 3 Migration Guide instead of treating the change as a normal package update.
Coordinate work in a team
- Commit project-owned assets together with their
.metafiles so Unity GUID references remain stable. - Commit the relevant
ProjectSettings,Packages/manifest.json, andPackages/packages-lock.jsonchanges. Ensure every workstation obtains the same licensed embedded Opsive package versions; do not rely on one developer’sLibrarycache. - An embedded install is recorded as a local
file:com.opsive...package; the manifest and lock file do not download that folder for another workstation. Use one private, license-compliant process to supply both Opsive package directories to every checkout. - Commit imported sample or integration files only when production assets reference them. Otherwise, make their import a documented setup step.
- Keep
Library,Temp, and generated IDE solution/project files out of source control. - Assign one person at a time to edit large shared assets such as an Animator Controller, Item Collection, Item Set Rule, character prefab, or primary scene. These serialized assets are harder to merge safely than separate prefabs or data assets.
- Review manager operations as asset changes. Build Item, Build Object, Update Character, Replace, and project setup actions can change more than the currently visible Inspector.
Verify the organization
- In the Project window, confirm that
Packagescontains the controller code and the game’s editable content is under its ownAssetsfolder. - Select each production character and item. Confirm that its prefab, Animator Controller, Item Collection, Item Set Rule, presets, and custom scripts point to the intended project-owned assets.
- Search the project-owned folder for missing scripts and broken object references.
- Open a clean test scene, instantiate the project-owned character and a representative item or object, and verify them in Play Mode.
- Test a clean checkout on another workstation or build agent. It should restore the same package versions, compile without manual file copying, and load the required assets with stable references.
- Before an upgrade is merged, confirm that expected changes are limited to package, integration, project-settings, and intentional project-asset diffs.
Troubleshooting
| Symptom | Check | Fix |
|---|---|---|
| A customization disappeared after a package update or sample import. | The edited file was under Packages, the imported demo, or an integration folder. |
Restore the change from version control, copy or recreate it under the project folder, and point production references to that project-owned asset. |
| Character Manager rejects the selected character. | Character references a prefab asset instead of a scene instance. | Place the model or prefab in a scene, build or update that instance, verify it, then save or apply the project prefab deliberately. |
| Animation Replacer changed the demo controller. | Animator Controller pointed to the supplied controller instead of a project copy. | Revert or reimport the demo asset, duplicate the controller into the project folder, assign the copy, and repeat the replacement. |
| Item Type Manager or Character Manager selects demo item data. | The last-used or scene Item Collection was not the project’s collection, so the manager found the demo fallback. | Select the project Item Collection and matching Item Set Rule before building or updating the character’s item support. |
| A teammate sees missing scripts or package types. | Their project does not contain the same Ultimate Character Controller and Opsive Shared versions, or a custom Assembly Definition lacks its UCC reference. | Restore the agreed package versions and add Opsive.UltimateCharacterController under Assembly Definition References. |
| A teammate sees the startup setup window on every clean checkout. | Assets/Opsive/ImportStatus.asset is absent or recreated locally. |
Either commit the shared import-status asset and its .meta file or accept the prompt as part of the team’s documented setup policy. |
| A prefab, Item Collection, or controller has a difficult merge conflict. | Multiple branches edited the same serialized asset. | Restore each branch from source control, choose an owner for the shared asset, reapply the second change in Unity, and split future work into smaller owned assets where practical. |
Related tasks
- Importing
- Quick Setup
- Character Creation
- Items & Inventory
- Objects
- Animator Controller
- Version 3 Migration Guide
Developer reference
Custom runtime scripts compiled by an Assembly Definition should reference Opsive.UltimateCharacterController. Put custom editor-only scripts in an Editor folder or editor assembly and keep both assemblies under the project-owned script folder. Prefer subclasses, components, modules, and documented events over direct edits to package source. When a vendor-source patch is unavoidable, keep it as an explicit, reviewable patch or private fork that can be reapplied and tested against each update.
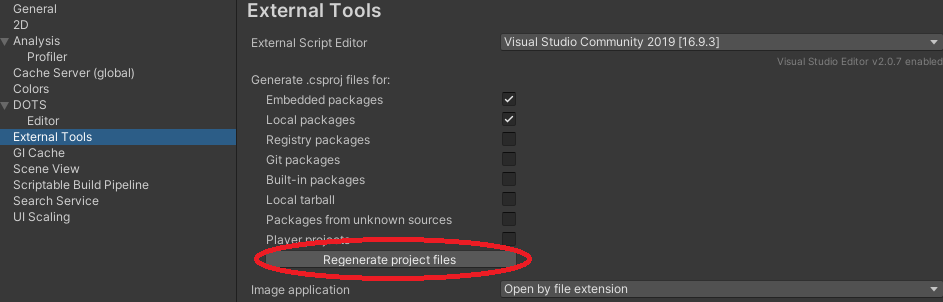
If package source is missing from the IDE project, open Edit > Preferences > External Tools. Under Generate .csproj files for, enable Embedded packages and Local packages as appropriate, then select Regenerate project files.

Version 3’s managers use different ownership models: Item Type Manager creates the Item Collection and its initial Individual Item Set Rule at the chosen Assets location; Item Manager and Object Manager save new prefabs at a chosen Assets location; Character Manager modifies a scene instance; and Animation Replacer modifies the selected Animator Controller asset in place. Check the selected source and destination before running each action.