Use the Rewired integration when Rewired should own the player, device, action maps, and runtime rebinding while Ultimate Character Controller continues to request movement, look, ability, and item inputs by name.

The bridge adds Rewired Input as an Ultimate Character Controller PlayerInput implementation. It does not configure device ownership, UI navigation, touch controls, split-screen cameras, or saved bindings by itself.

Compatibility boundary

The packaged Ultimate Character Controller Version 3 bridge source was last updated in 2023 and declares no minimum or maximum Rewired version. It uses the longstanding ReInput.players.GetPlayer, Player.GetButton, Player.GetAxis, and Rewired mouse APIs. Check the Rewired documentation and Asset Store for the available release. Their version listings do not establish that this particular Opsive bridge was tested against that release.

Rewired supplies different installations for different Unity generations. Install the Rewired branch intended for the project’s Unity version, then compile the Opsive bridge in a clean test project before replacing input in the main scene. Rewired’s own integration list describes the Ultimate Character Controller package as a third-party integration maintained outside Rewired.

The inspected bridge also calls UnityEngine.Input directly for Escape, mouse-button cursor capture, and inherited joystick-connected detection. A Rewired release that can use Unity’s newer input backend does not remove those bridge-side calls. Test the project’s Active Input Handling setting on every target platform, and adapt the bridge if that setting makes the legacy calls unavailable.

Before you begin

  • Set up and test the Ultimate Character Controller character, camera, abilities, and items with one existing input implementation first.
  • Install Rewired and complete its installer for the current Unity version.
  • Decide which Rewired Player owns each local character and which devices that Player may use.
  • Make a backup before replacing the Rewired Input Manager or importing a sample configuration into an existing Rewired project.

Install Rewired and the bridge

  1. Import Rewired, then run Window > Rewired > Setup > Run Installer if its installer does not start automatically.
  2. Open Window > Rewired > Help > About and confirm the installed Rewired version and Unity branch before continuing.
  3. In Ultimate Character Controller, open Tools > Opsive > Ultimate Character Controller > Integrations Manager and select Available Integrations.
  4. Locate Rewired. The Integration button opens this documentation and Asset Store opens Rewired; neither button imports the Opsive package.
  5. Download the Ultimate Character Controller Version 3 Rewired integration from Opsive Downloads and import Rewired.unitypackage after Rewired is installed.
  6. Resolve the first compiler error. Continue only when Add Component offers Rewired Input with no missing Rewired types.

The package contains the bridge script, one Ultimate Character Controller Rewired Input Manager prefab, and separate Rewired Input Manager Solo and Rewired Input Manager Co-op prefabs under the Ultimate Inventory System folder. For an Ultimate Character Controller-only setup, use the prefab under Assets/Opsive/Shared/Integrations/Rewired/UltimateCharacterController, not an inventory-system prefab chosen only by its name.

Configure the Rewired Input Manager

Start from the supplied Ultimate Character Controller configuration

For a new Rewired project, drag Rewired Input Manager from the integration’s UltimateCharacterController folder into the scene. The supplied prefab is marked to persist between scene loads and contains one game Player named Player0, plus example keyboard, mouse, and joystick maps for common Ultimate Character Controller action names such as Horizontal, Vertical, Mouse X, Mouse Y, Controller X, Controller Y, Jump, Fire1, Reload, Action, item selection, and perspective switching.

Treat this prefab as a starting configuration, not a required source of truth. Keep only one active Rewired Input Manager. Adding the persistent prefab to several scenes can create competing managers when scenes change.

Keep an existing Rewired configuration

Do not replace a working Rewired Input Manager merely to obtain the Ultimate Character Controller actions. Add the Ultimate Character Controller-requested action names to the existing manager, create keyboard, mouse, joystick, or custom-controller maps, and assign those maps to the intended Players.

Every name requested by Ultimate Character Controller must match a Rewired Action exactly, including spaces and capitalization. Changing a key or controller element through Rewired is safe; renaming the Action without updating the Ultimate Character Controller Inspector is not.

Replace the character input component

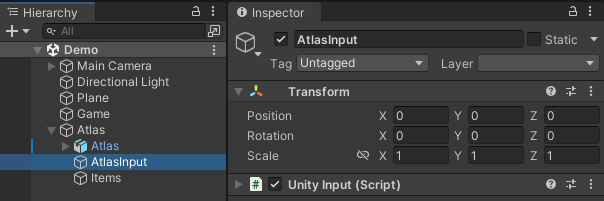
  1. In Edit Mode, expand the character and select its input GameObject. A character named Atlas commonly starts with an AtlasInput child.

    The AtlasInput child selected beneath the Atlas character with its legacy Unity Input component ready to be replaced.

  2. Remove the existing Opsive input implementation from that GameObject, such as Unity Input System or legacy Unity Input. Keep the input GameObject.

  3. Add Rewired Input to the same GameObject.

  4. Set Player ID to the intended Rewired Player ID. The packaged default is 0.

  5. Select the character root. On Player Input Proxy, assign the new Rewired Input component to Player Input.

  6. Keep Horizontal Look Input Name and Vertical Look Input Name matched to Rewired Actions. The inherited defaults are Mouse X and Mouse Y.

  7. Enter Play Mode once and confirm that the proxy moves the input GameObject beneath Ultimate Character Controller’s persistent scheduler while continuing to route input to the original character. Do not use its runtime hierarchy position as the player-ownership rule.

Assign players and devices

Rewired owns controller assignment; Player ID only tells this bridge which Rewired Player to read.

  • Single player: use one Rewired Player, usually ID 0, and assign the keyboard, mouse, and desired joysticks to it.
  • Local split-screen: create one Rewired Player per character, give each character its own Rewired Input and Player Input Proxy reference, and set a different Player ID on each bridge. Complete the matching camera, viewport, and HUD setup on Split Screen.
  • Shared keyboard: map distinct keys to the intended Players deliberately. The bridge does not divide a keyboard or prevent the same device from controlling several Players.
  • Connect and reconnect: configure Rewired’s controller assignment and reassignment policy. The bridge keeps reading the selected Player, so device changes must update that Player’s controllers rather than silently changing the character’s Player ID.

The supplied Ultimate Character Controller manager prefab defines only one gameplay Player. It is not a ready-made split-screen configuration.

Configure Unity UI and touch controls

Unity UI

Rewired Input controls Ultimate Character Controller gameplay, not the EventSystem. To navigate Unity UI through Rewired:

  1. Select the scene’s EventSystem.
  2. Disable or remove the ordinary Standalone Input Module.
  3. Add Rewired Standalone Input Module.
  4. Create the UI Actions requested by that module, map them to the intended Players, and configure which Player IDs may control the UI.

Use separate menu Actions rather than movement and gameplay Actions when rebinding must not leave a player unable to navigate the menu. See Rewired’s Standalone Input Module guide for multi-player EventSystems and Player Mouse setup.

Touch controls

Build touch controls through Rewired and its custom-controller workflow. Then enable Enable Touch Controls on Rewired Input. This field does not create or bind any controls; it makes the bridge report that the pointer is not over UI so Rewired’s touch controls can continue driving gameplay.

Remove or disable Ultimate Character Controller virtual controls generated for Unity Input System or legacy Unity Input. Those controls target different input implementations and do not become Rewired controls when this checkbox is enabled.

Test ordinary menus after enabling the option. Because the bridge bypasses its normal pointer-over-UI check, a gameplay action can also respond while the player touches UI unless the menu disables gameplay input or the Rewired maps are switched appropriately.

Configure rebinding and persistence

Use Rewired’s Control Mapper or a project-owned Rewired mapping screen. The bridge continues requesting the same Action name, so a changed key, button, or axis takes effect without changing Ultimate Character Controller.

The supplied Ultimate Character Controller Rewired Input Manager prefab does not include a UserDataStore component. Add an appropriate Rewired User Data Store when mappings, calibration, input behavior, or optional controller assignments must persist. Decide when the game saves and loads this data; the Ultimate Character Controller bridge neither invokes the store nor migrates saved maps after the Rewired manager’s defaults change.

Cursor behavior

The integration-specific defaults are:

Field Packaged default Behavior
Player ID 0 Reads that Rewired Player.
Disable Cursor Enabled Locks and hides the cursor while the component is active.
Enable Cursor With Escape Enabled Releases the cursor when the physical Escape key is pressed.
Prevent Look Vector Changes Enabled Stops look updates while the cursor is released.
Enable Touch Controls Disabled Uses the normal pointer-over-UI check.

Escape and the mouse buttons are read through UnityEngine.Input, not a Rewired Action. Rebinding an action named Unlock Cursor in the sample manager does not change this code path. Use a project-owned cursor action or bridge extension when cursor release must be fully rebindable.

How it runs

On Awake, Rewired Input obtains the Rewired Player identified by Player ID. Ultimate Character Controller then asks the component for named buttons and axes through the common IPlayerInput interface. The bridge forwards those calls to the selected Rewired Player and obtains the mouse position from that Player’s assigned Rewired mouse.

Changing Player ID through the component property during Play Mode immediately selects the new Rewired Player. Changing controller ownership within Rewired does not require replacing the bridge because the same Player object receives its new devices and maps.

The inherited Ultimate Character Controller input layer still owns look smoothing, tap and double-press timing, death disabling, gameplay-input events, and the ConnectedController state. In the inspected bridge, connected-controller detection comes from the global UnityEngine.Input.GetJoystickNames result rather than the selected Rewired Player. Do not use that state as proof that a particular Player owns a joystick.

Verify compilation and Play Mode behavior

  1. Confirm that Rewired and RewiredInput.cs compile with no missing types in the target Unity version.
  2. Enter Play Mode with one Rewired Input Manager and one character using Rewired Input. Confirm that Horizontal, Vertical, the two look Actions, Jump, Fire1, Reload, and Action reach the intended character.
  3. Change a keyboard or controller element assignment while keeping the Rewired Action name. The corresponding Ultimate Character Controller behavior should follow the new assignment.
  4. Press Escape, then click outside UI. Confirm the cursor releases, look pauses, and the cursor recaptures according to the configured fields.
  5. Open a menu. Confirm the Rewired UI module navigates and submits through the intended Player while gameplay input is disabled or its maps are inactive.
  6. Disconnect and reconnect each controller. Confirm Rewired restores the intended Player ownership and only that character responds.
  7. For split-screen, test one device at a time. Each device should move, look, use items, and navigate only the intended character and UI.
  8. Test touch controls on the target device, not only with a mouse in the Editor. Confirm touches do not leak through menus into gameplay.
  9. Change a binding, restart the build, and confirm the selected User Data Store restores it.
  10. Repeat the test in a development build for every target platform and Active Input Handling configuration the project supports.

Troubleshooting

Symptom Check Fix
Importing the bridge produces missing Rewired types Rewired may be absent, installed for another Unity generation, or incompletely installed Install the correct Rewired branch first and rerun Window > Rewired > Setup > Run Installer, then reimport the bridge.
Rewired Input cannot find its Player Player ID may not exist or the Rewired Input Manager may initialize incorrectly Keep one active manager, create that Player in Rewired, and use its exact ID.
The character does not respond but Rewired sees the device An Ultimate Character Controller input name may not match a Rewired Action, its Controller Map may be disabled, or Player Input Proxy may reference the old component Match the Action name, enable the map for the selected Player, and assign Rewired Input on the proxy.
Two characters respond to one device They may share Player ID, or Rewired may assign the device to both Players Give each bridge the intended Player ID and correct the device and map ownership in Rewired.
The mouse cannot aim or move the cursor The selected Player may not own the Rewired mouse Assign the mouse to that Player or provide a Player Mouse workflow appropriate for the game.
Gameplay works but menus do not The EventSystem may still use Unity’s input module or its UI Action names may be unmapped Add Rewired Standalone Input Module, create matching UI Actions, and assign their maps to the intended Players.
A binding change disappears after restart The Rewired Input Manager may have no User Data Store, or saved data may not be loaded Add and configure a UserDataStore, save at the required lifecycle points, and test a clean restart.
New default mappings do not appear during development Previously saved Rewired user data may override the manager’s changed defaults Clear the test save or migrate the saved maps according to Rewired’s User Data Store guidance.
Ultimate Character Controller virtual controls do nothing They were generated for Unity Input System or legacy Unity Input, not Rewired Remove them and build the touch layout through Rewired; then enable Enable Touch Controls.
Touching a menu also triggers gameplay Enable Touch Controls makes the bridge ignore its normal pointer-over-UI block Disable gameplay input while the menu owns input or switch the selected Rewired map category.
The cursor shortcut or controller-connected state behaves differently from Rewired Those bridge paths still use UnityEngine.Input globally Test Active Input Handling and replace the cursor or device-state path when per-player Rewired behavior is required.

Saving and networking boundaries

The bridge reads local input only. It does not save Rewired data, assign network authority, transmit input, or distinguish a local owner from a remote character.

  • Add Rewired Input only for the owning local character, or ensure the networking layer disables the input GameObject for remote characters.
  • Keep Player IDs and device assignment as local-session data unless the game’s own profile system intentionally persists them.
  • Save mappings through Rewired’s User Data Store, not the Ultimate Character Controller save system unless a project-specific adapter explicitly connects them.
  • In split-screen networking, establish local Rewired ownership before mapping each local character to its network object and camera.

Developer reference

The packaged source is Assets/Opsive/Shared/Integrations/Rewired/RewiredInput.cs. RewiredInput derives from Ultimate Character Controller’s PlayerInput and forwards GetButton, GetButtonDown, GetButtonUp, GetAxis, and GetAxisRaw to the selected Rewired.Player. Its PlayerID property changes the selected Player immediately during Play Mode.

The component overrides GetMousePosition with m_Player.controllers.Mouse.screenPosition. It overrides IsPointerOverUI only when Enable Touch Controls is enabled, returning false rather than querying the EventSystem.

The inspected integration package contains no custom rebinding UI, UserDataStore, Rewired UI input module, networking implementation, or save adapter. Those responsibilities remain with Rewired and project code. Because no supported Rewired range is encoded in the package, compile and runtime verification remain the compatibility test for the installed Rewired and Unity versions.