Opsive Ultimate Inventory System
The character controller is seamlessly integrated with the Ultimate Inventory System allowing you to use the Ultimate Inventory System inventory rather than the inventory included with the character controller. The integration includes many additional scripts and functionality which are responsible for the communication between the two assets. The main ones are the Character Inventory Bridge and the Inventory Item Set Manager. This integration can be downloaded from the Downloads page.
The current version of the integration is compatible with version 3.0.3+ of the character controller and version 1.2.12+ of the inventory system.
You can get familiar with the integration is by playing around in the integration demo scene which can be found in the
Assets\Opsive\UltimateCharacterController\Integrations\UltimateInventorySystem\Demo folder.
Videos
The videos are a great starting point. Once you go through them to get a good idea of how the system works it is recommended to read through the documentation to learn more.
You may want to go through some of the other video tutorials specific to the Character and Inventory systems too.
Some of the videos you may interested in are
- Character: First/Third Person Character Creation
- Character: First/Third Person Item Creation
- Character: Weapon/Item Setup
- Character: State System
- Inventory: Basic Concepts
- Inventory: Getting Started With The Ultimate Inventory System
- Inventory: Creating a Database and Attributes
- Inventory: Inventory Component and Item Collections
- Inventory: UI Designer Overview
- Inventory Item View Slot Containers
- Inventory: Customizing UI
- Inventory: Item Actions
Videos just show the tip of the iceberg. It is highly recommended to read the documentation to get all the information required to use the systems to their full potential
Getting Started
It is highly recommended to fully read through the documentation below once, before following the steps below, as it gives more context. You can check the required versions for both packages in the integration window (inside the inventory system editor).
Terminology
- Inventory Item: An item defined in the scope of the Inventory system. It is a simple object that is used to store attribute values.
- Character Item: An item defined in the scope of the Character Controller. It is a component on a GameObject which define how the object should be animation, used, etc.
- Equippable: an item that can be equipped using the character controller.
- Equippable Collections: one or multiple Item Collections that store items that the character can switch between using the character controller.
- Item Set: a set of items the the character holds at any one time. They are managed by the Item Set Manager.
- Item Set Rule: An object that will define what item Set will be created depending on the items equipped.
- Item Slot Set: An object that can be used on an Item Slot Collection to define what items can be “soft equipped” on the character.
- Soft Equipped: When an item is equipped on the character but is not active (for example when a character has his weapon holstered on their belt or back)
- Active Equipped: An Item that the character physically holds and can be used.
- Item Set Slot: The slot within an Item Set managed by the Item Set Manager. Also known as “SlotID” in the character system scope.
- Equippable Slot: The slot within an Item Slot Collection which uses an Item Slot Set and that was set as an Equippable Item Collection.
Concept
The integration is used to communicate between the character and the inventory system. Therefore it is important to understand the parts of both system that overlap where the integration is mostly used.
Any item which the character can hold and use with the character controller will need to be “Equippable” and follow the integration requirements. This includes items such as weapons, body, tools, etc. Any of the other items should not be “Equippable”. This includes ammo, mMaterials, consumables, etc.
In some cases the items can be in a grey area. For example armor or magic, should they be “Equippable” character Items or not?
In most cases armor is not a usable iem and therefore does not need to be a character item. Instead it can be equipped using the Equipper solution from the Inventory system. If that is the case make sure that the armor does not inherit the “Equippable” category which should only be used by inventory items with character items. For magic it really depends on the use case, but either way could make sense. It mostly depends which workflow you prefer building on: Inventory Item Actions or Character Item Actions.
Most of the UI related to items should be controlled by the Inventory System, although the Character UI can be used to display the equipped items and the ammo amount. The items are organized in Item Collection within the Inventory System Inventory. On a high level these are the required Item Collections.
- Default: the main item collection can be considered as the characters bag, it contains all the items the character owns expect the equipped items.
- Bridge (multiple): The Bridge Item Collections holds the inventory items which are on the character and can be equipped at any time by switching Item Set. Multiple Bridge Item Collections can be used. A good example for it is having an ItemSlotCollection for a primary and secondary weapon, while having another Item Collection for the Body item that is always equipped and cannot be removed.
- Loadout (multiple/optional): Items that do not change even when the save data is loaded and can be added to other Item Collections, using an Item Collection of type “Character Loadout Item Collection”, or to the Default Item Collection otherwise.
Whenever an item is added to or removed from one of the Equippable Item Collections the Item Sets in the Inventory Item Set Manager are recomputed using the Item Set Rules to match set of items in the Bridge Item Collections. This allows great flexibility and scalability with Item Sets.
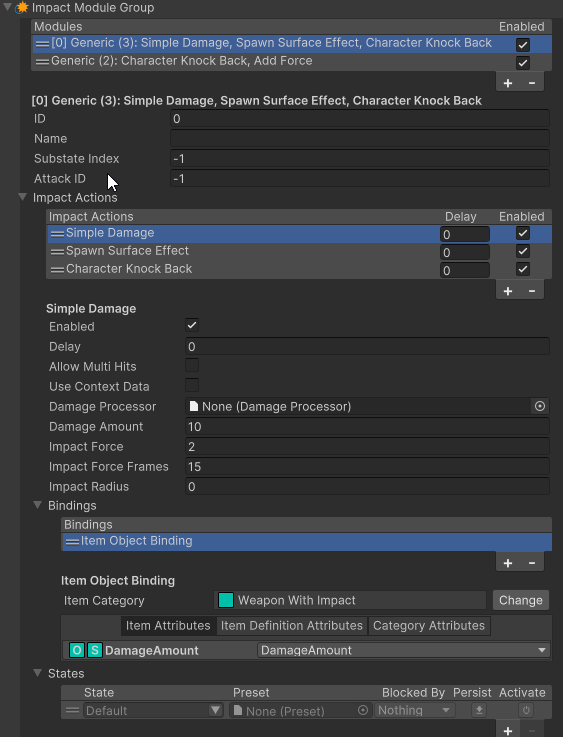
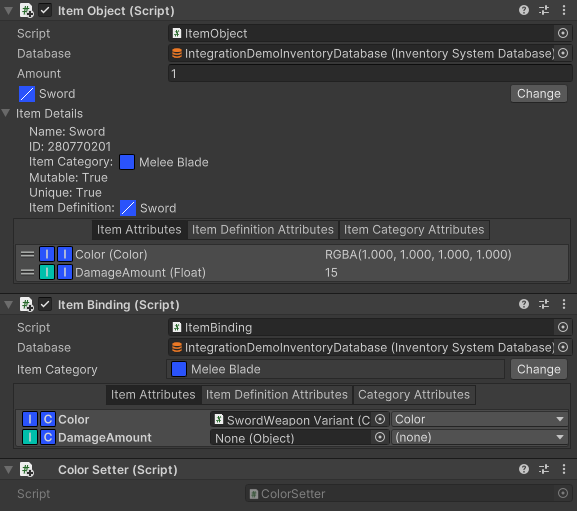
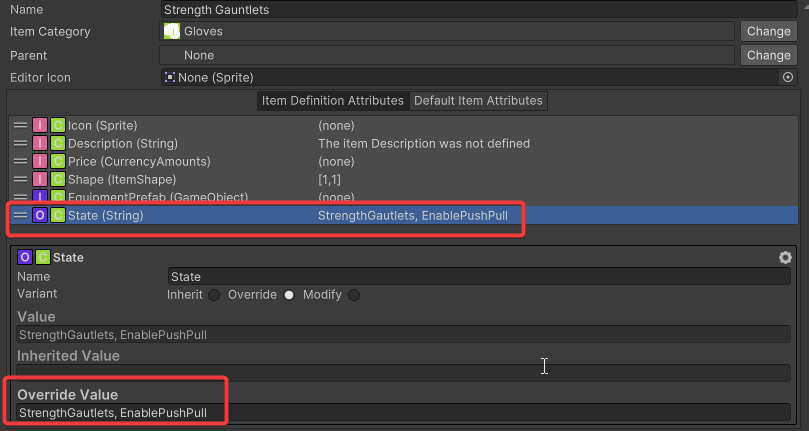
When an inventory item is removed from the Bridge Item Collection it can only be reused by that same character. Any property values (example DamageAmount) on the character item that you wish to save or carry over to another character Item must be bound to an attribute on the inventory item. This can be done using the State Object Bindings, Item Action Modules or components. The most commonly used are:
- Item Object Binding (State Object Binding): Allows you to bind Attributes from an Item on an ItemObject to a property of a BoundStateObject like any ItemEffect, ImpactAction or ItemActionModule.
- Item Binding (Component): Allows you to bind any top level property from any component to an Item Attribute of the Item on the ItemObject or Inventory
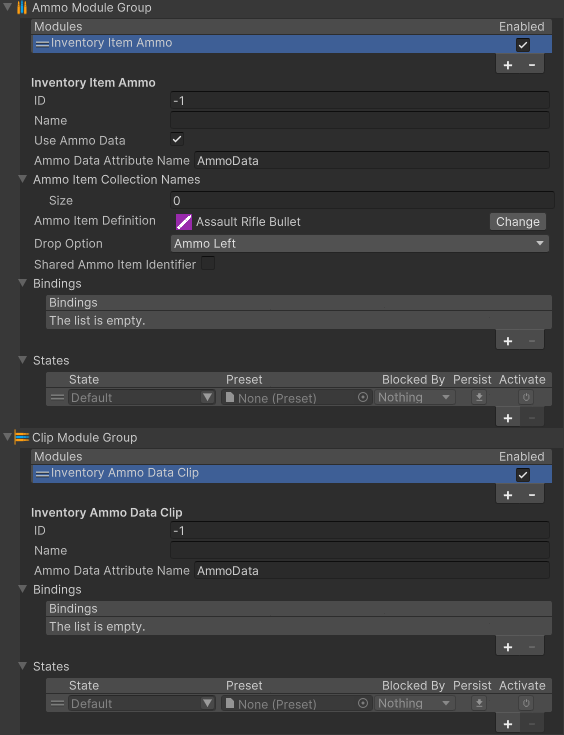
- Inventory Item Ammo (Shootable Ammo Module): Use an Inventory Item as ammo, can get the ammo item definition from AmmoData
- Inventory Ammo DataClip (Clip Ammo Module): Use an Item AmmoData to store the Clip size and Clip remaining amount. Which allows you to have persisting clip size when exchanging items between characters.
Setup scene
- Install both packages and the integration from above.
- Using the Inventory Manager, create a new inventory database that follows the requirements defined below (or simply duplicate the EmptyCharacterInventoryDatabase).
- Create a new scene, use the Inventory and Character Manager to setup the scene with the required manager components.
Setup character
- Create an Opsive Character using the Character Manager or use an existing character.
- Open the Integrations Manager from Tools -> Opsive -> Ultimate Inventory System -> Integrations Manager. Select the Integration Inspectors tab.
- Drag your character into the Character field under Character Setup. The character must be in the scene and must first be setup with the Character Manager. Select Setup Character.
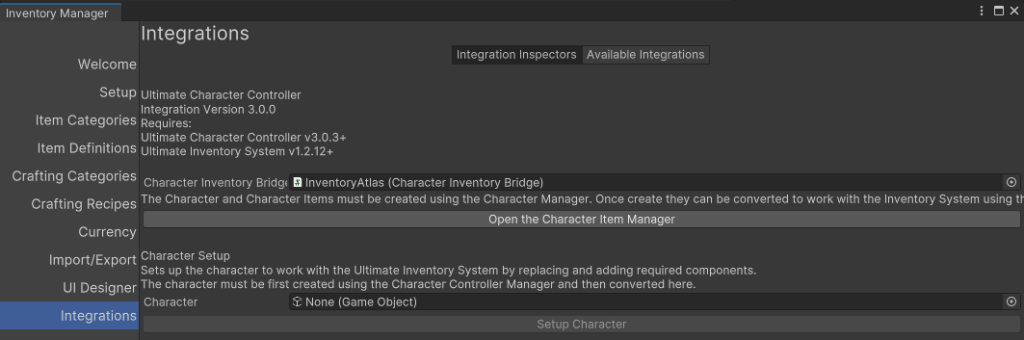
- Ensure the Character Inventory Bridge component references the Equippable Item category. Ensure it also references the correct Item Collections. Learn more about the item collections below.
- The character is now setup, you may start creating items.
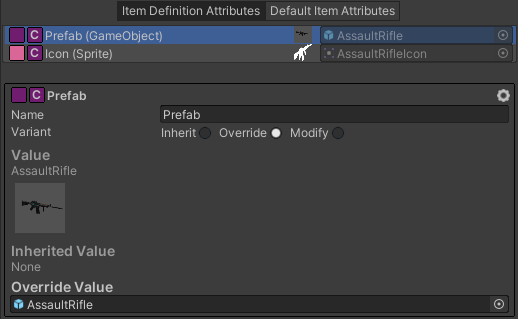
Setup Item
- Using the Inventory Manager Editor, create a new Item Definition for the item that you’d like to add. Ensure that it inherits from a child of the Equippable Item Category (Like Single Item or Multi) and that the Category used has an Attribute which can hold the Character Item prefabs as GameObjects.
The AttributeName for the CharacterItem prefabs must match the one specified in the InventoryBridge. An must be of type GameObject or GameObject[]. - Using the Character Manager Editor, create your Item prefab using the Item Creation steps. Item Types from the Ultimate Character Controller do not need to be created as you should instead use the Item Definitions.
- The Character Item prefab must be referenced by the Attribute on the ItemDefinition. This can be done manually within the ItemDefinition Manager.
- Ensure the character item prefab is now setup correctly.
- Make good use of Object Identifiers to find references to objects (transforms, colliders, etc.) on the character once the item is spawned at runtime.
- On the Character Item Prefab use the Item Binding, ItemObjectBinding or custom Modules and Components to bind your Inventory Item Attribute values to properties on your item. Example “DamageAmount”, “InventoryAmmoDataClip” or “ColorSetter”.
Converting Existing Ultimate Character Controller Items
If you have an existing project using the character controller and wish to convert the items on your character to work with the Ultimate Inventory System you must follow the steps below. Character Items which are already prefabs set to work with the runtime pickup can go straight to the steps defined in the Setup Item section above.
- Create a new character item prefab using the steps from the Item Creation section. The bottom Object Identifier section is especially useful for specifying the locations of GameObjects that exist on the character.
- Copy the Item and ItemAction components from your existing item to the new item prefab that was just created.
- Delete the item from your character using the Item Manager.
Once you have the character item prefab use the steps defined in the Setup Item section above.
Setup Item Set Rules
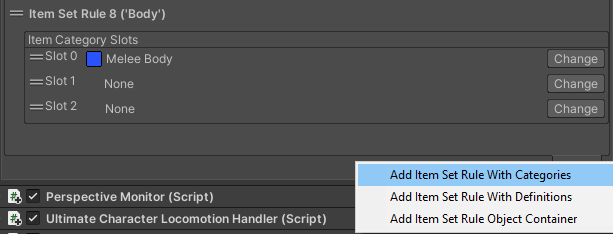
Setting up your item set rules is important to decide how Item Sets will be created at runtime. Item Sets are the combination of items that can be equipped by the character, Example Sword+Shield: Sword in the right hand (slot 0) and Shield in the left hand (slot 1).
Make sure to read through the ItemSetRules section.
The integration comes built-in with 3 new rules.
- ItemCategoryItemSetRule: define slots by ItemCategories
- ItemDefinitionItemSetRule: define slots by ItemDefinitions
- ItemSlotCollectionItemSetRule: directly link ItemSlotCollection slots to ItemSet slots (requires items to be set such that they can be equipped in all possible slots where they can be added)
Create an Item Set Rule Steps
- Go to the Inventory Item Set Manager inspector
- Define your Item Set Rules Groups. Only one Item Set within an Item Set Group can be active at a time. Having multiple Item Set Groups allows you to combine multiple active item sets together. For example having an Equippable Item Set Rule Group for your weapons (sword, shield, Bow, etc…) and having another Item Set Rule Group for Magic Items can allow you to equip any combination of Item Sets within the Equippable Category with any Item Set within the Magic Category. Instead of creating all the possible combination of Sword+NaN+NaN, Sword+NaN+Magic, Sword+Shield+NaN, Sword+Shield+Magic, NaN+Bow+Nan, NaN+Bow+Magic etc.. You may simply have Sword+NaN+NaN, Sword+Shield+NaN, NaN+Bow+NaN in one category and NaN+NaN+Magic in the other one. Depending on the amount of Item Set Rules you will require, this can save you a great amount of repetitive setup.
- Create your Item Set Rules in a way that is restrictive enough. Think of your Item Set Rules as the types of items that can be equipped together and or act differently. For example Melee Weapon, or Melee Weapon + Shield, or Bow. Even though Melee Weapon and Bow are just one item, they act very differently, therefore they should have their own Item Set with a specific State name. The Item Set Rule State name is very important to change the state of the player depending on the equipped Item Set. For example the Bow uses the state system extensively, here is a forum post on how to setup a bow using the integration. To learn more about the State System and preset go here.
- Learn more about the Inventory Item Set Manager and Item Set Rules below and check the integration demo scene to see an example of how to setup your Item Set Rules.
Create Bow Item Steps
- Follow the generic “Setup Item” steps above.
- Don’t forget to use an ObjectIdentifier component to define the position where the character will hold the arrow (check the demo scene for further assistance.)
- Add an Item Set Rule that uses the Bow in slot 1 (slot 1 is the left hand by default). Make sure there aren’t other Item Set Rules which could be adding the bow in the wrong slot.
- In the Bow Item Set Rule set the “State” name to “Bow”. The state name is used in a lot of places to change the character when the character holds the bow.
- In the character Item Abilities find the “Use(Slot 0)” and “Use(Slot 1)” Ability, and assign a new state for “Bow” -> “BowUseSlot<0/1>” accordingly. This ensures that pressing the attack button (left click) uses the left hand item (Bow) and not the right hand item.
- Refer to the Bow Item prefab within the integration folder for further assistance.
Create Body Item Steps
The body item is often used as the default item that is equipped when not other items are equipped. Step 1-4 are to create the item, step 5-7 are to make it the default item.
- Follow the generic “Setup Item” steps above. Make sure to that the body prefab item has the “First/Third Person Perspective Item” & “First/Third Person Melee Weapon Properties”.
- Set the Animator Audio States within the Melee Action. Also make sure your animation events are setup correctly or you may choose to not wait for animation events.
- Create an Item Set Rule for your Body Item and make sure it has state name “Body”.
- The Item Set Rule should have “Default” and “Enabled” set to True and “Can Switch To” set to False if you wish to make it your default item when nothing is equipped.
- To always have the Body Item equipped create a new Item Collection called “Equippable” and renamed your weapon equipment item collection to “Equippable Slots”. “Equippable Slots” will be of type ItemSlotCollection and have purpose set to Equipment or None (aka Other). “Equippable” would normally have type ItemCollection and purpose set to None.
- Assign “Equippable” and “Equippable Slots” as Equippable ItemCollections within the Character Inventory Bridge component under the “Equippable Item Collection Names” field. Doing so will allow the bridge to monitor both item collections and equip item accordingly.
- Refer to the Body Item prefab within the integration folder for further assistance.
Common Errors & issues
Here are some common errors that users have reported and how to fix them.
Error when updating the Ultimate Inventory System
This error happens when updating the integration, if both the character controller and the inventory system were removed before they are re-imported. If the Ultimate Inventory System is re-imported before the character controller then this error will appear.

Simply install the character controller using the installer to fix the error.
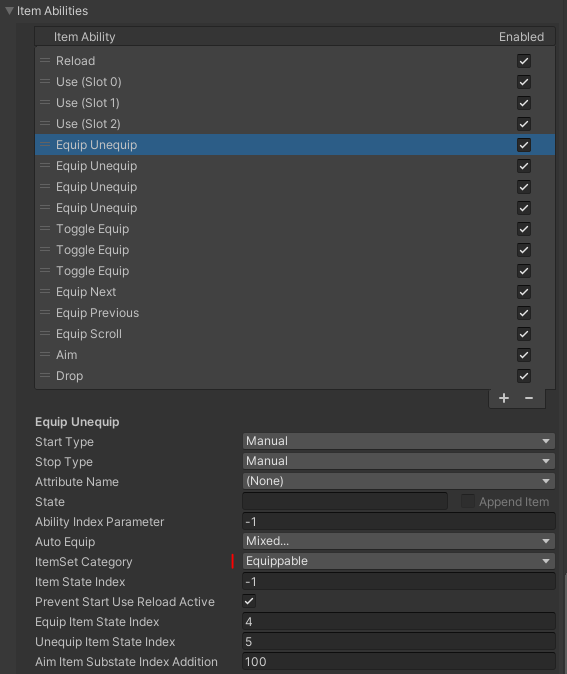
Equip Unequip Ability has a Category with ID 3636…. that cannot be found
This errors happens if you setup a new character with built-in abilities preconfigured from the Character Controller Demo.
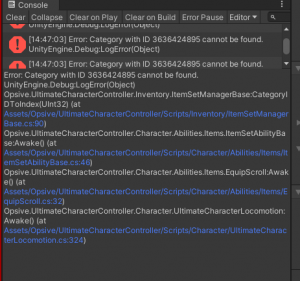
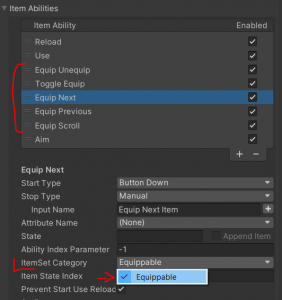
The easiest way to fix it is to go through each Equip/Unequip Ability, within the Character Locomotion script under Item Abilities, and re-selecting the item set category to force the category ID to be serialized.
Null Reference Exception within Item Action Awake
This error can happen when an the main item prefab with all the Ultimate Character Controller scripts (Item, First/Third Person Perspective, Melee/Shootable Weapon, etc…) is spawned outside the player. This can often happen if the item prefab was mistakenly set as the “DropPrefab” instead of a simple model without any scripts.
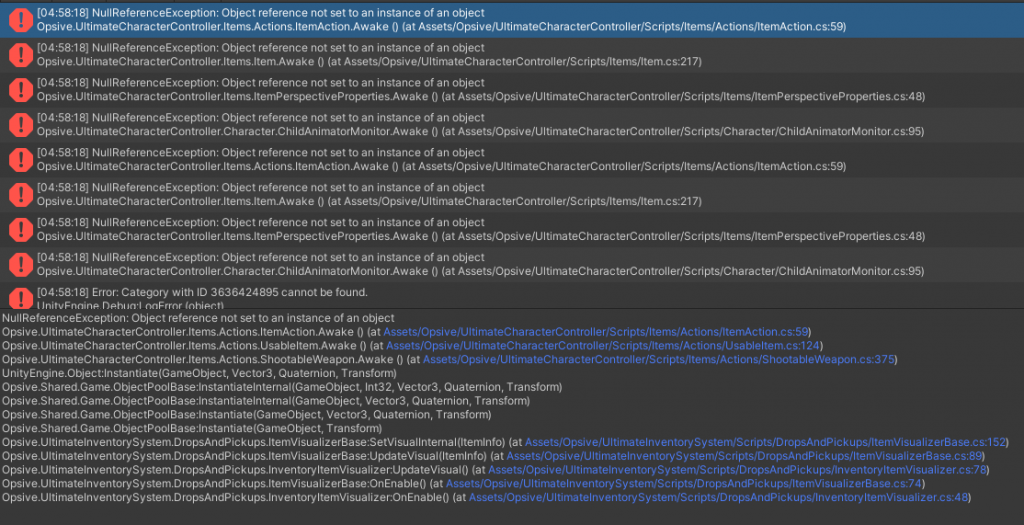
Item Action in this case is referring to the Ultimate Character Controller Item Action (Melee Weapon, Shootable Weapon, etc…) and not to the Ultimate Inventory System Item Action which is used in the UI in most cases.
Duplicate ID ‘1’ found
This warning happens if Character Setup is used to create multiple characters. The Character setup will create a character with an Inventory Identifier, since it is extremely useful for the main player character. The Inventory Identifier must have a unique ID set in the inspector.
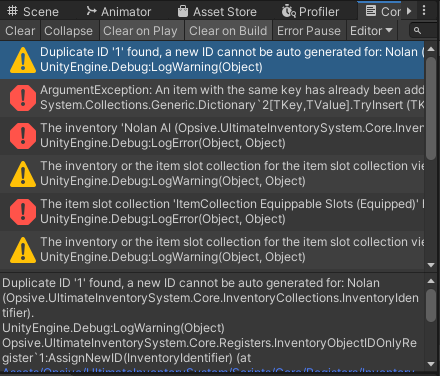
There are two options to fix this warning:
- On the Inventory Identifier change the ID and make sure it is Unique.
- Remove the Inventory Identifier component.
For enemy character prefab the Inventory component must be removed, otherwise the warning will appear each time a new enemy is spawned.
Equipped item is not showing up on the character
There are many reasons your equipped item could not show up properly on your character.
- The InventoryBridge does not point to the correct ItemCollection. Ensure the names match
- You are missing an ItemSetRule that matches your item with the correct slot. To double check if that’s the case check the InventoryItemSetManager at runtime after equipping the item, an ItemSet should show up. If it does but it is not “Active” then your item is soft equipped and not active equipped.
- You are using MoveItemToCollection ItemAction instead of CharacterEquipUnequip. This will soft equip the item and not actively equip it. Refer to the concept section above for more information.
- The Equip Ability on the Character Locomotion is not set to the correct category
- The item is waiting for the equip animation event but it never happens. Untick the wait for animation event or make sure you have the correct AnimtorItemID with an equip animation that has the animation event. Check the animation IDs for the demo animator controller here.
Inventory Database
The integration includes two databases: IntegrationDemoInventorySystem and EmptyCharacterInventoryDatabase. The IntegrationDemoInventorySystem database is used within the Ultimate Character Controller demo scene. To get started within a fresh database you can use the EmptyCharacterInventoryDatabase which contains the minimum for the Ultimate Character Controller integration. This database can be duplicated from the Ultimate Inventory System’s Setup Manager:
![]()
It is also possible to create your own database from scratch or edit an existing Database to be compatible with the Integration.
Required:
- A parent category for all your Character Items, usually called “Equippable”:
- Equippable: The Equippable category specifies the items that can be equipped, such as an assault rifle or a sword. While this high level category is required, the Ultimate Inventory System allows you to nest categories so you can have any category structure beneath this.
- All “Equippable” Item Definition must have an Attribute of type “GameObject” or “GameObject[]”, usually called “Prefabs”. It is recommended to create a “Single Item” and “Multi Item” or “Single Equippable” and “Multi Equippable” category which have those attributes respectively. Then any child category, can use use either one.
- Multi Item: the Multi Item category is an optional category which specifies that the same item can be equipped in multiple item set slots. Examples include dual pistols or the grenade which can be equipped in the left or right hand. Any item which satisfies this requirement must inherit the Multi Item category. Items which can be dual wielded but are not of the same item type, such as a sword and shield, do not need to be parented to the Multi Item category.
- Prefabs: A GameObject which is used by items which are in the Single Item category. This attribute specifies the prefab that should be spawned.
- Prefabs: A GameObject[] which is used by items which are in the Multi Item category. This attribute specifies the set of prefabs that should be spawned. The array order does not matter, the item set slots used are defined on the prefabs.
Recommended:
- It is recommended to use a category example “Shootable” that has a “AmmoData” Item Attribute which can be used to bind the character “ShootableWeapon” consumable item amount and clip size to data stored on the Inventory Item itself. A “InventoryAmmoDataClip” module is required to bind the attribute to the clip.
- AmmoData: A AmmoData which is used store the Ammo ItemDefinition, the clip size and the remaining clip amount. It must be set as a Item Attribute to be updated at runtime as the weapon is used.
- If the AmmoData type does not show up in the type drop down within the Attribute Editor, that means it is not part of your Unit Options. Learn more about Attributes and Unit Options here
- Add categories with Item or ItemDefinition attributes which can be used to bind with character Item Action component properties. Some good examples are “DamageAmount”, “ImpactForceFrames”, “ImpactForce”, etc…
- Add categories specific to equipment slots in an ItemSlotSet (example “Primary”, “Secondary”, “HeadGear”, etc…)
- Add categories for the item sets. These are categories used to define what items can be combined together on the character. (example “One Hand Blade”, “Shield”, “Two Hand Gun”, “Multi Wield Gun”, etc…)
- Use the category multiple parents to your advantage. Simply mix and match the categories you need. (example “Multi Wield Gun” could inherit from “Equippable”, “Primary”, “Secondary”, “Shootable”, “Multi Item”, “Gun”, etc…)
- ItemDefinitions can inherit from other ItemDefinitions take advantage of that feature to create a lot of items which are slightly similar.
- Read more about attributes and the database in the Inventory System documentation.
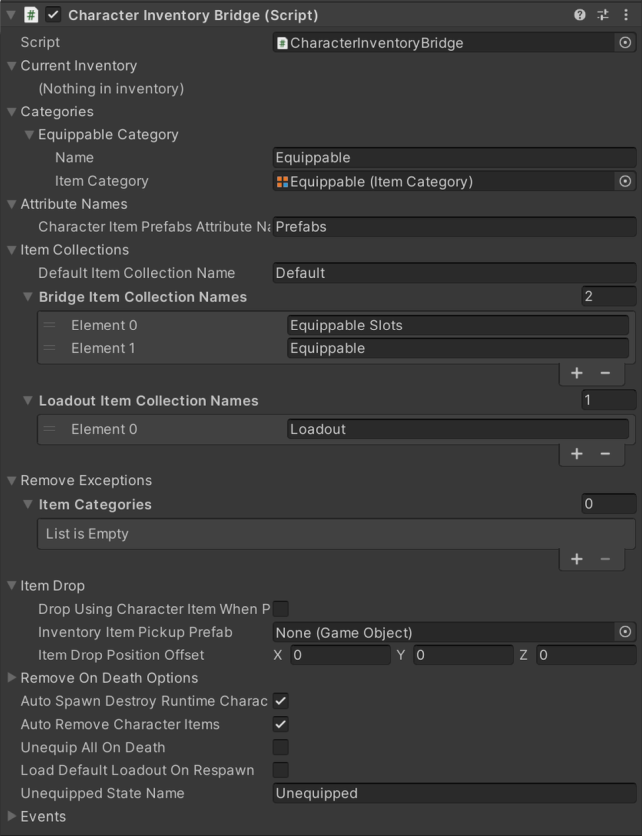
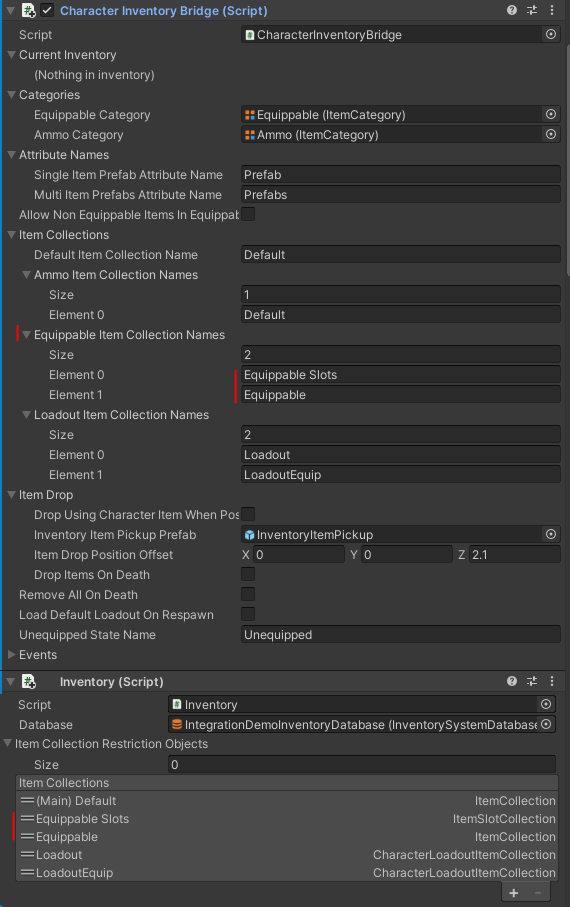
Character Inventory Bridge
The character Inventory Bridge derives from the Character Controller Inventory Base script, it communicates with the Inventory System Inventory to make a smooth integration between both tools.
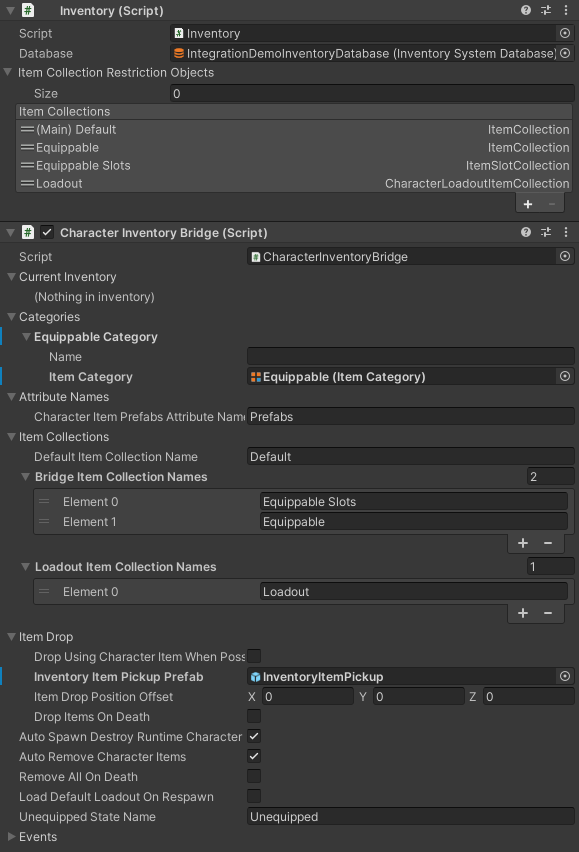
- Equippable Category: The Equippable category specifies the items that can be equipped, such as an assault rifle or a sword. While this high level category is required, the Ultimate Inventory System allows you to nest categories so you can have any category structure beneath this.
- Character Item Prefabs Attribute Name:The attribute name of the GameObjects attribute which specifies the prefabs that should be spawned for mutli items.
- Default Item Collection Name: The main item collection with all non-equippable the items.
- Bridge Item Collection Names: A list of item collections which are used to store all items which can be equipped or are unequipped by the Character Controller.
- Loadout Item Collection Names: The loadout Item Collections are loaded on start. If the loadout Item Collection are of type “Character Loadout Item Collection” they will be loaded by the collection otherwise the item will be added to the main item collection.
- Drop Using Character Item When Possible: If true the when dropping a Character Item, the drop prefab will be used from the Character Item instance Drop Prefab. If not, the generic “Inventory Item Pickup Prefab” will be used.
- Inventory Item Pickup Prefab: The prefab used to drop all items, except Character Items if the “Drop Using Character Item When Possible” field above is toggle on, when the Drop function is called on the Character Inventory Bridge script.
- Item Drop Position Offset: The offset from the character position to spawn the item drop.
API
The Character Inventory Bridge has a lot of useful functions used to get the items you want, equip them, etc…
///
/// Get a reference to the Inventory
///
// Get the Inventory system Inventory from anywhere using the manager.
var inventory = InventorySystemManager.GetInventoryIdentifier(1).Inventory;
// Get the character Inventory Bridge from the Inventory.
var characterInventoryBridge = inventory.gameObject.GetCachedComponent<CharacterInventoryBridge>();
// Get all the equippable item collection, returns a Item Collection Group.
var equippableItemCollections = characterInventoryBridge.BridgeItemCollections;
///
/// Add Items
///
//Items must be added to the Inventory before they can be added.
// This adds the item to the main item collection.
var addedItem = inventory.AddItem("Assault Rifle", 1);
///
/// Soft&Active Equip/Unequip Items
///
// Unequipped -> Item is in the Inventory but not in the bridgeItemCollections
// Soft Equipped -> The Item is one of the BridgeItemCollections but it is not actively equipped
// Active Equipped -> The Item is in one fo the BridgeItemCollection and it is actively equipped on the character
// Before an item can be equipped it must be part of one of the Equippable Item Collection.
var equippableCollectionIndex = 0;
var slotIndex = -1; //The itemcollection slot index.
characterInventoryBridge.MoveItemToEquippable(addedItem, equippableCollectionIndex, slotIndex);
// Once the item ins in equippable it can be equipped.
characterInventoryBridge.Equip(addedItem, true);
// And unequipped
characterInventoryBridge.Equip(addedItem, false);
// Note that the item is still in equippable at this point and it can be sent back to default item collection with
characterInventoryBridge.MoveItemToDefault(addedItem, equippableCollectionIndex, slotIndex);
// It is actually more efficient to use the MoveEquip if you plan to move to equippable and equip directly after.
// Moving the item to one of the Equippable item collection and Equipping it can be done in one line of code.
characterInventoryBridge.MoveEquip(addedItem, true);
// It can be unequipped too.
characterInventoryBridge.MoveEquip(addedItem, false);
///
/// Get Active Equipped Items
///
// Get the "Active" equipped item by checking the UCC slotID:
var activeEquippedItemInSlot0 = characterInventoryBridge.GetActiveInventoryItem(0);
//In this case the SlotID is the UCC slotID, not the ItemSlotCollection slot index, they are not always the same.
//Get the soft&active equipped items by looping over the items in the equippable item collections:
var allEquippedItems = characterInventoryBridge.BridgeItemCollections.GetAllItemStacks();
for (int i = 0; i < allEquippedItems.Count; i++) {
    var item = allEquippedItems[i].Item;
    var isActive = characterInventoryBridge.IsItemActive(item);
    //Do stuff with the soft or active equipped item.
}
///
/// Get Soft Equipped Items
///
// Get a character Item from an inventory Item.
var slotID = -1; // The Item Set slot.
var characterItem = characterInventoryBridge.GetCharacterItem(addedItem.Item, slotID);
// For multi inventory item can have multiple character items
var cachedListResult = new List<CharacterItem>();
var characterItems = characterInventoryBridge.GetCharacterItems(addedItem.Item,cachedListResult);
// you can get the inventory item from a character item.
var inventoryItem = characterInventoryBridge.GetInventoryItem(characterItem);
///
/// Drop Items
///
var inventoryDrop = characterInventoryBridge.DropItem(addedItem, true, true);
Inventory Item Set Manager
The Inventory Item Set Manager is essentially the same as default ItemSetManager but witout the ItemCollection.
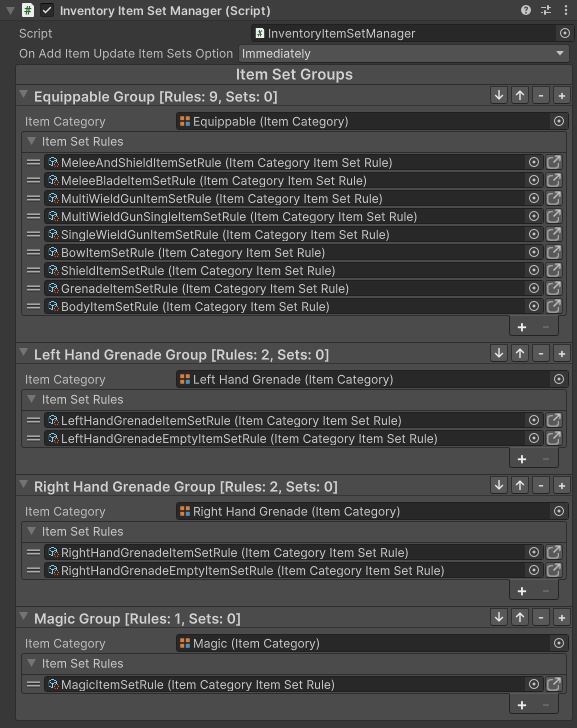
When an item is added to, or removed from, the Bridge Item Collections, the Character Inventory Bridge component will notify the Inventory Item Set Manager to update the Item Sets. The system will go through all the Item Set Rules and check if any of them return a new Item Set for the current set of equippable Items. This ensures the Item Sets list is clean and scales well.
It is recommended to have a look at the integration demo scene to see how the Item Set Rules are setup there.
Item Set Rules
Item Set Rules are used to create Item Sets given a list of equippable items. By default there are three types of Item Set Rules:
- Item Set Rule With Item Categories: An Item Set is created if each slot with an Item Category inherently contains an equippable item.
- Item Set Rule With ItemDefinitions: An Item Set is created if each slot with an Item Definition inherently contains an equippable item.
- Item Set Rule Object Container: An Item Set Rule which points to an “Item Set Rule Object” scriptable object. The Item Set Rule Object class can be inherited to create custom Rules for more advanced use cases, example a Item Set Rule which returns multiple Item Sets with different state names.
The Item Set Rule type can be chosen when adding an Item Set Rule to the Item Set Rules Object.
API
A custom Item Set Rule can be created by inheriting the ItemSetRule or InventorySystemItemSetRule class:
/// <summary>
/// And Example of an ItemSetRule.
/// </summary>
[CreateAssetMenu(menuName = "Opsive/Ultimate Character Controller/Inventory/Example Item Set Rule",
    fileName = "ExampleItemSetRule", order = 0)]
[Serializable]
public class ExampleItemSetRule : InventorySystemItemSetRule
{
    /// <summary>
    /// Returns if an item set is valid for the allowed slots mask.
    /// </summary>
    /// <param name="itemSet">The item set to check.</param>
    /// <param name="allowedSlotsMask">The allowed slots mask.</param>
    /// <returns>Returns true if the item set is valid.</returns>
    public override bool IsItemSetValid(ItemSet itemSet, int allowedSlotsMask)
    {
        return true;
    }
    /// <summary>
    /// Does the character item match this rule.
    /// </summary>
    /// <param name="itemSetRuleStreamData">The item set rule stream data.</param>
    /// <param name="currentPermutation">The current item permutation so far.</param>
    /// <param name="characterItem">The character item to check.</param>
    /// <returns>True if the character item matches this rule.</returns>
    public override bool DoesCharacterItemMatchRule(ItemSetRuleStreamData itemSetRuleStreamData, ListSlice<IItemIdentifier> currentPermutation,
        CharacterItem characterItem)
    {
        // Add some condition here to say whether you item matches this rule or not
        return false;
    }
    /// <summary>
    /// Can the slot be empty for this rule.
    /// </summary>
    /// <param name="slotID">The slot ID to check.</param>
    /// <returns>True if it can be empty.</returns>
    protected override bool CanSlotBeNull(int slotID)
    {
        return true;
    }
}
Equipping Skinned Mesh Clothes
The Character Controller Inventory does not support character skinned mesh items. Clothes and armor must be equipped through the Ultimate Inventory System. The easiest way to do so is by using the Equipper script.
Since armor and weapons will be equipped through different systems the clothes don’t have to be equipped with an “Bridge” ItemCollection, this are only required for the Character Controller weapons. Therefore another ItemCollection can be used for clothes and armor.
- Create a new ItemSlotCollection for your armor and name it accordingly (i.e “Armor Equipped”), set its purpose to “None” such that it won’t be confused with the “Equippable” collections.
- Create an ItemSlotSet for your armor slots and assign it to your new ItemSlotCollection.
- Add an Equipper script to your character, assign the ItemSlotSet and define which slots are skinned mesh.
- Create an additional Equipment UI (aka ItemSlotCollectionView) separate from the weapons equipment UI. Make sure that each are set up correctly and point to the correct ItemSlotCollections. This is done by setting the Item Collection name/purpose on the ItemSlotCollectionView inspector under the Item Collection ID field.
- You will have two equip item actions, one for your armor items and one for your weapon items. Use the MoveToItemCollection Item Action for equipping the armor in the UI and make sure the correct ItemCollection name are specified (i.e Main and “Armore Equipped”), The CharacterEquipItemAction should only be used for equipping “Equippable” Character Controller weapons.
- Create items with skinned mesh prefabs following the Equipper guidelines for skinned mesh equipments.
- Make sure to only use the “EquipmentPrefab” attribute and not the “UsableItemPrefab” attribute since usable Item Prefabs are not required in the integration.
Since your armor and weapon items will be separated in two or more item collections you may wish to create an Item Collection Group to keep track of all your equipment in code.
The Equipper script is fairly simple, you may extend it or replace it with your own custom script to make it more advanced.
Events
All the events used in the integration can be found in the “Integration Event Names” script. Most will be interested in the following Inventory system or character controller events, to know when an item moves between item collections or when it is equipped and active on the character.
EventHandler.RegisterEvent<ItemInfo, ItemStack>(m_InventoryBridge.Inventory, EventNames.c_Inventory_OnAdd_ItemInfo_ItemStack, OnAddItemToInventory);
EventHandler.RegisterEvent<ItemInfo>(m_InventoryBridge.Inventory, EventNames.c_Inventory_OnRemove_ItemInfo, OnRemoveItemFromInventory);
EventHandler.RegisterEvent<Items.Item, int>(m_CharacterGameobject, "OnAbilityUnequipItemComplete", OnUnequipItemComplete);
EventHandler.RegisterEvent<Items.Item, int>(m_CharacterGameobject, "OnInventoryEquipItem", OnEquipItemComplete);
EventHandler.RegisterEvent<Items.Item, int>(m_CharacterGameobject, "OnAbilityWillEquipItem", OnWillEquipItem);
Other useful events for the Character Controller can be found here. The Inventory system event names can be found in the “Event Names” script.
Inventory Item Pickups
Item Pickups/Drops can be either use the integration component “Inventory Item Pickups” or any of the Inventory system pickups. The main difference is that the Inventory Item Pickup works using the Character pickup ability, while the inventory system pickups work with the Inventory Interactable system. It is your choice to either use one, the other, both or neither.
As mentioned in the Character Inventory Bridge section, a generic Inventory Pickup prefab is defined on that character and is used for all items. Except for Character Items which optionally can be dropped using the pickup prefab defined on the Character Item instance itself.
The generic Inventory Pickup prefab can show different models when the “Inventory Item Visualizer” is used. This component watches the first item in an inventory and spawns a prefab set as an attribute on the item. Therefore the same pickup prefab may be used to drop a log or a brick and they will look differently if the drop prefab attribute is found on the inventory item.
Item to Character State Binding
The character state system is extremely powerful, so it makes sense for the Ultimate Inventory System Items to take advantage of it.
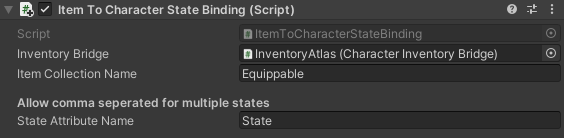
Seperate states by commas if you wish to have multiple states activated for one item.
UI
The UI functions separately between the character and inventory systems. Each can be setup indepedently using the Manager Editor provided by their respective tool.
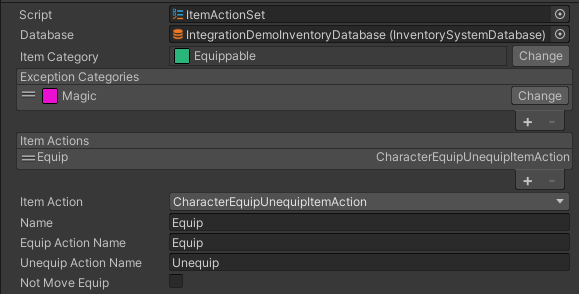
The Inventory system UI is more advanced and has many features. For example the Item Action is usually used to equip items. But the Integration equipping is more advanced than what is used in the Inventory system demo. So we created a few very useful Inventory Item Actions which can be used with the integration. It is recommended you create your own Item Actions too for more control.
Custom Inventory Item Actions
- Character Drop: Drop Items using the character.
- Character Quantity Drop: Drop a chosen amount of Items using the character.
- Character Equip Unequip: Equip or Unequip an item.
- Character Modify Attribute: Use an item attribute to modify a character attribute. This can be used to increase/decrease Health, Armor, or any other character attribute value.
- Character Use: Equip Use and Unequip an item. This is used in the demo to cast a fire ball for example when using the Magic item “Fireball”.
Most users will wish to disable the character input while panels are opened.
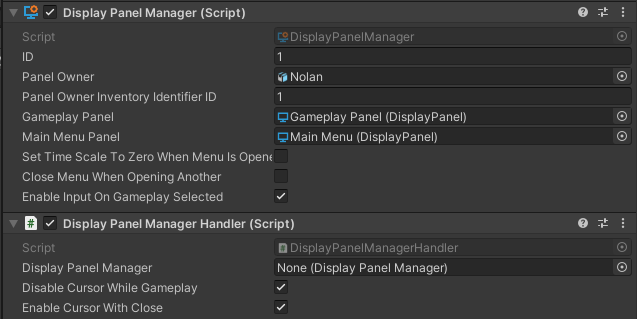
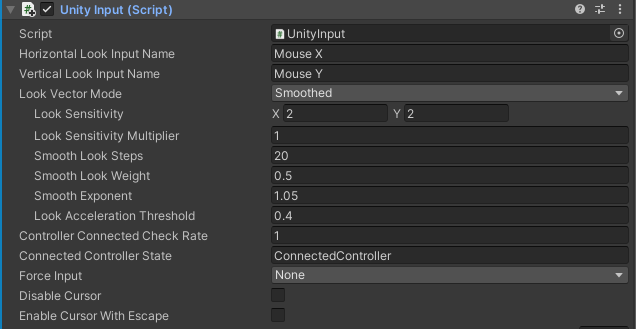
By default the Character Controller hides the cursor. But while Inventory Panels are open you may wish to show that cursor. Use the Display Panel Manager Handler, instead of the Unity Input to handle the cursor
API
Since Item, Inventory and Item Collection class names are used in both the Character and Inventory system for different things, it is important to use the right ones when creating custom code. Here are some using statements that can help to prevent confusion:
using Item = Opsive.UltimateInventorySystem.Core.Item;
using ItemCollection = Opsive.UltimateInventorySystem.Core.InventoryCollections.ItemCollection;
using Inventory = Opsive.UltimateInventorySystem.Core.InventoryCollections.Inventory;
using CharacterItem = Opsive.UltimateCharacterController.Items.Item;