Item Slots give each equipment location a stable ID so Inventory, Item Sets, visible models, abilities, and animation all agree about where an item belongs. The normal humanoid mapping is right hand 0 and left hand 1.

Understand the slot map

Four similar values have different jobs:

Value What it controls
Character Item Slot > ID Identifies an attachment location on a character model or first-person arm rig.
Character Item > Slot ID Selects the Inventory position and the matching first- or third-person attachment location.
Character Item > Animator Item ID Identifies the item’s animation family. It is written to Slot<ID>ItemID; it is not a Slot ID.
An Item Set Rule’s array position Specifies which Item Definition is allowed in that Slot ID.

Inventory scans every Character Item Slot below the character, including inactive objects. Its slot count is the highest nonnegative ID plus one, with a minimum of one. Keep IDs contiguous: IDs 0 and 3 create four Inventory positions even when 1 and 2 are unused.

Several available Character Items can be assigned to one slot, but only one can be active in that slot at a time. A second hand, independent utility location, or another simultaneously equipped item therefore needs another Slot ID.

Configure slots in Character Manager

  1. Open Tools > Opsive > Ultimate Character Controller > Character Manager.
  2. Select or configure the scene character and enable Items.
  3. Assign the full-body model and any First Person Arms that will display held items.
  4. Select Adjust Slots beside Item Slots.
  5. Under Model, add the transform that should own each attachment point. For a humanoid, use the right hand as Right ID 0 and the left hand as Left ID 1.
  6. Choose Other and enter 2 or higher for a project-specific location. Keep IDs nonnegative and contiguous unless an empty Inventory position is intentional.
  7. Under every First Person Arms entry, add the equivalent attachment transforms and reuse the same logical IDs.
  8. Resolve every validation message. A parent must be below the displayed model or arm rig, and each parent and ID must be unique within that hierarchy.
  9. Select Close, then Build Character for a new character or Update Character for an existing one.

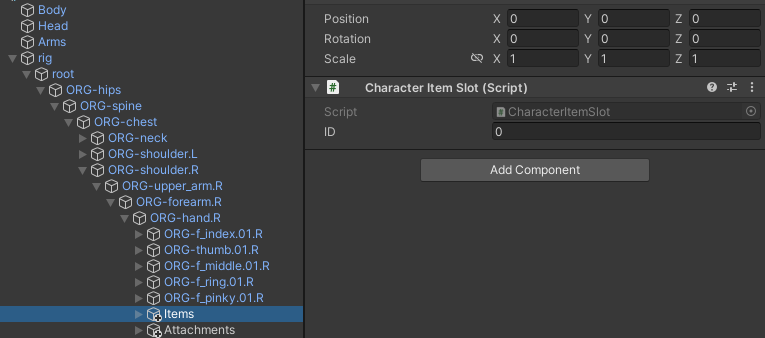
Character Manager creates a child named Items under each selected attachment transform and adds Character Item Slot with the chosen ID. This is different from the controller-level Items object: the controller-level object has Item Placement and stores Character Item roots, while the hand-level objects mark where their visible models attach.

Character Item Slot Inspector showing the ID field for an attachment's Items child

Editor checkpoint

Before creating an item, expand every model and arm rig in the Hierarchy. Each intended attachment transform should contain one Items child with one Character Item Slot. Right-hand locations should use the same ID in every relevant perspective and model, as should left-hand and custom locations.

Match first- and third-person slots

A Character Item has one Slot ID even when it renders different objects in first and third person. Each perspective therefore needs a Character Item Slot with that same ID:

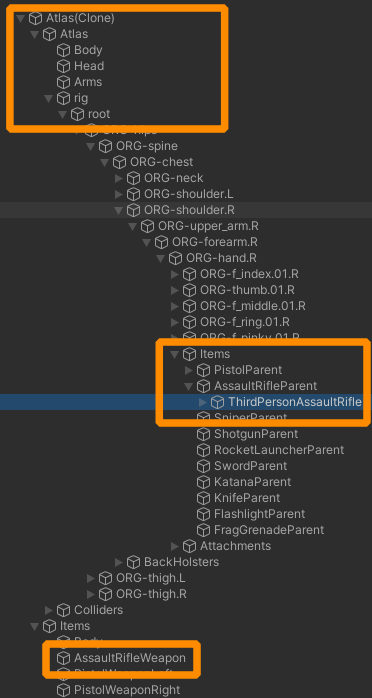
  • The third-person perspective searches the active character model for its matching slot.
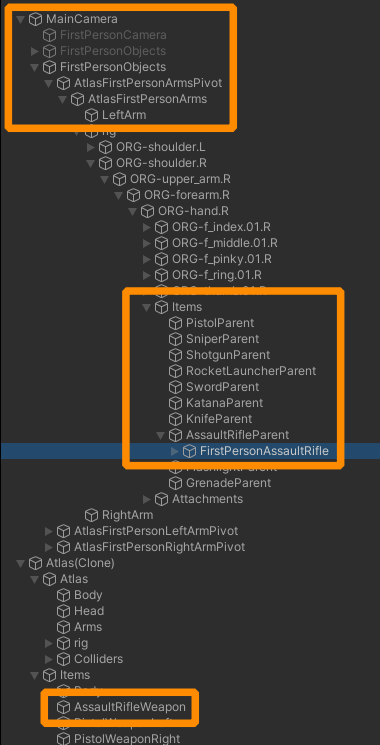
  • The first-person perspective searches the selected First Person Base Object and its arm hierarchy.
  • Item Manager blocks an on-character build when the selected first- and third-person slots use different IDs.
  • A character that switches models needs the same logical slot map on every model that can display the item.

The transforms do not need identical names or positions. They represent the same logical location: for example, a third-person right hand and the corresponding first-person right arm can both be slot 0.

Third-person hierarchy with a Character Item root under Item Placement and its visible model below a hand slot

First-person hierarchy with a Character Item root under Item Placement and its visible model below the camera arms slot

Keep a third-person representation for AI or multiplayer characters that other cameras must see, even when the local player uses a first-person view. A first-person representation is only needed for a first-person camera path.

Assign a Character Item to a slot

Use Tools > Opsive > Ultimate Character Controller > Item Manager after the character’s slot map is stable.

Build a reusable prefab

  1. Leave Character empty so Item Manager shows Slot ID.
  2. Assign Item Definition and enter the Slot ID that the prefab can occupy.
  3. Set Animator Item ID to the animation mapping implemented by the character’s Animator Controller. Do not copy the Slot ID into this field unless that happens to be the intended animation mapping.
  4. Enable Add First Person Item and Add Third Person Item only for the perspectives the prefab supports.
  5. Keep Add Item Prefab to Item Definition enabled so Inventory can find this slot-specific prefab at runtime.
  6. Build the item, then inspect its Character Item > Slot ID before adding it to a loadout.

One Item Definition can reference more than one Character Item prefab. For example, a pistol definition can reference a right-hand prefab with Slot ID 0 and a left-hand prefab with Slot ID 1. Inventory uses the definition and slot together; do not add two prefabs with the same definition and Slot ID.

Build directly on a character

When Character is assigned, Item Manager derives the Slot ID from the selected perspective parents. Choose the first-person Item Parent and the humanoid third-person Hand, or select an Item Parent for a custom rig. The manager requires the two selected Character Item Slots to have the same ID before it enables the build.

Changing Animator Item ID through Update Item does not move an existing item to another slot. When the slot must change, update the Character Item’s Slot ID, both perspective parents, its Item Set Rules, and its Animator setup as one controlled change; rebuilding a copy is safer for a complex item.

Build common equipment layouts

Scenario Slot map Character Items and Item Set
Rifle or one-handed firearm Right hand 0; left hand 1 may stay empty Build the firearm for slot 0. The Item Set Rule places its definition at array position 0.
Sword and shield Sword/right hand 0; shield/left hand 1 Build separate Character Items for the two definitions and place each at its exact Item Set position. Their Animator Item IDs normally differ.
Two matching pistols or swords Right hand 0; left hand 1 Add two slot-specific Character Item prefabs to the same definition, require an Inventory amount of two, and put that definition in both Item Set positions. Both Character Items may use the same Animator Item ID.
Independent utility item Existing hand slots plus a contiguous custom ID Add the same custom ID to every perspective that displays it, create a Character Item for that ID, and give it an Item Set Group or rule that can stay active with the main equipment.

A holster is not usually another Inventory slot. Use the third-person item’s Holster Target when one Character Item should move between its equipped and holstered positions without becoming an independently equipped item.

Connect Item Sets, actions, and abilities

The Slot ID follows the item through the complete runtime flow:

  1. An Item Definition owns one or more slot-specific Character Item prefabs.
  2. Inventory creates the matching Character Items and stores them by Slot ID.
  3. An Item Set Rule places definitions at exact slot positions. It cannot move a Character Item from one slot into another.
  4. Equip Unequip activates the Character Item selected for each changed slot.
  5. The Character Item Action belongs to that slot-specific Character Item. Its ID selects an action on the item; it does not select a slot.
  6. Use and Reload can target Slot ID -1 for every eligible equipped item or a specific Slot ID for independent hand controls.
  7. Drop uses Slot ID -1 to target all slots by default; enter one Slot ID when the ability should drop only that position.

An Item Pickup adds an Item Definition amount. Its Character Item prefabs and the Item Set Rules decide which slot-specific representations become available and which combination equips. A pickup does not relocate one Character Item between hands.

Add Animator parameters for custom slots

The supplied Animator setup covers slots 0 and 1. For every additional slot X, add this complete group to each Animator Controller that needs to animate it:

  • SlotXItemID (Int)
  • SlotXItemStateIndex (Int)
  • SlotXItemStateIndexChange (Trigger)
  • SlotXItemSubstateIndex (Int)

Animator Monitor considers a slot supported when it finds SlotXItemID, then writes all four values for that slot. Keep the group together. Adding the parameters does not create animation states or transitions; add conditions for the new item’s Animator Item ID, item ability state, and substate.

For dual pistols, Slot0ItemID and Slot1ItemID can contain the same Animator Item ID because the parameter names keep the two hands separate. For a sword and shield, the two parameters normally contain different Animator Item IDs.

Verify in Play Mode

  1. Open the runtime Item Set Manager and confirm each generated set places its Character Items in the intended array positions.
  2. Equip a single right-hand item. Confirm only slot 0 becomes active and the visible object appears under the correct third-person or first-person attachment.
  3. Switch perspective. Confirm the same Character Item resolves the equivalent slot instead of moving to another hand or disappearing.
  4. Equip a sword and shield or another two-item set. Confirm one active Character Item occupies each slot.
  5. Test a dual-wield definition with an Inventory amount of two. Confirm the right and left prefabs resolve independently and both Slot Item ID parameters show the intended Animator value.
  6. Run slot-specific Use, Reload, and Drop inputs. Confirm only the requested hand responds; then test an all-slot value of -1 deliberately.
  7. Pick up, unequip, re-equip, and drop the item. Confirm the Item Set becomes valid or invalid without changing the Character Item’s assigned slot.
  8. For a custom slot, watch its four Animator parameters and confirm its states enter and leave cleanly.

Troubleshooting

Symptom Check Fix
The item appears in the wrong hand. Compare Character Item > Slot ID with the Character Item Slot ID on every active model and arm rig. Give corresponding attachment points the same ID and rebuild or correct the Character Item’s perspective parents.
Build Character or Update Character is disabled. Open Character Item Slots and look for an invalid parent, duplicate parent, or duplicate ID within one model or arm group. Assign a child of the displayed hierarchy and keep every parent and ID unique in that group.
Build Item reports that perspective slots do not match. Compare the selected first- and third-person Character Item Slot IDs. Select the equivalent locations or correct their IDs in Character Manager.
Inventory has more slots than expected. Find the highest Character Item Slot ID and look for gaps or an obsolete component in an inactive hierarchy. Remove the obsolete slot or make the intended IDs contiguous, then rebuild or reload the character before testing again.
The character owns the definition but no valid Item Set appears. Check whether the definition has a Character Item prefab for the rule’s exact array position and whether Inventory owns enough copies. Add the missing slot-specific prefab, correct the rule position, or add the required amount.
The item is visible in one perspective only. Check the active model or First Person Base Object for a matching Character Item Slot. Add the missing logical slot and update the character, or remove support for the unused perspective from the Character Item.
The item equips but the Animator does not change. Distinguish Slot ID from Animator Item ID and inspect the full four-parameter group. Use the Animator Item ID expected by the controller and add the exact parameters and transitions for that slot.
One input uses or reloads both hands. Inspect the ability’s Slot ID. Replace -1 with the intended slot, or use separate slot-specific abilities and inputs.
Drop removes more equipment than intended. Inspect Drop > Slot ID. Replace the default -1 with the one slot that the ability should drop.

Persistence and multiplayer

Treat Slot IDs as stable project data. A save system should restore Item Definition amounts and the intended Item Set, then let Inventory rebuild its slot-specific Character Items. Do not save scene Transform references or assume that a generated runtime Item Set index remains stable after its rules change.

The base Inventory forwards authoritative equip and unequip changes to a supported multiplayer integration with the Item Identifier and Slot ID. Every peer still needs the same slot map, Character Item prefabs, Item Definitions, and Item Set Rules. Keep third-person objects configured for remote observers; first-person objects remain a local-view concern unless the integration documents another ownership model.

  • Item Creation builds a slot-specific Character Item prefab or an item directly on a character.
  • Inventory owns Item Definition amounts and creates Character Items for their slots.
  • Item Type, Definition, and Category explains the data identity shared by slot-specific Character Item prefabs.
  • Item Set and Rules defines the combinations that may occupy the slot array.
  • Dual Wielding configures two hand slots, two Character Items, abilities, and animation together.
  • Character Item explains Slot ID, Animator Item ID, perspective objects, and equip timing.
  • Item Pickup adds definitions and can request a named Item Set.
  • Use, Reload, and Drop explain slot-specific ability targeting.
  • Equip Unequip performs Item Set transitions across the changed slots.
  • Animator Parameters documents the four per-slot parameters and their runtime values.

Developer details

Use Inventory’s slot-aware methods when code needs to inspect or change equipment:

int slotCount = inventory.SlotCount;
CharacterItem activeItem = inventory.GetActiveCharacterItem(slotID);
CharacterItem item = inventory.GetCharacterItem(itemIdentifier, slotID);

inventory.EquipItem(itemIdentifier, slotID, immediateEquip: false);
inventory.UnequipItem(slotID);

Ordinary player equipment changes should still go through Item Sets and item abilities so animation, State System, timing, and networking remain coordinated.

The main slot-aware Inventory events are OnInventoryEquipItem and OnInventoryUnequipItem, each with (CharacterItem, int slotID), plus OnInventoryRemoveItem with the removed Character Item and its Slot ID. Character Item registers OnAnimatorItemEquip, OnAnimatorItemEquipComplete, OnAnimatorItemUnequip, and OnAnimatorItemUnequipComplete as slot-filtered animation events.

In released Version 3.2.0, Inventory determines its array size from Character Item Slot components during initialization. The count can grow when a higher ID is discovered, but the same initialized Inventory instance does not reduce its stored count after a high-ID component is removed. Configure slots before Play Mode and recreate or reload the character after reducing the highest ID.

Runtime lookup does not enforce the Character Manager’s uniqueness rules. Manually added duplicate IDs can make a perspective resolve the first matching component, and negative Character Item Slot IDs are not valid array positions. Prefer Character Manager, contiguous nonnegative IDs, and one component per logical location.