Use the Cinemachine integration when Cinemachine should frame and compose the shot while Ultimate Character Controller continues to assign the character, select the gameplay View Type, provide the look direction, and coordinate character and item states.

Before you begin

  • Start with a working Ultimate Character Controller Version 3 character and Camera Controller. Verify the ordinary Ultimate Character Controller camera before replacing its active View Type.
  • Install Cinemachine 3.1 or later from Unity’s Package Manager, not the legacy Asset Store package. The released bridge uses the Cinemachine 3 Unity.Cinemachine API and names such as Cinemachine Camera, Orbital Follow, Pan Tilt, and Rotation Composer. See Unity’s Cinemachine 3.1 installation guide.
  • Decide whether the game needs first person, third person, or both. A dual-perspective camera needs a separate Cinemachine Camera and Ultimate Character Controller Cinemachine View Type for each perspective.
  • Keep one owner for each job: Cinemachine composes the shot, the Ultimate Character Controller Camera Controller owns the active gameplay View Type, and Ultimate Character Locomotion owns the character.

Install the integration

  1. Open Window > Package Manager, install Cinemachine, and confirm that its installed version is 3.1 or later.
  2. Open Tools > Opsive > Ultimate Character Controller > Integrations Manager, select Available Integrations, and use the Integration action for Cinemachine to obtain the current Ultimate Character Controller Version 3 package.
  3. Import the Cinemachine integration package and allow Unity to compile. Keep its scripts in the supplied location unless the project deliberately organizes integrations under a custom assembly definition.
  4. Select the camera with Camera Controller, expand View Types, and confirm that First Person Cinemachine and/or Third Person Cinemachine is available from the add menu.

Resolve compilation errors before configuring the scene. A missing Unity.Cinemachine namespace normally means Cinemachine is absent, is an incompatible major version, or is not referenced by a custom assembly definition that contains the integration scripts.

Connect a Cinemachine Camera

  1. Select the Unity Camera GameObject that contains Camera Controller. Add Cinemachine Brain to this same GameObject. Creating the first Cinemachine Camera may add the Brain automatically, but the bridge specifically looks for it beside Camera Controller.
  2. Select GameObject > Cinemachine > Cinemachine Camera to create a separate Cinemachine Camera GameObject.
  3. On Cinemachine Camera, assign Tracking Target and choose the perspective-specific Position Control and Rotation Control below. Add Cinemachine Input Axis Controller, or another explicit axis driver, and connect the look actions to the Pan Tilt/Orbital Follow axes used by the shot. Creating a plain Cinemachine Camera and assigning it to UCC does not supply this input driver.
  4. From Add Extension, add Cinemachine Camera Offset. On the resulting component, set Apply After to Noise. The bridge uses this extension for its configured camera offset, positional springs, and first-person height adjustment.
  5. Return to Camera Controller > View Types, use the add control, and select First Person Cinemachine or Third Person Cinemachine.
  6. Select the new View Type and assign the Cinemachine Camera GameObject’s Cinemachine Camera component to Cinemachine Camera.
  7. In the Active column, select the Cinemachine View Type that should start active.
  8. For a camera that can change perspective, repeat the process with a second Cinemachine Camera and the other Cinemachine View Type. Set First Person View Type, Third Person View Type, and Can Change Perspectives on Camera Controller.

Use a separate Cinemachine Camera for each View Type. During a normal handoff, ensure the outgoing assigned camera is still the Brain’s live camera: the bridge lowers its assigned camera’s priority but deactivates Brain.ActiveVirtualCamera, which can be a different camera after Timeline or another priority owner intervenes. Coordinate that handoff explicitly before changing the UCC View Type.

Configure first person

Use a stable head or eye-level Transform as the tracking target:

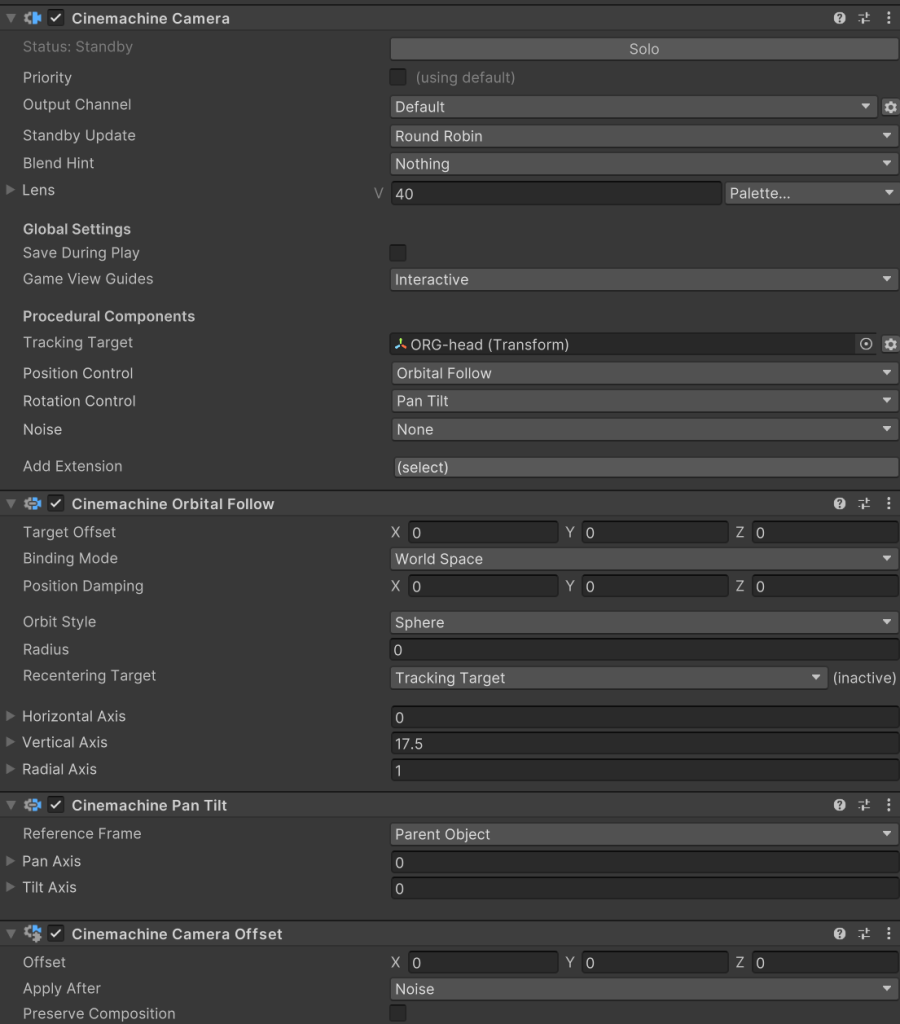
  1. On Cinemachine Camera, set Tracking Target to the character’s head.
  2. Set Position Control to Orbital Follow and Rotation Control to Pan Tilt.
  3. On Cinemachine Orbital Follow, begin with Target Offset (0, 0, 0), Binding Mode set to World Space, Position Damping (0, 0, 0), Orbit Style set to Sphere, and Radius 0.
  4. On Cinemachine Camera Offset, begin with Offset (0, 0, 0) and Apply After set to Noise.
  5. On First Person Cinemachine, preserve the first-person Culling Mask, Overlay Render Type, First Person Camera, and First Person Culling Mask required by the active render pipeline. Configure pitch limits on Cinemachine Pan Tilt and test its axis input. The UCC Min Pitch Limit and Max Pitch Limit clamp an internal value that is not written to Pan Tilt, so they do not constrain this shot.

First-person Cinemachine Camera tracking the character's head with Orbital Follow radius zero, Pan Tilt rotation, and Camera Offset applied after Noise

The head target establishes position. Cinemachine’s configured axes and driver supply shot pitch/yaw; the UCC View Type reads the Cinemachine Camera rotation for gameplay look and supplies field of view and overlay behavior. Test animated head motion carefully. Avoid rotational spring forces with the supplied spring extension until the stage-multiplication limitation below is corrected, because rendered recoil and gameplay aim differ.

Configure third person

Use the character root or another stable character-relative target:

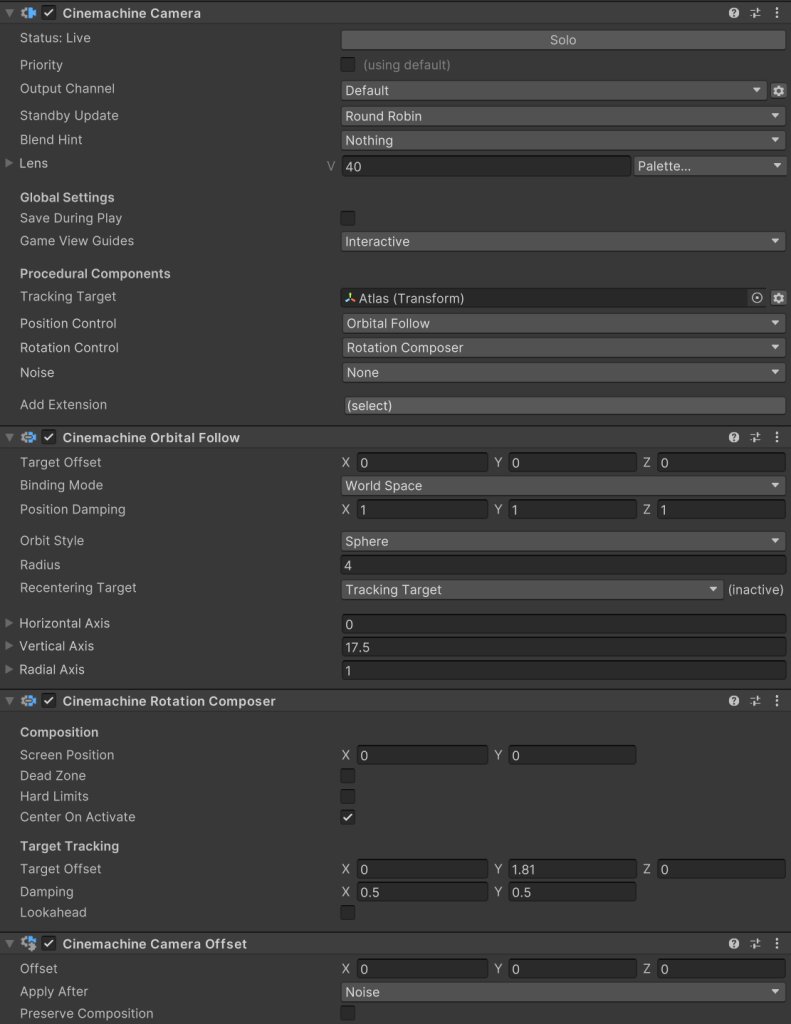
  1. On Cinemachine Camera, set Tracking Target to the character.
  2. Set Position Control to Orbital Follow and Rotation Control to Rotation Composer.
  3. On Cinemachine Orbital Follow, begin with Target Offset (0, 0, 0), Binding Mode set to World Space, Position Damping (1, 1, 1), Orbit Style set to Sphere, and Radius 4.
  4. On Cinemachine Rotation Composer, begin with Target Offset (0, 1.81, 0) and tune it for the character’s actual height and desired framing.
  5. On Cinemachine Camera Offset, begin with Offset (0, 0, 0) and Apply After set to Noise.

Third-person Cinemachine Camera tracking the character with Orbital Follow radius four, Rotation Composer target offset 1.81, and Camera Offset applied after Noise

These values are a starting composition, not a character-size requirement. Tune the orbit radius, damping, and target offset with the actual model, movement speed, field of view, and gameplay spaces. The integration does not add obstruction avoidance; add and configure Cinemachine’s Deoccluder or another supported collision extension when walls can enter the shot.

How camera ownership works

System Responsibility
Camera Controller Attaches the character, receives Ultimate Character Controller look input, selects the active View Type, exposes the gameplay look source, and coordinates zoom, states, and perspective changes.
First Person Cinemachine or Third Person Cinemachine Connects one UCC View Type to a Cinemachine Camera, reads its rotation for gameplay look, and manages field of view, offsets, and activation. Input axes require a separate Cinemachine driver; gravity, recoil, and deactivation have the limitations below.
Cinemachine Camera Tracks the selected target and applies its Position Control, Rotation Control, Noise, and extensions.
Cinemachine Brain Chooses the live Cinemachine Camera and applies its result to the Unity Camera. The integration changes the assigned camera’s priority when the Ultimate Character Controller View Type activates.
Ultimate Character Locomotion and Perspective Monitor Move the character and update first-person or third-person model presentation after the perspective changes.

The integration uses a manual Brain update route coordinated with UCC’s Simulation Manager. Each Cinemachine View Type creates its own world-up Transform during initialization and assigns it to the same Brain; only the active View Type updates its Transform. With one view, that can follow character up. With multiple views, the last initialized view owns the Brain reference even while another is active. A dual-perspective dynamic-gravity setup therefore needs corrected world-up ownership, such as a shared up source or reassignment on activation, before it can reliably follow the active character orientation.

When Camera Controller changes perspective, it deactivates the outgoing Cinemachine View Type and activates the selected default for the new perspective. First Person Cinemachine also updates the first-person overlay camera and culling mask in response to the perspective event. Configure the Ultimate Character Controller Transition View Type or the Cinemachine Brain blend deliberately; avoid applying a long blend in both systems until each handoff works on its own.

Key choices

  • Cinemachine Camera: this is the required camera assigned to the Ultimate Character Controller View Type. “Virtual Camera” is the Cinemachine 2 name and is not the current field label.
  • Field Of View and Field Of View Damping: Ultimate Character Controller writes the active View Type’s field of view into the Cinemachine Camera lens. Camera states such as Aim can therefore change the lens without bypassing Cinemachine.
  • Look Direction Distance: controls how far forward the gameplay look direction extends.
  • Use Character Look Direction: enable this when abilities and items should use the character’s forward direction. Leave it disabled when the Cinemachine Camera and crosshairs should define the look direction.
  • Camera Offset: requires Cinemachine Camera Offset. The bridge warns when a nonzero offset is requested without that extension.
  • Springs: positional offsets require Cinemachine Camera Offset. The supplied Cinemachine Spring Extension applies rotational correction on every pipeline stage; in Cinemachine 3.1.7, four stages apply a pure 5-degree spring as 20 rendered degrees while UCC gameplay look applies it once. Avoid rotational spring forces with that extension until it is corrected to apply once at a chosen stage, then verify shot and gameplay aim together.
  • First-person overlay: choose the same Overlay Render Type and camera-layer setup used by the rest of the Ultimate Character Controller first-person camera workflow. Cinemachine does not replace the render-pipeline overlay configuration.
  • Obstruction and bounds: use Cinemachine extensions such as Deoccluder or Confiner. The Cinemachine View Types do not inherit the included Ultimate Character Controller third-person collision fields.
  • Split screen: each Camera Controller needs its own Cinemachine Brain and Cinemachine Cameras. Assign distinct Cinemachine output channels so one player’s Brain does not select another player’s shot.
  • Timeline: before UCC deactivates a Cinemachine View Type, arrange for its assigned camera to be the Brain’s live camera. The deactivation path disables the live camera GameObject, even when another camera became live through Timeline or priority changes. A robust mixed-owner handoff requires explicit coordination or a corrected deactivation path.

Verify in Play Mode

  1. Enter Play Mode and confirm the Console has no missing Cinemachine Brain or Cinemachine Camera error.
  2. Inspect the assigned Cinemachine Camera. It should report Live, and the Ultimate Character Controller Cinemachine View Type should be selected as active on Camera Controller.
  3. Move horizontal and vertical look input. Verify that the configured Cinemachine axis driver changes the intended axes and that Pan Tilt limits constrain the first-person shot.
  4. Walk, turn, jump, aim, and use an item. Check framing, field of view, overlays, and gameplay look. Keep rotational spring forces out of this baseline; only test matched recoil after the extension’s repeated-stage application is corrected.
  5. For third person, walk behind walls and through narrow spaces. Confirm the configured Cinemachine collision or occlusion extension keeps the target visible without clipping.
  6. For both perspectives, switch in both directions while standing, moving, aiming, and holding an item. Confirm the outgoing assigned camera was live before deactivation, the correct incoming camera becomes Live, and model visibility changes.
  7. Test dynamic gravity with one view. For multiple views, first establish corrected/shared world-up ownership, then verify the Brain follows the active character in every perspective; the supplied multi-view implementation does not guarantee this.
  8. Test respawn, teleport, pause, and scene loading. If Timeline or another cinematic camera takes control, confirm the Ultimate Character Controller gameplay View Type becomes Live again afterward.

Troubleshooting

Symptom Check Fix
Unity reports that Unity.Cinemachine or a Cinemachine type is missing Cinemachine may be absent, older than 3.1, or excluded from a custom assembly definition that contains the integration scripts Install Cinemachine 3.1 or later from Package Manager. If the scripts were moved under an assembly definition, add Unity.Cinemachine and the required Opsive assemblies to that assembly’s references.
The Cinemachine View Types are absent from the add menu The integration may not have imported or may have stopped compiling Resolve the first Console error, then reimport the Ultimate Character Controller Version 3 Cinemachine integration.
Play Mode logs that a Cinemachine Brain must be set up Cinemachine Brain is not on the same GameObject as Camera Controller Move or add Cinemachine Brain to the Unity Camera that owns Camera Controller.
Play Mode logs that the Cinemachine Camera must be set The View Type’s Cinemachine Camera field is empty Assign the intended Cinemachine Camera component to that View Type. Use a different camera for each perspective.
The camera is present but never becomes Live Another Cinemachine Camera, output channel, Timeline track, or inactive GameObject may own the Brain Check the Brain’s channel and active camera, stop the competing owner, and let the Ultimate Character Controller View Type activate its assigned camera.
Look input moves the shot but items aim in another direction Use Character Look Direction, the crosshairs, View Type, and Movement Type may describe different facing rules Choose whether character forward or camera/crosshairs should own the look direction, then test the matching Movement Type and item setup.
A nonzero Ultimate Character Controller camera offset has no effect Cinemachine Camera Offset may be missing from the assigned camera Add the extension, set Apply After to Noise, and retest the View Type’s Camera Offset.
Recoil is absent, exaggerated, or disagrees with item aim Check rotational spring forces and Cinemachine Spring Extension The supplied extension applies correction at all four Cinemachine 3.1.7 stages. Avoid rotational spring forces until the extension is corrected to apply once, then compare rendered and gameplay direction.
The third-person camera passes through walls No Cinemachine obstruction extension is configured Add Cinemachine Deoccluder or another suitable Cinemachine 3 collision workflow and configure its layers and obstacle behavior.
Perspective switching disables an unexpected camera or blends unpredictably Inspect the Brain’s live camera at deactivation, shared camera assignments, and both systems’ blends Give each perspective its own camera and one blend owner. Coordinate handoffs so the outgoing assigned camera is live; the current bridge otherwise disables whichever camera is live.
Look input has no effect, or UCC pitch limits do not constrain the shot Check Cinemachine Input Axis Controller or the custom axis driver and Pan Tilt settings Configure axis input explicitly and set pitch limits on Cinemachine Pan Tilt. The bridge does not write its accumulated UCC pitch/yaw into those axes.
Dynamic gravity works in one perspective but not the other Multiple View Types overwrite the same Brain world-up reference during initialization Use one view for the supported baseline, or correct world-up ownership before relying on dual-perspective dynamic gravity.
First-person arms disappear or render incorrectly The first-person Overlay Render Type, First Person Camera, or culling masks may not match the active render pipeline Restore the Ultimate Character Controller first-person overlay setup and verify it before tuning the Cinemachine composition.

Developer reference

The integration supplies CinemachineViewType, FirstPersonCinemachine, ThirdPersonCinemachine, CinemachineUpdater, and CinemachineSpringExtension.

During initialization, CinemachineViewType requires a CinemachineBrain on the Camera Controller GameObject and an assigned CinemachineCamera. It adds CinemachineBrainEvents and CinemachineUpdater when needed. The updater sets the Brain to manual updates and invokes it once during the render frame so Cinemachine runs in the intended order with Ultimate Character Controller simulation.

When the View Type activates, the bridge enables Cinemachine Brain, raises its assigned camera above the current live camera’s priority, synchronizes field of view, and activates that camera GameObject. Deactivation lowers the assigned camera’s priority but disables the GameObject returned by Brain.ActiveVirtualCamera. Those objects can differ after an external handoff.

The View Type returns character forward or the Cinemachine Camera’s rotation for gameplay look and applies configured crosshair/spring corrections. Rotate does not drive Pan Tilt or Orbital Follow axes. The supplied spring extension applies its correction at every pipeline stage, while UCC look applies it once, so correct that discrepancy before relying on matched recoil. Each view also assigns its own world-up Transform in Awake without reassigning the Brain on activation. FirstPersonCinemachine handles perspective and height-change events for overlays and vertical offset; preserve those responsibilities in custom extensions.