
View Types
View Types define the rotation and the position that the camera should orient itself towards. The camera uses the horizontal and vertical inputs (Mouse X/Mouse Y by default) from the PlayerInput component in order to determine which direction it should move. The default view type will rotate the camera, move the character, and then position the camera. This order allows the character to correctly orient itself towards the camera direction.
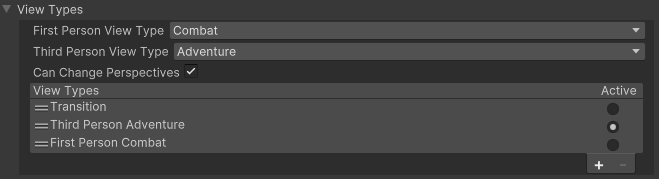
View Types can be selected within the ViewType Reorderable List on the Camera Controller component. View Types can be added and removed through this list as well.
API
View Types can be retrieved by using the GetViewType method on the Camera Controller component. The ActiveViewType property will contain a reference to the View Type that is currently being used by the Camera Controller.
using UnityEngine;
using Opsive.Shared.Camera;
using Opsive.UltimateCharacterController.Camera;

public class MyObject : MonoBehaviour
{
    /// <summary>
    /// Retrieves the combat view type.
    /// </summary>
    private void Start()
    {
        var camera = CameraUtility.FindCamera(null);
        if (camera == null) {
            return;
        }

        var combatViewType = camera.GetComponent<CameraController>().GetViewType<Opsive.UltimateCharacterController.FirstPersonController.Camera.ViewTypes.Combat>();
        if (combatViewType != null) {
            Debug.Log("Found the Combat view type.");
        }
    }
}
Create a New View Type
It is rare that you will need to create a new View Type but if you do it is pretty straight forward if you do need to do so. New View Types can be created by inheriting the ViewType class and implementing three methods:
/// <summary>
/// Rotates the camera according to the horizontal and vertical movement values.
/// </summary>
/// <param name="horizontalMovement">-1 to 1 value specifying the amount of horizontal movement.</param>
/// <param name="verticalMovement">-1 to 1 value specifying the amount of vertical movement.</param>
/// <param name="immediateUpdate">Should the camera be updated immediately?</param>
/// <returns>The updated rotation.</returns>
Quaternion Rotate(float horizontalMovement, float verticalMovement, bool immediateUpdate);

/// <summary>
/// Moves the camera according to the current pitch and yaw values.
/// </summary>
/// <param name="immediateUpdate">Should the camera be updated immediately?</param>
/// <returns>The updated position.</returns>
Vector3 Move(bool immediateUpdate);

/// <summary>
/// Returns the direction that the character is looking.
/// </summary>
/// <param name="lookPosition">The position that the character is looking from.</param>
/// <param name="characterLookDirection">Is the character look direction being retrieved?</param>
/// <param name="layerMask">The LayerMask value of the objects that the look direction can hit.</param>
/// <param name="useRecoil">Should recoil be included in the look direction?</param>
/// <returns>The direction that the character is looking.</returns>
Vector3 LookDirection(Vector3 lookPosition, bool characterLookDirection, int layerMask, bool useRecoil);
Rotate
The Rotate method will do the actual rotation for the camera. A quaternion is returned which the Camera Controller will then use to set the rotation of the camera.
Move
The Move method will position the camera. A Vector3 is returned which the Camera Controller will then use to set the position of the camera.
LookDirection
Specifies the direction that the character should look. This method is called by the character/item classes when it need to retrieve the a directional rotation, such as determining which direction the head should look for IK or determining which direction a weapon should fire.
The following properties must also be implemented:
public abstract bool FirstPersonPerspective { get; }
public abstract float Pitch { get; }
public abstract float Yaw { get; }
public abstract Quaternion CharacterRotation { get; }
public abstract float LookDirectionDistance { get; }
FirstPersonPerspective
Is the View Type used when the character is in a first person perspective?
Pitch
Returns the pitch of the camera. This property is used when switching View Types.
Yaw
Returns the yaw of the camera. This property is used when switching View Types.
CharacterRotation
Returns the rotation of the character. This property is used when switching View Types.
LookDirectionDistance
Specifies the max distance that the character can look ahead from their current position. This is mostly used by the View Type within the LookDirection method.
Example
The following View Type is an example of a complete view type that will keep the camera in the same position/rotation. It can be used as a stationary camera.
using Opsive.UltimateCharacterController.Camera.ViewTypes;

public class MyViewType : ViewType
{
    private float m_Pitch;
    private float m_Yaw;
    private Quaternion m_BaseCharacterRotation;

    public override bool FirstPersonPerspective { get { return false; } }
    public override float Pitch { get { return m_Pitch; } }
    public override float Yaw { get { return m_Yaw; } }
    public override Quaternion BaseCharacterRotation { get { return m_BaseCharacterRotation; } }
    public override float LookDirectionDistance { get { return 100; } }

    public override void ChangeViewType(bool activate, float pitch, float yaw, Quaternion baseCharacterRotation)
    {
        if (activate) {
            m_Pitch = pitch;
            m_Yaw = yaw;
            m_BaseCharacterRotation = baseCharacterRotation;
        }
    }

    public override Quaternion Rotate(float horizontalMovement, float verticalMovement, bool immediateUpdate)
    {
        return m_Transform.rotation;
    }

    public override Vector3 Move(bool immediateUpdate)
    {
        return m_Transform.position;
    }

    public override Vector3 LookDirection(Vector3 lookPosition, bool characterLookDirection, int layerMask, bool useRecoil, bool includeMovementSpread)
    {
        return m_CharacterRigidbody.rotation * Vector3.forward;
    }
}