Use the InControl integration when InControl should translate keyboard, mouse, controller, or touch input while Ultimate Character Controller continues to run the character, camera, abilities, and items. The integration replaces the character’s Opsive Unity input component with InControl Input; it does not configure InControl’s devices, bindings, UI navigation, or multiplayer joining for you.

Before you begin

  • Start with an Ultimate Character Controller Version 3 character that moves, looks, jumps, and uses one representative item before changing its input provider.
  • Install InControl from the Unity Asset Store first and complete its own project setup. When using InControl’s Unity Input Manager backend, its documented menu is InControl > Setup Input Manager. Add its runtime manager with GameObject > InControl > Manager.
  • Commit or back up the project before importing the bridge or regenerating ProjectSettings/InputManager.asset.
  • Use only one input provider for the character. Keeping Opsive Unity Input, Opsive Unity Input System, and InControl Input active together can duplicate actions or leave Player Input Proxy pointing to the wrong component.

The bundled Ultimate Character Controller Version 3 integration assembly declares no minimum or maximum InControl version. The Asset Store listed InControl 1.8.11 when this page was verified, but that current listing is not a compatibility guarantee for every Ultimate Character Controller Version 3 release. Import the installed pair, resolve compilation first, and run the Play Mode checks below before updating a production scene.

Import the integration

  1. Install InControl and wait for Unity to finish compiling.
  2. Open Tools > Opsive > Ultimate Character Controller > Integrations Manager, select Available Integrations, find InControl, and use its Integration action to open the current distribution route.
  3. Sign in to Opsive Downloads, download the InControl integration, and import it with Assets > Import Package > Custom Package. The bridge is not in the base product’s Integrations folder before download; importing it creates Assets/Opsive/Shared/Integrations/InControl. Import InControl first because the bridge assembly compiles against its types.
  4. Confirm that Unity has added Assets/Opsive/Shared/Integrations/InControl and that the Console has no missing InControl namespace, type, or assembly errors.

Replace the character input provider

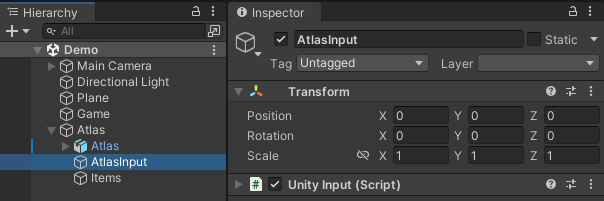
  1. In the Hierarchy, expand the character and select its <CharacterName>Input child, such as AtlasInput.

    The AtlasInput child selected beneath the Atlas character with its legacy Unity Input component before replacement.

  2. Remove the existing Opsive Unity Input component. If the character used Unity’s Input System, remove the Opsive Unity Input System component and disable or remove the Unity Player Input component that belonged to that route. Keep the input GameObject and the character’s Player Input Proxy.

  3. On the same input GameObject, select Add Component, search for InControl Input, and add it.

  4. On the character, assign Player Input Proxy > Player Input to the new InControl Input component.

  5. Ensure the scene contains the InControl Manager created by GameObject > InControl > Manager.

  6. For a first test, set InControl Input > Bindings Type to Opsive.Shared.Integrations.InControl.SampleBindings.

  7. If the Setup Manager previously added Ultimate Character Controller Virtual Controls or On Screen Controls, disable or remove that input UI while testing InControl. The supplied bridge does not translate those controls; use InControl’s touch controls and include them in the selected bindings instead.

Configure the bindings

The sample bindings are a starting point for a clean integration test. They map common Ultimate Character Controller names such as Horizontal, Vertical, Mouse X, Mouse Y, Controller X, Controller Y, Jump, Fire1, Fire2, Reload, Action, item selection, and perspective switching to keyboard, mouse, and controller controls.

For a production game, create a class that inherits InControl’s PlayerActionSet and implements the integration’s IBindings interface, then enter its full namespace and class name in Bindings Type. The class must:

  • create its actions in CreateBindings();
  • return the matching action from GetInputControl(string name); and
  • use the exact names requested by the Ultimate Character Controller ability, item action, camera, or movement setting.

Follow InControl’s binding actions to controls workflow for the bindings themselves. Ultimate Character Controller reads each axis as one float, so build movement and look axes with InControl one-axis actions. A TwoAxisInputControl produces a warning and returns zero through this bridge; expose horizontal and vertical as separate one-axis controls instead.

The supplied InControl Input component enables Disable Cursor and Enable Cursor With Escape by default. This locks and hides the cursor while playing, releases it with Escape, and captures it again after a click outside UI. Disable or coordinate these options when a menu, pointer-driven game, or another camera system owns the cursor.

Choose device, touch, and UI ownership

Scenario Recommended ownership
One local player Leave the action set’s InControl Device unassigned unless the game needs a fixed controller. InControl then chooses an active device when the action set is used.
Local split-screen Give every character its own InControl Input component and binding instance, point each Player Input Proxy to its own component, and assign a different InControl device in code. The bridge has no Player or Device Inspector field and does not pair joining controllers.
Keyboard and mouse plus controller Decide whether both should control the same player. The sample bindings include both, so copying them to multiple local players can make one keyboard control more than one character.
Touch controls Use InControl’s touch-control workflow and bind those controls to the same actions. Ultimate Character Controller’s generated Virtual Controls and On Screen Controls target its Unity input providers, not this bridge.
Controller-driven menus On the EventSystem, add Add Component > Event > InControl Input Module and disable or remove Standalone Input Module. By default this UI module reads InControl’s current active device; per-player menus require their own deliberate action and ownership setup.

See Split Screen for camera, viewport, and HUD ownership. A second Camera Controller does not separate input devices.

Verify in Play Mode

  1. Enter Play Mode and confirm that the Console does not report No bindings specified, No InControl Manager was found, or an inability to create the configured PlayerActionSet.
  2. Test movement and look with the intended keyboard, mouse, or controller. The character should respond once per input, and releasing an axis should return it to zero.
  3. Test Jump and one representative ability or item action. The Ultimate Character Controller Inspector name and the binding name must produce the same action.
  4. Press Escape and click back in the Game view to verify the intended cursor behavior. Open and close any full-screen menu and confirm gameplay input remains disabled only while that menu owns it.
  5. If the game uses touch, test the InControl touch layout on the target device rather than relying on mouse simulation alone.
  6. For split-screen, test every controller separately. One device should move only its assigned character, and each camera and HUD should continue following that same character after respawn and a scene reload.
  7. Make a development build for the target platform and repeat the controller attach, detach, pause, and reconnect flows supported by that platform.

Troubleshooting

Symptom Check Fix
Unity reports missing InControl namespaces or assembly references. The bridge was imported before InControl, or the installed InControl package does not provide the referenced runtime assembly. Install InControl first, let it compile, then reimport the bundled Ultimate Character Controller Version 3 InControl.unitypackage. If the pair still fails, return to the last verified versions rather than editing assembly references blindly.
The Console reports No bindings specified. InControl Input > Bindings Type is empty. Enter the full type name, such as Opsive.Shared.Integrations.InControl.SampleBindings.
The Console reports that it cannot create the action set or that it does not implement IBindings. The type name is misspelled, cannot be resolved, or the class does not inherit PlayerActionSet and implement IBindings. Correct the namespace and class name, fix compilation, and use a class that implements both required contracts.
The Console reports No InControl Manager was found. No enabled InControlManager exists when InControl Input awakens. Add it with GameObject > InControl > Manager, then reload the scene or re-enter Play Mode.
The character does not respond, but InControl sees the device. Player Input Proxy > Player Input may be empty, reference the removed provider, or point to another character’s input object. Assign this character’s InControl Input component and disable competing providers.
One ability fails while movement works. Its requested input name is absent from GetInputControl, differs in spacing or capitalization, or was not created by CreateBindings(). Add the exact Ultimate Character Controller input name to the binding map and retest that one action.
The Console warns that Ultimate Character Controller does not support TwoAxisInputControl. A movement or look name returns an InControl two-axis action. Return two separate one-axis controls, such as horizontal and vertical, through separate Ultimate Character Controller names.
One controller moves multiple characters. Their action sets have no fixed Device, include the same devices, or share global keyboard and mouse bindings. Assign a distinct device to each action set after it initializes, restrict included devices where appropriate, and remove shared keyboard bindings from device-exclusive players.
Gamepad navigation does not operate a menu. The EventSystem still uses a different input module, or InControl Input Module has not been given the intended submit, cancel, and move actions. Configure InControl’s UI module separately; the Ultimate Character Controller character bridge does not install or bind it.
Actions fire twice. More than one Opsive input provider remains enabled or two proxies reference the same provider. Keep one provider per player and verify each Player Input Proxy reference.

Developer reference

Opsive.Shared.Integrations.InControl.InControlInput derives from Opsive’s PlayerInput. During Awake() it resolves Bindings Type, creates that PlayerActionSet, verifies IBindings, calls CreateBindings(), and checks for an InControlManager. Button reads map to IsPressed, WasPressed, and WasReleased; axis reads accept OneAxisInputControl.Value or RawValue.

The ActionSet property exposes the created PlayerActionSet. Assign a local player’s device only after InControl Input has initialized successfully:

using InControl;
using Opsive.Shared.Integrations.InControl;

public static void AssignDevice(InControlInput playerInput, InputDevice device)
{
    playerInput.ActionSet.Device = device;
}

InControl also exposes IncludeDevices and ExcludeDevices on the action set when a game needs a broader ownership policy. The supplied Ultimate Character Controller bridge does not provide an Inspector for those lists, a controller-join flow, binding persistence or rebinding UI, an InControl UI module, or touch controls. Build those responsibilities with InControl and keep Ultimate Character Controller connected through the character’s Player Input Proxy.

For API behavior and action-set lifetime guidance, see InControl’s PlayerActionSet reference. The discontinued open-source edition is frozen at 1.4.4; current feature development is distributed through the Asset Store, so do not treat the GitHub edition as a current substitute for the installed package.