Third Person Pseudo3D (2.5D)
The Pseudo3D (2.5D) movement type allows the character to move relative to a 2.5D camera. This Movement Type has many options that can be configured to fine tune the movement such as if the character should be able to move along the local z axis. An optional Path can be used so the character will follow a cubic bezier curve. The Pseudo3D (2.5D) view type should be used in conjunction with this movement type.
| Input | Character Results |
| Forward | If Allow Depth Movement is enabled the character will move in the forward direction relative to the camera (away from the camera, into the scene). If Allow Depth Movement is disabled then the character will not move. |
| Left | The character will move to the relative left direction of the camera. If Look In Move Direction is enabled then the character will rotate in this direction as well. |
| Right | The character will move to the relative right direction of the camera. If Look In Move Direction is enabled then the character will rotate in this direction as well. |
| Backwards | If Allow Depth Movement is enabled the character will move in the backwards direction relative to the camera (into the camera). If Allow Depth Movement is disabled then the character will not move. |
Setup
A 2.5D character can be setup by performing the following:
- Create a new character using the Character Manager. The perspective should be Third Person and have a Movement Type value of Pseudo3D.
- Ensure your camera is setup to use the Pseudo3D View Type.
- Assign the character to the camera’s Character field.
- Optionally setup the path that the character should follow (below).
Path
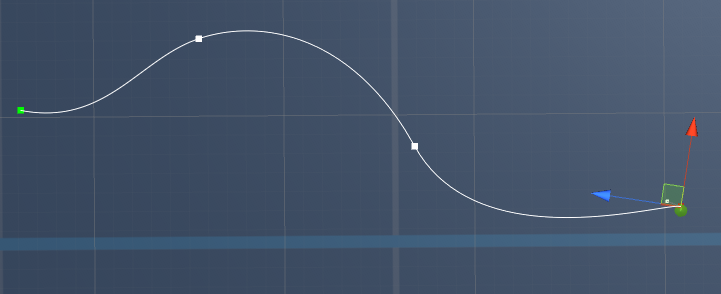
A curve can define the orientation that the camera faces as the character traverses the scene. This path can be setup by doing the following:
- Add a new GameObject to your scene that will be the container for the curve. Add the Path component to this GameObject.
- Click on the “Add Curve Segment” button under the path component. A new curve segment will be added to the scene.
- Adjust the endpoint positions of the curve. A new segment can be added by clicking on the “Add Curve Segment” button again.
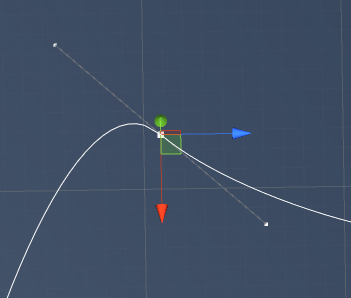
- The start curve point will be colored green, and the end curve point will be colored red. Points in the middle of the curve will be white.
- Curve points can be adjusted by clicking on them. Endpoints have a single tangent associated with them which can adjust the curve’s slope. Midpoints have two tangents associated with it and is also used for adjusting the curve’s slope. The tangent can be adjusted by first selecting an midpoint or endpoint and then selecting the smaller point connected to it.
- Assign the newly created path to the Path field of the 2.5D Movement Type.
- Add the Follow 2.5D Path ability to your character.
Inspected Fields
Allow Depth Movement
Can the character move along the depth axis (the z axis relative to the camera)?
Look In Move Direction
Should the character look in the direction of movement?
Look Rotate Buffer
A small buffer used to prevent the character from quickly switching directions when the mouse is near the character’s origin.
Path
The path that the character should orient towards. If null then the character will be oriented towards the look source direction.