Version 3 Migration Guide
Characters, cameras, and items that have been setup using version 2 of the controller can be migrated to version 3. Unity 2021.3.0 or later is required by version 3 of the character controller. In order to migrate to version 3 the following steps must be performed:
- Remove the Assets/Opsive folder from your project.
- Remove the character controller platform defines.
- Import & install version 3.
- Fix any compiler errors within your own code.
- Use the Migration Manager to update your character, camera, and items.
- Adjust your character and item values.
- Update your scene.
More details on the process can be found below.
Remove the Assets/Opsive Folder
Before importing version 3 the Assets/Opsive folder must first be removed. Ensure you do not have any unique assets in this folder and you have backed up your project. Version 3 contains many file changes and is not able to be imported on top of version 2.
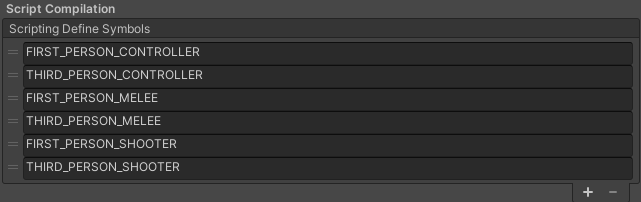
Remove the character controller platform defines.
Within the Player Settings the following compiler defines should be removed:
FIRST_PERSON_CONTROLLER
THIRD_PERSON_CONTROLLER
FIRST_PERSON_MELEE
FIRST_PERSON_SHOOTER
THIRD_PERSON_MELEE
THIRD_PERSON_SHOOTER
ULTIMATE_CHARACTER_CONTROLLER_MULTIPLAYER
ULTIMATE_CHARACTER_CONTROLLER_VR
The appropriate defines will be added after installing version 3.
Import & Install Version 3
After importing version 3 the installer will open. You can also open it from the Tools -> Opsive -> Ultimate Character Controller -> Installer menu option.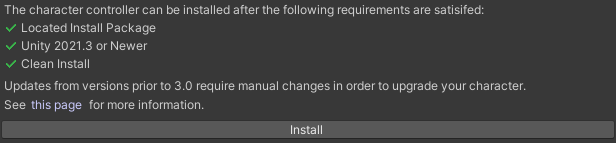
Assuming all of the requirements have been satisfied you can then install version 3.
Fix any Compiler Errors
You are most likely to receive compiler errors in the following areas after upgrading to version 3:
Ability Movement
In version 2 abilities could move the character with the Motor Throttle, Move Direction, or Ability Motor properties. This has been simplified so now to move your character the Desired Movement property should be used.
m_CharacterLocomotion.DesiredMovement = m_Rigidbody.TransformDirection(moveDirection);
Similarly the character should now be rotated with DesiredRotation:
m_CharacterLocomotion.DesiredRotation = targetRotation * Quaternion.Inverse(m_Rigidbody.rotation);
You may have noticed that m_Rigidbody.position/rotation is used instead of m_Transform.position/rotation. The reason for this is because the character moves with Rigidbody.MovePosition/MoveRotation and the transform value may not be up to date if Physics.autoSyncTransforms is disabled.
Ability UpdateAnimator
The Ability.UpdateAnimator method has been deprecated in version 3. The Animator parameters should now be set within the Ability.Update method.
Modular Items
Version 3 now uses a modular item system so the item API has dramatically changed. The Item Actions, such as Shootable Weapon or Melee Weapon, have been removed. If you have subclassed these actions you can switch to using the item modules. See this page for more information.
OnObjectImpact
The parameters called by OnObjectImpact have changed. Instead of have a separate parameter for each value a new ImpactCallbackContext object has been created.
using UnityEngine;
using Opsive.Shared.Events;

public class MyObject : MonoBehaviour
{
    /// <summary>
    /// Initialize the default values.
    /// </summary>
    public void Awake()
    {
        EventHandler.RegisterEvent<ImpactCallbackContext>(gameObject, "OnObjectImpact", OnImpact);
    }

    /// <summary>
    /// The object has been impacted with another object.
    /// </summary>
    /// <param name="ctx">The context of the impact.</param>
    private void OnImpact(ImpactCallbackContext ctx)
    {
        Debug.Log("Event received " + name + " impacted by " + ctx.ImpactCollisionData.SourceGameObject + " on collider " + ctx.ImpactCollisionData.ImpactCollider + ".");
    }

    /// <summary>
    /// The GameObject has been destroyed.
    /// </summary>
    public void OnDestroy()
    {
        EventHandler.UnregisterEvent<ImpactCallbackContext>(gameObject, "OnObjectImpact", OnImpact);
    }
}
Migration Manager
After all of the compiler errors have been fixed you can navigate to the Migration Manager in order to update your character, camera, and items. The Migration Manager can be found under the Tools -> Opsive -> Ultimate Character Controller -> Migration Manager menu option.
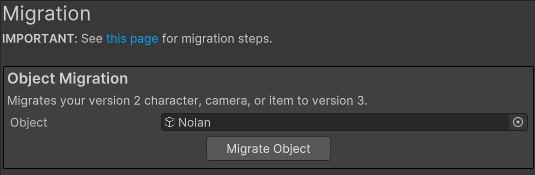
The Migration Manager will update your character, camera or item to the equivalent set of version 3 components. Items went through a significant upgrade so the Migration Manager is not able to setup the same functionality. You will instead need to use the modular item system to recreate the same functionality.
Update Character and Item Values
Most of the character values are similar between version 2 and 3. The locomotion algorithm changed so the Motor Acceleration/Damping values will need to be updated on the Ultimate Character Locomotion component. In order to have similar move speeds you can multiply the version 2 Motor Acceleration value by 17.7 and the version 2 Motor Damping value by 20.
As mentioned earlier, the item system underwent a significant upgrade so any item action functionality will need to be recreated after updating the item.
Update Your Scene
When you open your scene that was using version 2 you’ll notice that there are some missing scripts. In version 3 the Kinematic Object Manager has been removed so you will have one missing script on the Game GameObject. The version 2 Aim Assist components have been removed. These components were added to the camera so you can also remove those missing scripts.
After all of the missing scripts have been removed you should then update your scene within the Setup Manager. This will add the new managers that are used by the controller.