Moving Platform keeps elevators, trains, doors, and other moving surfaces synchronized with the Ultimate Character Controller character. Use it for a waypoint-driven object; use Animator Update when an Animator drives the motion.

Before you begin

  • Prepare the scene and its managers with Quick Setup.
  • Confirm that the project has the required MovingPlatform layer in the Layer Manager.
  • Decide which transform will actually move. Put its visible geometry and solid colliders on that transform.

Set the component GameObject, and any separate child surface collider that the character can stand on, to the MovingPlatform layer. The component warns and corrects its own GameObject at runtime, but it does not change child layers.

The moving platform GameObject uses the MovingPlatform layer.

Build a waypoint platform

  1. Create an empty GameObject to hold the route. Leave this container stationary.
  2. Add the platform object and its colliders as a child of the route container.
  3. Add the Moving Platform component to the platform object. Unity also adds the required Rigidbody; the component configures that Rigidbody for its synchronized movement.
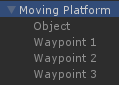
  4. Create one GameObject for each destination. Keep these waypoints beside the platform object under the stationary route container, not below the moving object.
  5. Position and rotate each waypoint. Place the first waypoint at the platform’s starting pose unless the platform should travel there when Play Mode begins.
  6. Open Path on the Moving Platform component. Add rows and assign each Transform in travel order.
  7. For each waypoint, optionally set Delay and State. The state becomes active when that waypoint is the destination and remains active through its delay, until another destination is selected.
  8. Choose Direction and Movement Type, then open Movement to set the speed and interpolation.

A stationary Moving Platform route container with the moving Object and three sibling waypoint GameObjects.

The Scene view draws the waypoint poses and connecting route. Under Editor, enable Draw Debug Labels to include the delay and distance labels while tuning the path.

Choose the route behavior

Scenario Movement Type What it does
Elevator, shuttle, or sliding door Ping Pong Travels to the last waypoint, reverses, and follows the same route back.
Train or continuously circulating platform Loop Travels through the list and then takes a direct segment from the last waypoint to the first.
Called elevator or scripted destination Target Follows the waypoint sequence until it reaches Target Waypoint, then stops there.
Unpredictable destination Random Selects a waypoint at random after each delay. Use Random Seed for a repeatable sequence, or -1 to leave the random sequence unseeded by this component.

Direction controls whether the route begins by increasing or decreasing the waypoint index. In Target mode, choose the direction that leads through the intended intermediate stops.

Tune movement and rotation

  • Start with Movement Speed 0.1, Movement Interpolation Ease In Out, and Rotation Interpolation Sync To Movement for a smooth passenger platform.
  • Choose Ease In or Ease Out when only the departure or arrival should be softened. Ease Out 2, Slerp, and Lerp provide alternative path interpolation when the standard easing does not fit the motion.
  • Sync To Movement blends between waypoint rotations as the platform travels. Ease Out and Custom Ease Out let the rotation settle independently; the latter reveals Rotation Ease Amount.
  • Choose Custom Rotate for a continuously revolving object and set Custom Rotation Speed. This rotation mode also works without waypoints.
  • Max Rotation Delta Angle limits the rotation applied in one simulation step. Keep -1 when no limit is required.

Do not animate or otherwise move the same transform independently while the Moving Platform component controls it.

Start or change the platform through gameplay

Open Interaction on the Moving Platform component for these options:

  • Enable Enable On Interact when the platform should remain stopped until the character activates it. Add an Interactable component to the scene object, include Moving Platform in its Targets, and configure the character’s Interact ability.
  • Enable Change Directions On Interact when an already-moving platform should reverse. Use this instead of Enable On Interact; when both are enabled, starting the platform takes precedence and the interaction does not reverse it.
  • Add a trigger Collider and set Character Trigger State when standing on the platform should activate a State System state on the platform. Character Trigger Layer determines which colliders count. The first matching collider enables the state and the last one to leave disables it.

The State beside each waypoint is a separate route state: it is active while that waypoint is the current destination. Use route states for direction-specific effects and the trigger state for effects that depend on a character being aboard.

Use Animator-driven motion

When an Animator controls the platform, add Animator Update to the animated root instead of Moving Platform. Animator Update advances the Animator through the Ultimate Character Controller simulation so the character and camera receive synchronized motion.

Set the GameObject of each moving surface collider to the MovingPlatform layer. Assign Moving Children only when the Animator moves child transforms while its root stays in place; list each child whose position and rotation must be smoothed.

How the character follows the platform

While grounded, Character Locomotion recognizes a surface collider whose hit transform is on the MovingPlatform layer and tracks that transform’s position and rotation. The character is not reparented, so its own locomotion and jump behavior continue to run normally. The collider the character stands on must move with the same transform hierarchy that Moving Platform or Animator Update synchronizes.

Verify in Play Mode

  1. Enter Play Mode without the character on the platform. Confirm that the platform visits the waypoint positions and rotations in the selected order, pauses for each Delay, and follows the expected loop, reversal, target, or random behavior.
  2. Watch the component in the Inspector. In the Scene view, the green route line identifies the current destination while the component is enabled.
  3. Step onto the platform. The character should remain stable relative to its surface while still accepting movement and jump input.
  4. If interaction is enabled, activate the configured Interactable and confirm that the platform starts or reverses according to the selected option.
  5. If a waypoint or trigger state is configured, confirm that the state becomes active only during its intended route or occupancy condition.

Troubleshooting

Symptom Check Fix
The platform does not move. The Waypoints list is empty, contains a missing transform, Movement Speed is zero, Target Waypoint is already reached, or Enable On Interact started the component disabled. Assign every waypoint, use a positive speed, select a different valid target, or trigger the configured Interactable. A missing waypoint disables the component when Play Mode starts in the Unity Editor.
The character jitters, slides, or does not follow. The moving surface is not on the MovingPlatform layer, its collider is outside the synchronized hierarchy, or two systems drive the same transform. Set up the required layer, move the collider with the synchronized object, and use either Moving Platform or Animator Update as the movement driver.
Loop mode takes an unwanted shortcut. Loop connects the last waypoint directly to the first. Add waypoints along the return route or use Ping Pong.
Interact starts the platform but never reverses it. Both Enable On Interact and Change Directions On Interact are enabled. Keep only the behavior required for this platform, or switch the option from another script after it starts.
A character trigger state never activates. The platform has no trigger Collider, Character Trigger Layer excludes the character collider, or the state name is not configured on the platform. Add a trigger to the platform’s Rigidbody hierarchy, include the character layer, and add a matching state to the Moving Platform component.

Developer reference

MovingPlatform implements IInteractableTarget and ISmoothedObject. Its commonly useful public members include Waypoints, Direction, MovementType, TargetWaypoint, MovementSpeed, MovementInterpolation, RotationInterpolation, CharacterTriggerLayer, CharacterTriggerState, EnableOnInteract, ChangeDirectionsOnInteract, NextWaypoint, and ActiveCharacterCount.

Released defaults

Inspector area Default configuration
Path Direction is Forward, Movement Type is Ping Pong, Target Waypoint is 0, and Random Seed is 0. A new waypoint has Delay 0 and a blank State.
Movement Movement Speed is 0.1, Movement Interpolation is Ease In Out, Rotation Interpolation is Sync To Movement, Rotation Ease Amount is 0.1, Custom Rotation Speed is (0, 0, 0), and Max Rotation Delta Angle is -1.
Interaction Character Trigger Layer contains the Character layer, Character Trigger State is blank, and both interaction toggles are off.
Editor Gizmo Color is translucent blue and Draw Debug Labels is off.

At startup, Moving Platform configures its required Rigidbody as kinematic with Discrete collision detection and frozen constraints. The Rigidbody reports movement and collisions to Unity; it is not the movement driver.

The component has no dedicated arrival or departure event. For data-driven responses, use the waypoint State or Character Trigger State fields. Code can inspect NextWaypoint and ActiveCharacterCount, or set a target at runtime:

using Opsive.UltimateCharacterController.Objects;

public void SendPlatformTo(MovingPlatform platform, int waypointIndex,
                           MovingPlatform.PathDirection direction)
{
    if (platform == null || platform.Waypoints == null ||
        waypointIndex < 0 || waypointIndex >= platform.Waypoints.Length) {
        return;
    }

    platform.Direction = direction;
    platform.MovementType = MovingPlatform.PathMovementType.Target;
    platform.TargetWaypoint = waypointIndex;
    platform.enabled = true;
}

Character Locomotion normally attaches automatically from the grounded MovingPlatform layer check. For a special attachment that does not use that grounded check, call CharacterLocomotion.SetMovingPlatform(transform, true) and later pass null with the override argument to release it.