Importing
Import the controller package and confirm that Unity compiles it cleanly before configuring a character, camera, or scene in Setup Manager. The runtime package is stored under Packages; the demo is an optional, separate sample import.
Before you begin
- Use Unity 2021.3 or newer, as required by the included Version 3 Installer.
- Back up the project before replacing an older controller installation. A project upgrading from version 2 requires the Version 3 Migration Guide and a clean import.
- Close Play Mode and allow Unity to finish any existing compilation before importing.
Choose the controller package
- Ultimate Character Controller supports First, Third, and Both perspectives.
- Ultimate First Person Shooter supports the First perspective.
- Third Person Controller supports the Third perspective.
Setup Manager’s Perspective popup can display choices that the installed product does not support. Selecting one shows a validation error and prevents Setup Camera. Install the required perspective content first; Both requires both first- and third-person controller content.
Import the controller package
- Import the downloaded Opsive asset into the Unity project and wait for its Installer scripts to compile. The Installer window should open automatically.
- If it does not open, select Tools > Opsive > Ultimate Character Controller > Installer.
- Confirm that the Installer marks Located Install Package and Unity 2021.3 or Newer as satisfied. If Clean Install is shown for an older installation, confirm that requirement as well.
- If a package dropdown is shown, select Ultimate Character Controller, Ultimate First Person Shooter, or Third Person Controller to match the purchased product and required perspective.
- Select Install.
- In Unity’s Import Package window, keep the supplied controller files selected and select Import.
- Wait for Unity to finish importing and compiling before changing project settings.
For an upgrade from version 2, move custom work out of the old Opsive/UltimateCharacterController and Opsive/Shared folders, make a backup, then remove those old folders before using Install.
Verify the package import
Before opening Setup Manager, confirm that:
- The Project window shows Opsive Ultimate Character Controller and Opsive Shared under Packages.
- The Console contains no compiler errors.
- Tools > Opsive > Ultimate Character Controller contains Setup Manager and the other controller managers.
If any check fails, resolve it before continuing to Quick Setup. This prevents package or compiler problems from being mistaken for character-setup problems.
Import the optional sample
The sample provides a configured scene for learning and testing. It is not required for a custom project.
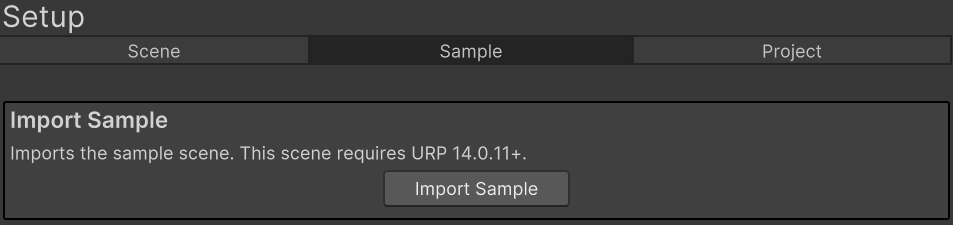
- Select Tools > Opsive > Ultimate Character Controller > Setup Manager.
- Select the Sample tab.
- Select Import Sample and wait for the import to finish.

Configure the sample requirements
The imported sample requires TextMesh Pro, Universal Render Pipeline 14.0.11 or later, and the Unity Input System.
- In Window > Package Manager, confirm that TextMesh Pro, Universal RP, and Input System are installed.
- The Import Sample action imports the UCC Universal Render Pipeline integration automatically. If it is missing, open Setup Manager > Project, select URP under Render Pipeline, and select Import.

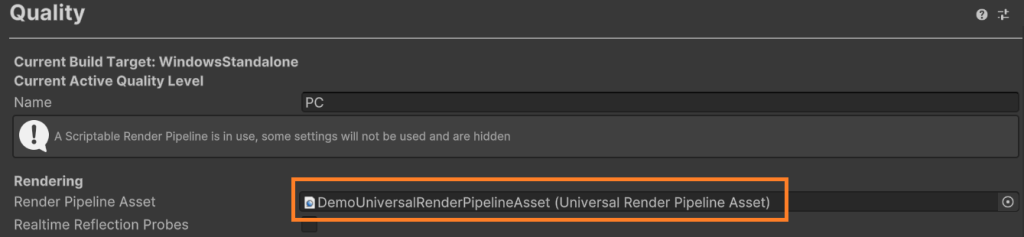
- Assign DemoUniversalRenderPipelineAsset as the active render pipeline asset:
- Before Unity 6, use Edit > Project Settings > Graphics.

- In Unity 6, use Edit > Project Settings > Quality.

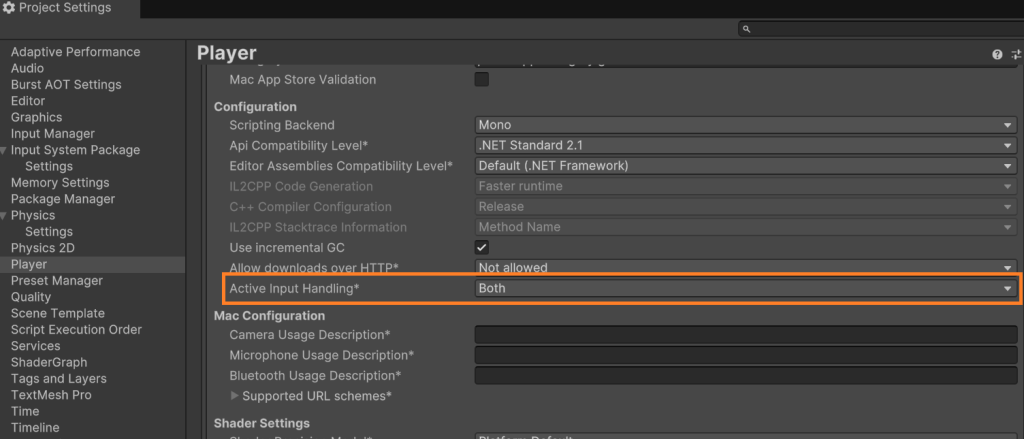
- In Edit > Project Settings > Player, set Active Input Handling to Both or Input System (New).

Verify the sample in Play Mode
Open the imported Demo scene after all requirements are satisfied. Enter Play Mode and confirm that the scene renders with the demo materials, responds to its configured movement and look input, and produces no missing-package or render-pipeline errors in the Console.
If the sample works, return to Quick Setup to configure the project’s own managers, camera perspective, and character.
Troubleshoot import problems
- The Installer cannot locate its install package: Check that the downloaded .unitypackage still exists in Assets/Opsive/Installer/UltimateCharacterController. Reimport the purchased asset if that file is missing, then reopen Tools > Opsive > Ultimate Character Controller > Installer.
- The required perspective is unavailable: Check whether the First Person, Third Person, or combined Ultimate Character Controller package was installed. Install or reimport the product that supplies the required perspective.
- The sample has incorrect materials or shaders: Check the active pipeline, the UCC URP integration, and the assigned DemoUniversalRenderPipelineAsset. Import or assign the missing requirement, then reopen the Demo scene.
- The sample does not respond to input: Check Active Input Handling and the Input System package. Set the handling mode to Both or Input System (New) and restart Unity when prompted.
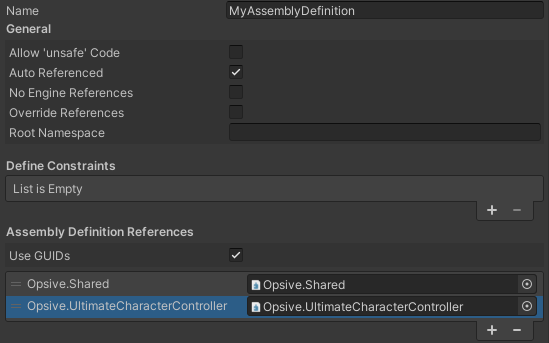
- A script in a custom Assembly Definition cannot resolve UCC types: Check Assembly Definition References and add Opsive.UltimateCharacterController.
- Unity reports one-time animation import warnings: Warnings such as File ‘AimWalkFwd’ has animation import warnings come from the Blender-authored source animations and do not affect playback.
Namespace collision example
An existing project class in the global namespace can hide a controller type with the same name. For example, this project-defined Health class is in the global namespace:
using UnityEngine;
public class Health : MonoBehaviour
{
/// <summary>
/// Damages the object.
/// </summary>
public void Damage()
{
// My implementation.
}
}
After importing UCC, that collision can produce an error such as:
Assets/Opsive/UltimateCharacterController/Demo/Scripts/DamageZone.cs(68,22): error CS1501: No overload for method Damage takes 4 arguments
Check whether the project defines Health or another reported type without a namespace. Move the project class into its own namespace:
using UnityEngine;
namespace MyProject
{
public class Health : MonoBehaviour
{
/// <summary>
/// Damages the object.
/// </summary>
public void Damage()
{
// My implementation.
}
}
}
Use the same fix for other project classes that collide with controller type names.
Related tasks
Developer reference: Assembly Definitions
Scripts compiled by a custom Assembly Definition must reference Opsive.UltimateCharacterController before they can use controller runtime types. Select the project’s Assembly Definition, add Opsive.UltimateCharacterController to Assembly Definition References, and apply the change.