Use these Item Manager configurations as starting points for a firearm, melee weapon, invisible Body action, magic anchor, multi-action item, or item-specific first-person base. Choose the scenario by how the item looks and runs; do not copy an example’s Animator ID unless the same value exists in your Animator Controller.

Before you begin

Complete the shared preparation in Item Creation: create the Item Definition, add the required Character Item Slots, and decide whether to save a reusable prefab or build directly on one scene character.

The examples below use the reusable-prefab route:

  1. Open Tools > Opsive > Ultimate Character Controller > Item Manager.
  2. When Item or First Person Base is used, assign a scene object that the manager can copy or modify. The visible-item fields may use model assets or scene objects; the builder instantiates them into the generated item.
  3. Leave Character empty, choose Slot ID, assign Item Definition, and keep Add Item Prefab to Item Definition enabled.
  4. Set Animator Item ID to a value implemented by the character’s Animator Controller. The values shown here match the supplied controller; see Default Animator Values.
  5. Enable at least one perspective and add the action that represents the gameplay. Both Add First Person Item and Add Third Person Item begin enabled.
  6. Select Build Item, save the prefab, and configure the generated action modules, Item Set Rules, pickups, and animation states that the scenario needs.

The Item Manager adds required Animator parameters to an assigned visible-object controller, but it does not create animation clips or states. Leave Animator Controller empty when the visible mesh has no independent animation.

Choose a starting setup

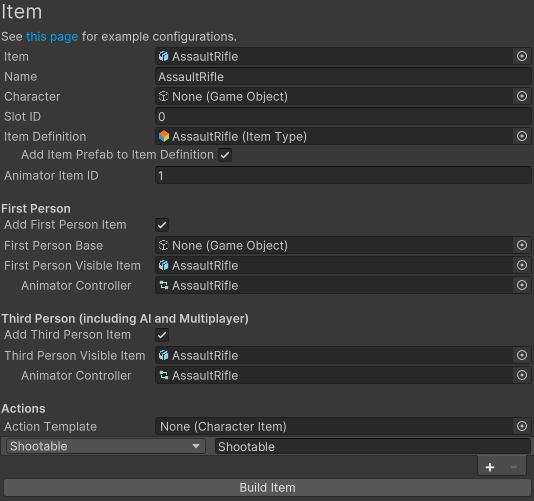
Assault rifle

Use this setup when the first- and third-person weapon models each have an Animator Controller for moving weapon parts or item-specific animation.

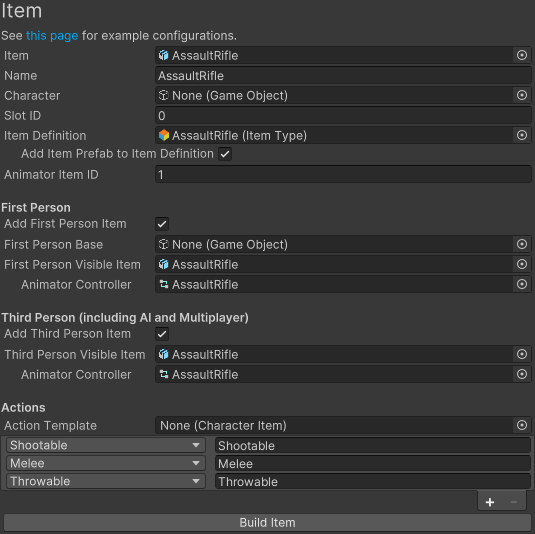
  • Assign the rifle model to both visible-item fields and assign the matching controller beneath each field.
  • Add a Shootable action, then configure its ammunition, shooter, clip, reload, fire-effect, and impact modules after the build.
  • Use Animator Item ID 1 only with the supplied Assault Rifle Animator states. A custom controller may use a different unique value.
  • Keep the third-person item for AI, multiplayer, or any camera that can observe the character from outside first person.

Item Manager configured for an AssaultRifle prefab in slot 0 with Animator Item ID 1, first- and third-person visible models and controllers, and a Shootable action

Runtime result: equipping the matching Item Set activates the correct perspective model, writes the rifle ID to SlotXItemID, and lets the matching Use and Reload abilities drive the Shootable action. The starter action still needs project-specific ammunition, effects, audio, and animation timing.

Sword

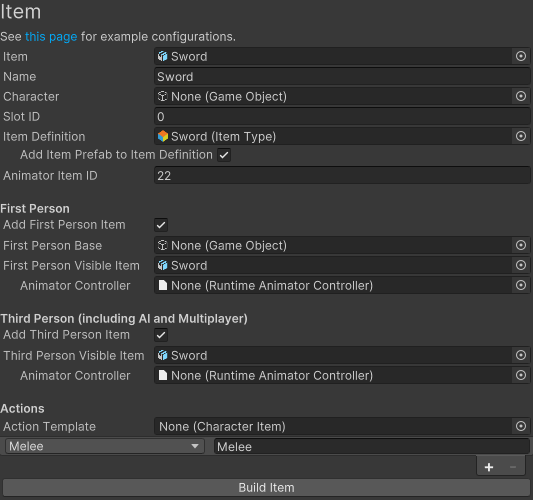
Use this setup when the character Animator supplies the attack animation and the sword meshes do not animate independently.

  • Assign the sword model to both visible-item fields.
  • Leave both visible-item Animator Controller fields empty.
  • Add a Melee action and configure its attack, collision, impact, and recoil modules after the build.
  • Animator Item ID 22 matches the supplied Sword states; choose the ID implemented by a custom controller instead.

Item Manager configured for a Sword prefab with Animator Item ID 22, first- and third-person visible models without separate Animator Controllers, and a Melee action

Runtime result: the character Animator supplies the equipped and attack poses while the Melee action tests the configured hitboxes. An empty visible-item Animator Controller does not remove the character’s Animator.

Invisible Body or unarmed action

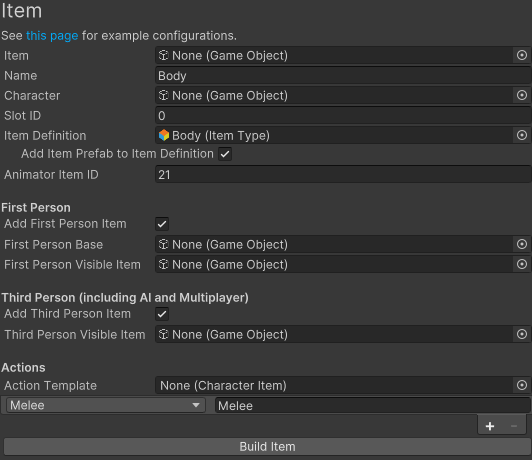
Use an invisible Character Item when an action needs the item and Item Set lifecycle but does not need a separate held model, such as a punch or Body action.

  • Leave Item and both visible-item fields empty, but provide the required Name and Item Definition.
  • Keep the perspectives needed by the character enabled. The Item Manager requires at least one perspective even when neither has a visible object.
  • Add Melee for an unarmed attack, then configure its collision and animation behavior after the build.
  • Animator Item ID 21 matches the supplied Body states.

Item Manager configured for an invisible Body prefab with both perspectives enabled, no visible objects, Animator Item ID 21, and a Melee action

Runtime result: the Character Item can equip and drive the action without spawning a held mesh. Invisible is intentional; verify the action, animation, and collision rather than looking for an item model.

Magic with transform anchors

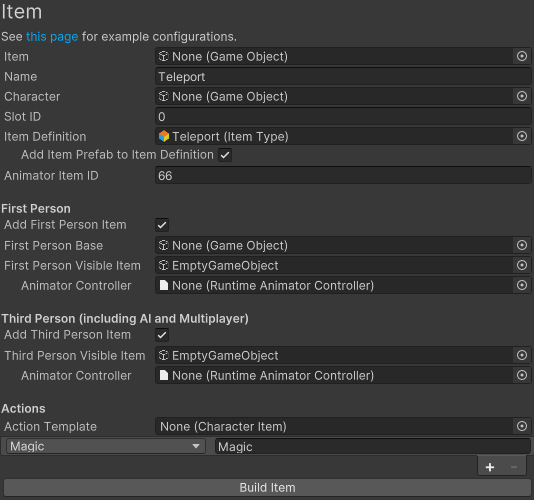
Use empty visible GameObjects when a magic action needs stable first- and third-person transforms for effects, audio, or cast origins but no permanent mesh.

  • Create named empty scene GameObjects at the intended cast origins and assign them as the first- and third-person visible items.
  • Leave their Animator Controller fields empty unless the anchors contain animated children.
  • Add a Magic action and configure its start, cast, stop, and effect modules after the build.
  • Animator Item ID 66 matches the supplied Teleport states; use the value implemented by your spell animation instead.

Item Manager configured for a Teleport magic prefab with empty first- and third-person visible anchors, Animator Item ID 66, and a Magic action

Runtime result: the empty objects follow the correct perspective slots and give the Magic modules a predictable transform. They remain invisible until configured effects or child renderers are spawned or enabled.

Multiple actions on one Character Item

Use multiple actions when one equipped object has genuinely different operations, such as a rifle that can shoot and perform a melee strike. The screenshot demonstrates three action rows; it is not a finished recommendation for combining those three behaviors.

  1. Add each required row under Actions and give it a descriptive name.
  2. Build the item and inspect the generated Character Item Action components and their IDs. The Magic builder leaves ID at 0, even when another action already uses 0; manually give each action a unique ID before Play Mode.
  3. Configure each action’s module groups independently.
  4. Configure the matching Use or Reload ability to target the intended Action ID. Adding several actions does not run all of them from one input automatically.

AssaultRifle Item Manager setup with Shootable, Melee, and Throwable action rows on one Character Item

Runtime result: one Character Item remains equipped while the selected item ability drives one action component. If two actions should share a complex configuration, start from an Action Template and resolve its references carefully.

A generated Throwable action sets the Character Item to drop its full Inventory amount. Do not use that action merely to launch a detachable rifle attachment unless that full-item lifecycle is intended; use a Shootable or custom module for a projectile that should leave the rifle equipped.

Item included in the first-person base

Use this setup when an item-specific first-person base already contains the visible weapon mesh, such as a dedicated arms-and-rifle object. You can use the whole base as the first-person object by leaving the visible-item field empty. Alternatively, assign an existing child as First Person Visible Item: the builder locates and reuses that child within the cloned base instead of duplicating it.

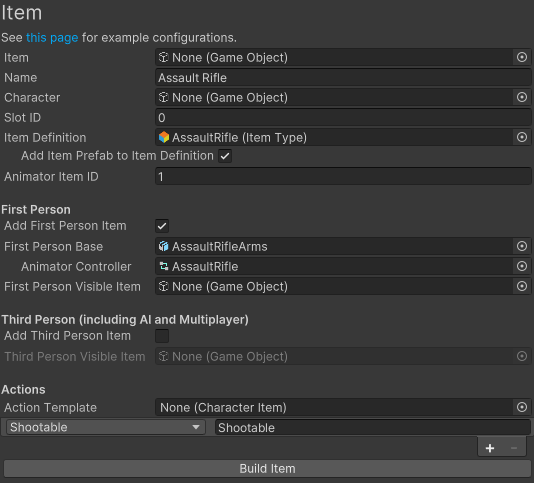
  • Assign the combined scene object to First Person Base.
  • Leave First Person Visible Item empty to use the whole base, or assign its existing weapon child to identify that child as the visible item.
  • Assign the base’s Animator Controller when the combined object animates.
  • Disable Add Third Person Item only for a truly first-person-only character. For AI, multiplayer, or an external camera, enable it and provide a separate third-person visible item.

First-person-only Assault Rifle setup using AssaultRifleArms as the First Person Base, no separate First Person Visible Item, and a Shootable action

Runtime result: the builder clones the base into the Character Item prefab, configures it as the first-person object, and adds a Character Item Slot when no separate visible item exists. Use a separate visible item instead when the weapon must switch independently of shared arms.

Check the generated item

After Build Item completes, verify the saved prefab before configuring gameplay:

  • The root has Character Item with the intended Item Definition, Slot ID, and Animator Item ID.
  • Every enabled perspective has its matching perspective component. Its object or visible-item reference matches the chosen scenario, including deliberate empty references.
  • Every selected action exists once, has a distinct purpose and name, has a unique action ID after inspection and any necessary correction, and contains the expected module groups.
  • Visible objects with an assigned controller have an Animator and Child Animator Monitor. The required UCC parameters exist in that controller.
  • The Item Type’s Prefabs list contains the saved Character Item exactly once.

The builder creates the item structure, not a finished gameplay loop. It does not create Item Set Rules, complete action-module values, input bindings, pickups, drop prefabs, or Animator states and clips.

Connect inventory, equipment, and pickups

  1. Give the character’s Inventory the Item Definition amount, or place an Item Pickup that grants it.
  2. Create an Item Set Rule that permits the definition in the Character Item’s slot.
  3. Configure the character’s item abilities to equip and use the intended set and Action ID.
  4. To drop and collect the item again, assign a Drop Prefab with an Item Pickup to the Character Item.

A pickup grants the Item Definition amount; it does not contain the visible setup. Inventory uses the Item Type’s prefab list to create the Character Item for the correct slot.

Verify in Play Mode

  1. Confirm the Inventory receives the expected Item Definition amount and creates one Character Item for its definition and slot.
  2. Equip its Item Set and confirm only the active perspective object is visible.
  3. Watch SlotXItemID and confirm it changes to the configured Animator Item ID.
  4. Use every configured action separately and confirm the matching action modules, animation, audio, effects, and collision run.
  5. Switch perspective or observe an AI or remote character and confirm the third-person object is present when required.
  6. Collect and drop the item once. Confirm the Inventory amount, equipped set, visible object, and pickup remain synchronized.

Troubleshoot a common setup

Symptom Check Fix
Build Item is disabled Read the manager’s validation message; check Name, Item Definition, enabled perspectives, scene objects, and matching slot IDs Supply the missing value or correct the slot. Keep at least one perspective enabled.
The item equips but is invisible Check whether the scenario deliberately leaves a visible field empty and whether the active perspective has an object Assign a visible object, or keep it empty only for Body/unarmed or an integrated first-person base.
The first-person base appears but the weapon does not Check whether the weapon renderer is actually inside First Person Base when First Person Visible Item is empty Put the mesh inside the item-specific base or assign it separately as First Person Visible Item.
The local player sees the item but AI or remote players do not Check Add Third Person Item and Third Person Visible Item Enable the third-person perspective and assign a world-space model.
The correct item equips with the wrong animation Compare Animator Item ID with the implemented SlotXItemID states Use the controller’s real ID and add the required animation states; the manager adds parameters, not states.
A generated action does nothing Check its modules and the Action ID selected by the matching item ability Configure the starter modules and point Use or Reload at that action.
A pickup grants the amount but nothing equips Check the Item Type’s prefab list, Character Item Slot ID, and Item Set Rules Add the saved prefab once and create a valid set for that definition and slot.

For a deeper diagnostic path, use Item Troubleshooting.

Developer notes

The Item Builder creates a Character Item root, adds one perspective component for each enabled perspective, clones the selected scene objects into the generated hierarchy, and adds the selected Character Item Action components. A visible object receives an Audio Source, and an assigned Animator Controller receives an Animator, Child Animator Monitor, and the standard UCC parameters.

When First Person Base is supplied without First Person Visible Item, the builder uses the cloned base as the perspective object and adds a Character Item Slot to it. With multiple actions, IDs distinguish the components that Use and Reload select. Inspect and correct them after building: the Magic builder retains ID 0 instead of choosing an unused ID. Duplicate IDs prevent the Character Item’s action lookup from initializing.