High Definition Render Pipeline
When the first person arms and items are drawn to the screen they are drawn using a second camera (called camera stacking). This prevents the objects from clipping with walls that are in front of the character. This works well for the standard pipeline, but the high definition render pipeline offers a better and more efficient solution.
The camera’s Renderer can be changed which allows you to specify the order that the objects are rendered. The Ultimate Character Controller uses this method to ensure the first person arms and items do not clip with other objects.
Setup
- Setup your project to use the high definition render pipeline.
- Import the integration from Tools -> Opsive -> Ultimate Character Controller -> Setup Manager -> Project Tab and select Import HDRP from the bottom of the window.
- Drag the “Overlay Pass” prefab from the HDRP integration package into your scene.
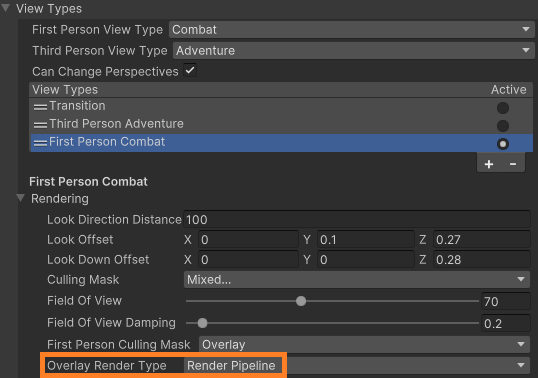
- On the Camera Controller select the First Person View Type (usually Combat) and change the Overlay Render Type to Render Pipeline:

- To prevent duplicate shadows ensure Cast Shadows is set to Off for all of the Renderers on the first person objects. For example, with the example character you’ll want to ensure Cast Shadows is set to Off for all of the objects underneath the Atlas/Atlas/FirstPersonObjects GameObject.
- The InvisibleShadowCastorHDRP material needs to be set:
- If using both first and third person perspectives, on your character’s Perspective Monitor the Invisible Material should be set to the InvisibleShadowCastorHDRP material included in the download.
- If using only the first person perspective, the InvisibleShadowCastorHDRP material should manually be set on all of the third person objects that should be invisible (such as the head, arms, and items).
- If you are using the Object Fader component set the Color Property Name to “_BaseColor”.
- On the Surface Manager the Main Texture Property Name should be set to the name of the main texture within the shader that you are using.