New Ability
The ability system is designed to make it as easy as possible to add new functionality to the controller. New abilities will likely be created often so the system does as much as it can for you while also giving you complete flexibility. For this example we are going to create a crawling ability. The goals of this ability are to:
- Place the character in a crawling state when they approach a tunnel.
- Adjust the rotation torque to prevent the character from rotating as quickly.
- Prevent any items from being used when the ability is active.
- Stop the ability when the character reaches the end of a tunnel.
To get started create the object that the character will actually be crawling under within the scene. We are going to keep it basic by creating a tunnel using three scaled cubes and a trigger that designates when the character should crawl.
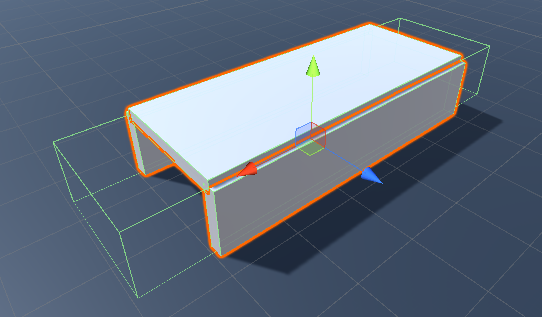
Now that the basic tunnel structure is setup let’s create a new ability and derive it from the Detect Object Ability Base class. By deriving the new ability from this class it’ll allow us to detect when the character gets close to a tunnel. If your ability does not need to detect an object (such as jump) then it can derive from the Ability class.
using UnityEngine;
using Opsive.UltimateCharacterController.Character.Abilities;

public class Crawl : DetectObjectAbilityBase
{

}
With this minimal code the ability is now able to be added to the Ultimate Character Locomotion ability list. The Item Equip Verifier ability should also be added so any items can be unequipped when the ability starts.

The following ability values need to be modified:
- Ability Index Parameter: 101.
This value indicates the value that the Ability Index value within the Animator changes to when the ability is active. This value should be unique among all of the abilities that your character uses. - Object ID: 101.
This value indicates the unique value of the object that the Detect Object Ability Base requires in order for the ability to start. - Object Detection: Trigger
The ability can start if the character enters a trigger. - Allow Equipped Slots: All slots should be deselected.
No items should be equipped when the ability is active. Reequip Slots should remain enabled so after the ability has completed any unequipped items will be reequipped.
An Object ID of 101 is used which indicates the object that the ability requires in order for it to start. To satisfy this requirement add the Object Identifier component to the tunnel’s trigger and set the ID value to 101.
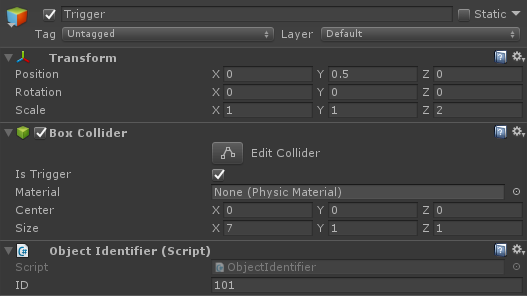
The next step is to add the animations to the Animator. For this do a search on mixamo.com for Crawling and download the first animation:
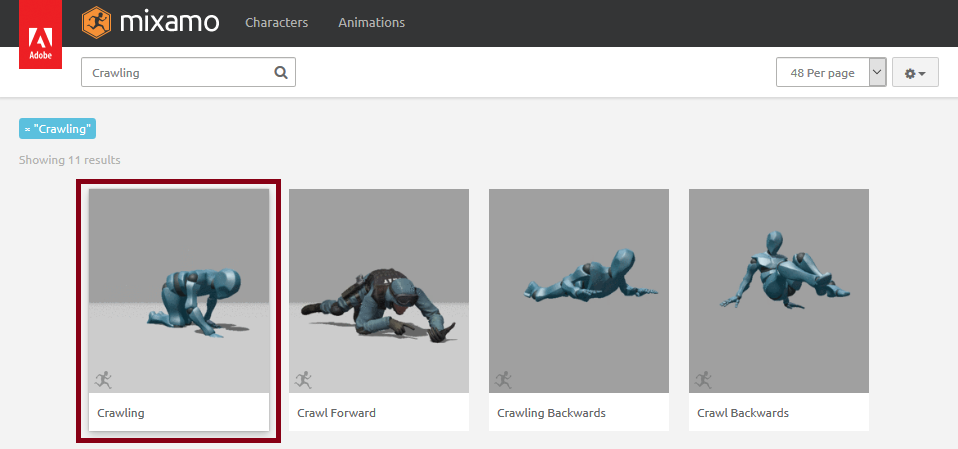
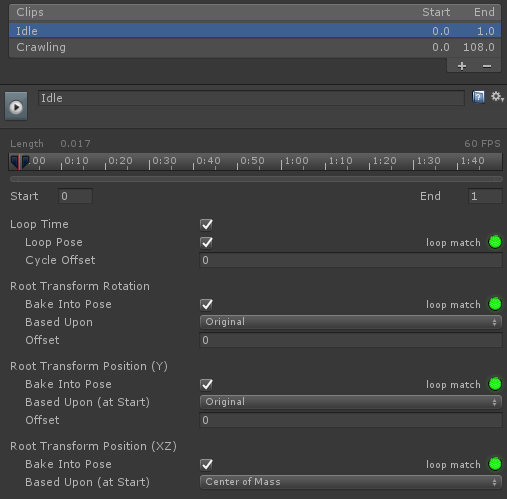
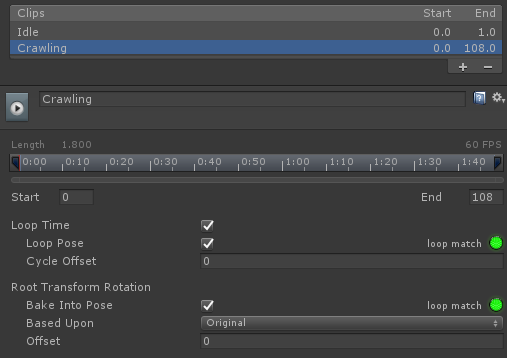
After you’ve imported the crawling animation perform the following on the fbx:
- The Animation Type should be set to Humanoid within the Rig tab.
- A new Idle animation clip should be created that spans frames 0 – 1 within the Animations tab.
- For both the Idle and Crawling clips the following should be performed:
- Enable Loop Time and Loop Pose on the clip.
- Enable Bake Into Pose for the Root Transform Rotation. The character controller will control the character’s rotation instead of the animation.
- The Idle clip should have the following performed:
- Enable Bake Into Pose for the Root Transform Position (Y and XZ). When the Idle animation plays the character should not move.
A new Crawling substate on the Full Body layer should be created within the Animator Controller. The Full Body layer is used because when the Crawl ability is active only the crawling animation can play. No items will be equipped during this time. Two states should be added to this substate: Idle and Crawl.
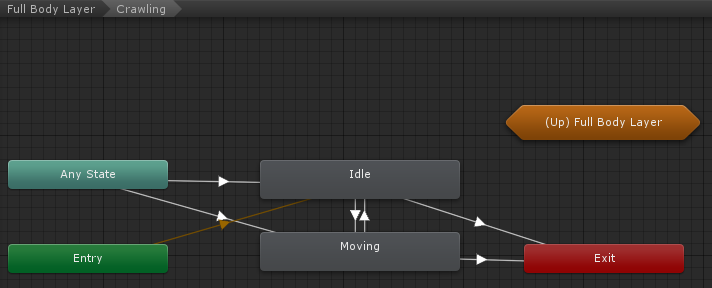
The transition from Any State to Idle and Moving should contain three conditions:
- AbilityIndex: Equals 101.
The 101 value was specified when the ability was added to the Ultimate Character Locomotion component. - AbilityChange
This parameter is triggered when the ability is enabled or disabled. - Moving: True (for the Moving state), False (for the Idle state).
This parameter indicates whether or not the character is moving.

The transition between Idle and Moving only contains one condition:
- Moving: True (Idle -> Moving state), False (Moving -> Idle state)
The final transition to the Exit node contains one condition:
- AbilityIndex: NotEqual 101
This condition will be true when the ability is no longer active.
After the Animator has been setup hit play within Unity and the ability should activate when the character enters the trigger. One of the first things that you’ll notice is that the ability does not deactivate when the character leaves the trigger so this will be the first thing that we add to the Crawl ability.
Abilities, similar to MonoBehaviours, can implement the OnTriggerExit method and it is here that we’ll want to stop the ability as soon as the character leaves the trigger:
    /// <summary>
    /// The character has exited a trigger.
    /// </summary>
    /// <param name="other">The trigger collider that the character exited.</param>
    public override void OnTriggerExit(Collider other)
    {
        // The detected object will be set when the ability starts and contains a reference to the object that allowed the ability to start.
        if (other.gameObject == m_DetectedObject) {
            StopAbility();
        }

        base.OnTriggerExit(other);
    }
The character should now stop the Crawl ability when the character leaves the trigger.
The next requirement of this ability is that the character turns slower while the ability is active. In order to achieve this we could set the rotation speed on the Ultimate Character Locomotion component but that doesn’t make for as good of an example so for this we are going to do it via code. If you look at the API for the Ability class you’ll see two methods that look promising:
UpdateRotation
Update the character’s rotation values.
ApplyRotation
Verify the rotation values. Called immediately before the rotation is applied.
UpdateRotation is generally used for adding new rotations, while ApplyRotation is used to verify that the rotations are valid. Since we are not adding any new rotation (only restricting the existing rotation) our changes should go within ApplyRotation:
    [Tooltip("The maximum number of degrees the character can rotate.")]
    [SerializeField] protected float m_MaxRotationAngle = 0.5f;

    /// <summary>
    /// Verify the rotation values. Called immediately before the rotation is applied.
    /// </summary>
    public override void ApplyRotation()
    {
        var angle = Quaternion.Angle(Quaternion.identity, m_CharacterLocomotion.DesiredRotation);
        if (angle > m_MaxRotationAngle) {
            m_CharacterLocomotion.DesiredRotation = Quaternion.Slerp(Quaternion.identity, m_CharacterLocomotion.DesiredRotation, m_MaxRotationAngle / angle);
        }
    }
The DesiredRotation value from the CharacterLocomotion component indicates the amount that the character is going to rotate. If this value is greater than the max rotation angle then the slerp method will limit the rotation.
The UpdateRotation and ApplyRotation methods are used for the rotation and there are similar methods for position:
UpdatePosition
Update the character’s position values.
ApplyPosition
Verify the position values. Called immediately before the position is applied.
The ControllerLocomotion.MoveDirection property contains the amount that the character is going to move.
The last requirement for this ability is that the items shouldn’t be able to be interacted with while the ability is active. The ShouldBlockAbilityStart method can be used for this:
    /// <summary>
    /// Called when another ability is attempting to start and the current ability is active.
    /// Returns true or false depending on if the new ability should be blocked from starting.
    /// </summary>
    /// <param name="startingAbility">The ability that is starting.</param>
    /// <returns>True if the ability should be blocked.</returns>
    public override bool ShouldBlockAbilityStart(Ability startingAbility)
    {
        return startingAbility is ItemAbility;
    }
ShouldBlockAbilityStart is called when another ability tries to start. Any active ability can prevent the ability from starting and in this case the Crawl ability will stop the ability if it is an ItemAbility (Equip, Unequip, Use, etc). With this change the Crawl ability satisfies all of our requirements and can now be used.
As a next step we recommend taking a look at the Ability API and existing abilities included within the controller – the ability system is extremely powerful and makes it convenient for adding new functionality without having to change the core classes. The complete Crawl ability is pasted below:
using UnityEngine;
using Opsive.UltimateCharacterController.Character.Abilities;
using Opsive.UltimateCharacterController.Character.Abilities.Items;

/// <summary>
/// Places the character in a crawling state.
/// </summary>
public class Crawl : DetectObjectAbilityBase
{
    [Tooltip("The maximum number of degrees the character can rotate.")]
    [SerializeField] protected float m_MaxRotationAngle = 0.5f;

    /// <summary>
    /// Verify the rotation values. Called immediately before the rotation is applied.
    /// </summary>
    public override void ApplyRotation()
    {
        var angle = Quaternion.Angle(Quaternion.identity, m_CharacterLocomotion.DesiredRotation);
        if (angle > m_MaxRotationAngle) {
            m_CharacterLocomotion.DesiredRotation = Quaternion.Slerp(Quaternion.identity, m_CharacterLocomotion.DesiredRotation, m_MaxRotationAngle / angle);
        }
    }

    /// <summary>
    /// Called when another ability is attempting to start and the current ability is active.
    /// Returns true or false depending on if the new ability should be blocked from starting.
    /// </summary>
    /// <param name="startingAbility">The ability that is starting.</param>
    /// <returns>True if the ability should be blocked.</returns>
    public override bool ShouldBlockAbilityStart(Ability startingAbility)
    {
        return startingAbility is ItemAbility;
    }

    /// <summary>
    /// The character has exited a trigger.
    /// </summary>
    /// <param name="other">The trigger collider that the character exited.</param>
    public override void OnTriggerExit(Collider other)
    {
        // The detected object will be set when the ability starts and contains a reference to the object that allowed the ability to start.
        if (other.gameObject == m_DetectedObject) {
            StopAbility();
        }

        base.OnTriggerExit(other);
    }
}