Use this quick setup to prepare a Unity project and scene, then get a controllable Ultimate Character Controller character running in Play Mode.

For the shortest evaluation route, complete First Playable Character before this project-specific setup. Use Requirements and First Decisions when the perspective, input backend, render pipeline, or model route is still undecided.

Before you begin

  • Import the Ultimate Character Controller and wait for Unity to finish compiling without errors.
  • Decide whether to prototype with the sample CharacterContainer prefab or build a character in your own scene.
  • The CharacterContainer route requires the sample package; see Importing for its package requirements.

Use CharacterContainer for the fastest prototype

  1. Open Tools > Opsive > Ultimate Character Controller > Setup Manager.
  2. Select the Sample tab.
  3. Select Import Sample and wait for the import to finish.
  4. In the Project window, search for the CharacterContainer prefab and drag it into an empty scene.
  5. Save the scene.

CharacterContainer includes a configured character, camera, and scene-level managers, so it is the quickest route for testing the controller before building a project-specific setup.

Set up the project settings

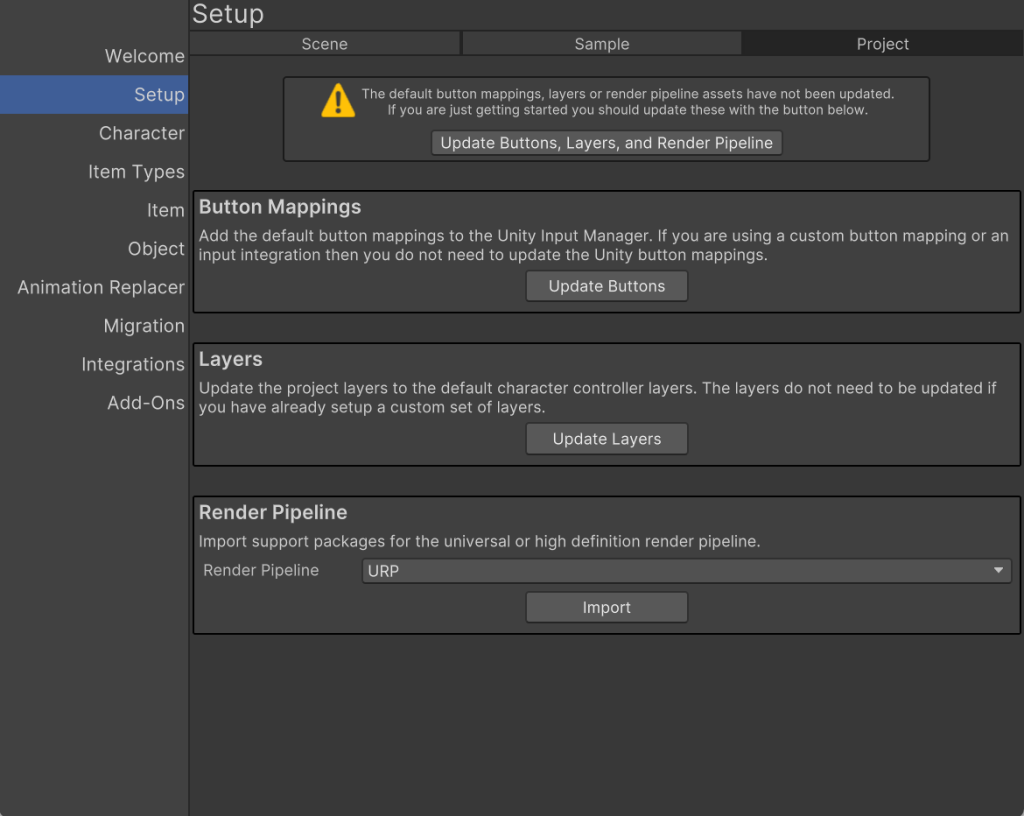
  1. Open Tools > Opsive > Ultimate Character Controller > Setup Manager and select the Project tab.
  2. For a new project that uses the default Input Manager mappings, select the combined setup action shown in the warning:
    • Update Buttons and Layers when using the Built-in Render Pipeline.
    • Update Buttons, Layers, and Render Pipeline when URP or HDRP is active.
  3. For a project that already uses the Input System, custom mappings, or another input integration, use the individual controls instead:
    • Select Update Layers under Layers if the required layer slots are available.
    • Under Render Pipeline, select URP or HDRP and then select Import when that integration is needed.
    • Do not select Update Buttons unless the project should receive the default legacy Input Manager mappings.

The Setup Manager Project tab showing the project update action for button mappings, layers, and the active render pipeline.

The layer update adds the controller’s default layer names. Review the Layer Manager first when an existing project already uses those layer indices.

Set up a custom scene

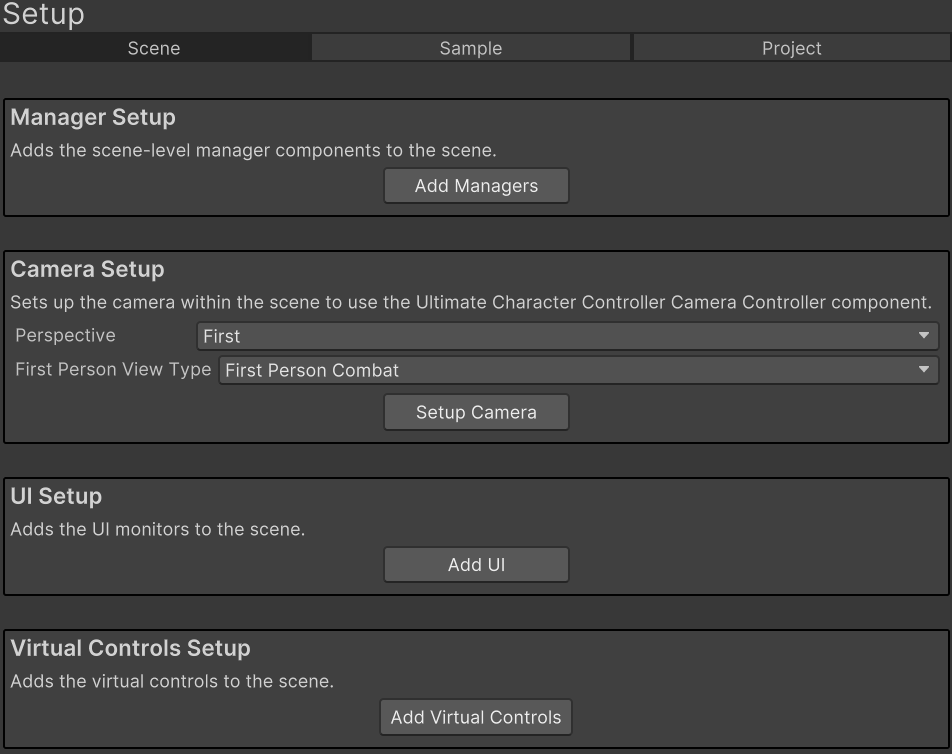
  1. In Tools > Opsive > Ultimate Character Controller > Setup Manager, select the Scene tab.
  2. Under Manager Setup, select Add Managers. This creates the Game GameObject with the required scene-level services, including the Surface Manager and Object Pool.
  3. Under Camera Setup, choose Perspective:
    • First for a first-person camera.
    • Third for a third-person camera.
    • Both when the game can switch perspectives.
  4. Choose the corresponding First Person View Type or Third Person View Type. When Perspective is Both, also choose Start Perspective.
  5. Select Setup Camera.
  6. Open Tools > Opsive > Ultimate Character Controller > Character Manager and follow Character Creation to build the playable character.

The Setup Manager Scene tab showing Manager Setup, Camera Setup, UI Setup, and Virtual Controls Setup.

Key choices

  • Sample or custom scene: Use CharacterContainer to evaluate or prototype quickly. Use the custom route when the scene, camera, and character must match the project’s own assets.
  • Input: The Update Buttons action targets the legacy Input Manager. Skip it when the project already uses the Input System or another integration, and follow the project’s Input setup instead.
  • Perspective: The selected first- or third-person controller must be imported before that Perspective and View Type can be configured. Use Both only when both perspectives are installed.
  • UI and virtual controls: Add UI and Add Virtual Controls are optional. Add them only when the scene needs the supplied monitors or on-screen controls. For virtual controls, choose the matching Input Type before adding them.
  • Items: Finish the character and movement setup before creating item data and prefabs. Items are not required for the first movement test.

Verify in Play Mode

Before entering Play Mode, confirm that the Hierarchy contains a Game GameObject, the camera has a Camera Controller component, and the character has an Ultimate Character Locomotion component.

Enter Play Mode and use the configured movement and look inputs. The character should move, the camera should follow or rotate using the selected View Type, and the Console should not report missing scene managers. A CharacterContainer instance should provide the same result without additional scene setup.

Troubleshoot setup problems

  • CharacterContainer is not available: Check whether the sample was imported. Open Setup Manager > Sample and select Import Sample, then search for the prefab again.
  • The camera setup reports that a perspective is unavailable: Check which first- or third-person controller is installed. Import the required controller or choose an installed Perspective, then select Setup Camera again.
  • The character does not respond to input: Check whether the project uses the Input System, legacy Input Manager, or another integration. Configure the matching Player Input implementation and mappings instead of applying settings for a different input route.
  • The scene reports missing manager components: Check for the Game GameObject. Open Setup Manager > Scene and select Add Managers to create or complete it.
  • URP or HDRP materials or shaders are incorrect: Check the active render pipeline and its controller integration. On Setup Manager > Project, select the matching Render Pipeline and select Import.