Item Collections
An Item Collection is a grouping of items. Items are stored in a list of Item Stacks where an Item Stack is a class with an item and an amount (not to be confused with an Item Amount which is a struct). Unique items will always have an amount of 1 by default because. Common items can have any positive amount.
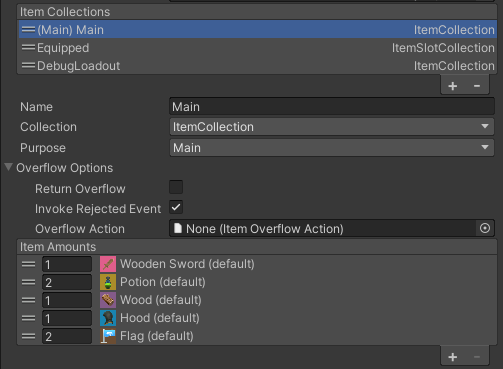
The purpose of the Item Collection can be specified within the inspector. This makes it easy to filter for a particular Item Collection based on the purpose of the Item Collection. If you plan to use many Item Collections it is recommended to set all the Purposes to None (aka Other) and use only names to differentiate Item Collections to avoid confusion.
- None: No specified purpose.
- Main: Default collection in an inventory.
- Secondary: Allows for custom use.
- Equipped: The included items have been equipped.
- Loadout: The collection is used for a loadout. The items won’t show in the UI.
- Hide: Hides collections won’t show in the UI.
- Drop: Used to drop items.
When you add and remove items it is recommended that you use the Item Info struct. An Item Info does not only have an Item Amount but it also has a reference to an Item Collection and/or an Item Stack. This allows you to specify where an item came from before you add it. This is particularly useful combined with restrictions as it allows you to reject an item and give it back where it came from. This can also be used by the Inventory Monitor to ignore items that come from a loadout or from Item Collections contained within the same inventory.
You can also get all the items which are of a certain category or definition. For the most flexibility you can get exactly the Item Info that you want by defining your own filter and comparer when calling the GetItemInfos(…) function.
Example: Returning all of the ItemInfos that have mutable items and ordered by Item Definition name:
var filteredAndSortedItemInfos = itemCollection.GetItemInfos(ref itemInfos,
x => x.Item.IsMutable,
Comparer<ItemStack>.Create((i1, i2) => i1.Item.ItemDefinition.Name.CompareTo(i2.Item.ItemDefinition.Name)) );
The base Item Collection class has the following features:
- item amounts must be positive, negative amounts is not allowed.
- Unique items can only have an amount of 1. If the same unique item is added twice a new duplicate item will be created with a new ID.
- There is only one Item Stack per Item (Use an Multi Stack Item Collection or a custom Item Collection to have multiple stacks of a single item).
- Any amount of item and item stack can be added (Use Item Restrictions to limit the amount of item that can be added, or use an Item Slot Collection if you wish to have a constant set of item slots).
You can create your own Item Collections and add restriction for further customization. For example there are restriction that allow only X items can be stored or only items of a certain category, etc.
Out of the box we offer a few generic Item Collections which can be setup for your own needs:
- Item Slot Collection: An Item Slot Collection is used to have a constant set of slots for your items. It is particularly useful to define your character equipment, hotbar, pouch, etc…
- Item Transaction Collection: This collection is often used as the Main Item Collection. It serves as a middle ground for sending item to the correct item collection whenever a new item is added to the inventory. It is paritcuarly useful when your Inventory is organized in many item collections
- Multi Stack Item Collection: This Item Collection allows multiple stacks of the same Item. Each Item Stack has a limit defined by a default value or by an attribute on the item. Once that limit is past the amount overflows into another Item Stack within the collection.
The Inventory component allows you to use Item Restrictions which apply restrictions on multiple Item Collections at the same time.
Overflow Options
The ItemCollection comes built-in with Overflow Options. An ItemCollection can overflow when ItemRestrictions or custom ItemCollections are used.
By default ItemCollections can overflow back to where they came from, or can be handled using a Item Overflow Action. A common is example is to use a “Item Overflow Action With Item Action” and set a Drop Item Action to drop item actions on overflow.
To create an Item Overflow Action:
Right click -> Create -> Ultimate Inventory System -> Item Overflow Actions.
You may create custom Item Overflow Action by overriding the ItemOverflowAction class (it is a scriptable object).
For more advanced use cases, you may also listen to the “c_Inventory_OnAddItemOverflow_ItemInfoToAdd_ItemInfoAdded_ItemInfoRejected” event.
Item Collection API
Create an Item from an Item Definition
//Find your item definition.
var myItemDefinition = InventorySystemManager.GetItemDefinition("MyItemDefinition");
//Create an item from that definition.
var myItem = InventorySystemManager.CreateItem(myItemDefinition);

//Or you can directly create an item from the item definition name.
var myOtherItem = InventorySystemManager.CreateItem("MyOtherItemDefinition");
Add an item using an Item Info
//Make your item Info, Note double (( )) the (1,myItem) is an itemAmount.
//Note: ItemInfos can have a reference to the item stack and the itemcollection/inventory where the item comes from.
var myItemInfo = new ItemInfo( (1,myItem) );
itemCollection.AddItem(myItemInfo);

//Alternatively you can directly cast the item amount to an item info both are structs not classes.
//Note: It returns the item info added, this allows you to know the amount of item added and in which stack it was added to.
var itemInfoActuallyAdded = itemCollection.AddItem((ItemInfo) (1, myItem));
Check if an item can be added (Restrictions can prevent items from being added)
The returned nullable Item Info has tells us if the item can be added and how much of the amoun can actually be added.
//create the Item Info you plan to add.
var itemInfoToAdd = (ItemInfo)(5, myItem);

// Check if the item can be added, the return type is a ItemInfo? (The ? means it is NULLABLE).
var canAddItemResult = itemCollection.CanAddItem(itemInfoToAdd);
if(canAddItemResult.HasValue){
	if(canAddItemResult.Value.Amount == itemInfoToAdd.Amount ){
		// The Item Amount can be fully added.
	}else{
		// The Item can be added but only partially.
	}
}else{
	// The item cannot be added.
}
Get an item Info from the collection
//You can get the first matching item stack to an item.
var retrievedItemInfo = itemCollection.GetItemInfo(myItem);
if (retrievedItemInfo.HasValue == false) { //No item stack with that description was found in the inventory. }
Get the amount of an item the collection has
//If you are interested in counting the amount of multiple stacks for matching description use GetItemAmount.
var amount = itemCollection.GetItemAmount(myItem);

//The boolean parameter lets us choose whether to check inherently or not.
var amountDefinition = itemCollection.GetItemAmount(myItemDefinition,true);
Remove an item and get a reference of the item stack where the item was removed from
//We can remove items from an inventory and it returns the item info that was actually removed.
var itemInfoRemoved = itemCollection.RemoveItem((ItemInfo)(1,myItem));

//Specifying an item info that has a reference to an item stack will remove from that stack first, if possible.itemCollection.RemoveItem(retrievedItemInfo.Value);
//We could have chosen to remove a different amount, than the amount.
retrieved.itemCollection.RemoveItem( (1,retrievedItemInfo.Value) );
Loop over all the items within the collection with Item Stack or Item Info
// Loop over the items in a collection using Item Stack or Item Info

// Get all the item Stack in an item collection
var allItemStacks = itemCollection.GetAllItemStacks();
for (int i = 0; i < allItemStacks.Count; i++) {
    var itemStack = allItemStacks[i];
    var item = itemStack.Item;
    // Do nothing if the item is null ( it shouldn't be null )
    if(item == null){ continue;}

    // Do something with the item
}


// Get all the item infos in the item collection, requires an array.
var pooledArray = GenericObjectPool.Get<ItemInfo[]>();
var allItemInfos = itemCollection.GetAllItemInfos(ref pooledArray);
for (int i = 0; i < allItemInfos.Count; i++) {
    var itemInfo = allItemInfos[i];
    var item = itemInfo.Item;
    // Do nothing if the item is null ( it shouldn't be null )
    if(item == null){ continue;}

    // Do something with the item
}
// IMPORTANT: make sure to return the pooled array once you finished using it.
GenericObjectPool.Return(pooledArray);
Get a list of items within the item collection using sorted and filters.
//You can get multiple items from your item collection.
//You'll need an array to store your item infos.
var array = new ItemInfo[0];
//You can use a pooled array instead of creating a new array each time.
IMPORTANT: make sure to return the pooled array once you finished using it.
var pooledArray = GenericObjectPool.Get<ItemInfo[]>();

//Set your filter and sort parameters, for this example we'll filter by category.
var filterParameter = InventorySystemManager.GetItemCategory("MyCategory");

//Item info list slice will have all the itemInfos in the inventory that contain inherits the category.
//You can set whatever filter parameter you want.
var itemInfoListSlice = itemCollection.GetItemInfos(ref pooledArray, filterParameter,
    //Specify your filter.
    (candidateItemInfo, category) => { return category.InherentlyContains(candidateItemInfo.Item); });

//IMPORTANT: Don't forget to return the pooled array once you finished using the array.
GenericObjectPool.Return(pooledArray);