Item Restrictions
In most games Inventories have limitations, such as space or stack size, etc… By default ItemCollections have no limitations in the Inventory System. You are allowed to set your own restrictions as you see fit.
There are three main ways of setting restrictions on your inventory:
- Using an “Item Restriction Set Object”.
- Using a custom component which inherits the IItemRestriction interface.
- Using custom Item Collections
All of these can be combined together for complex inventory restriction setups. In some cases where it is important to know if an Item has been rejected, it is recommended to use an “Item Transaction Collection” as your main item collection. A rejection event handler can be set from the Item Transaction Collection to deal with those cases.
Item Restriction Set Object
The Item Restriction Set Object is a Scriptable Object that can be created by right-clicking in the project view and select Create -> Ultimate Inventory System -> Inventory -> Item Restriction Set.
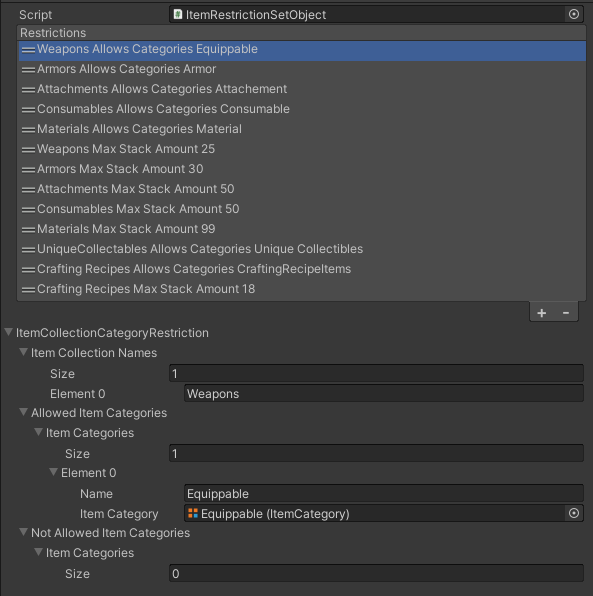
Many restrictions of different types can be added to the Item Restriction Set. Any script inheriting the “IItem Restriction” interface will appear as an option that can be added to the Item Restriction Set. The options that are the most common are:
- Item Collection Category Restriction: Restricts some item collections to only allow certain category of items to be added to them
- Item Collection Stack Amount Restriction : Allow only a certain amount of item stacks in an inventory, putting a limit on how many items can be hold.
To create your own custom Restriction and use it in the Item Restriction Set, follow the instruction below and take inspiration from the built-in restrictions.
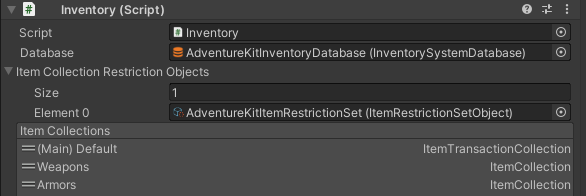
Once created the Restrition Object may be assigned to an Inventory in the inspector.
Group Item Restriction Object
Important: Do NOT use the Overflow actions in the Group Item Restriction Object. They are being processed at the wrong time (they are kept for legacy reasons). Instead use the Reject event specifed at the bottom of this page.
Note: The Group Item Restriction Object can still be used even though it is recommended to use the new Item Restriction Object instead which gives more flexibility.
The Group Item Restriction Object is a Scriptable Object that can be created by right-clicking in the project view and select Create -> Ultimate Inventory System -> Inventory -> Group Item Restriction.
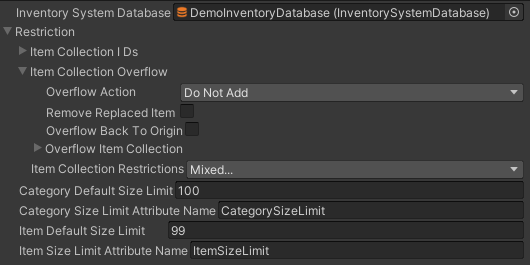
There are a few settings which can be configured:
- Item Collection IDs: The subset of Item Collections that will be affected by the restriction.
- Item Collection Overflow: Specifies what happens if an item overflows the restriction. For example you may choose to reject the item or replace an old one instead. You can even choose to move items that where forcibly removed to another Item Collection or even apply item actions to them. A common use case for this is to add a drop action when an item is forcibly removed.
- Item Collection Restriction: A mask of restriction types. Depending on the options selected some additional settings will appear. You can choose to restrict the amount of item which are part of a particular Item Definition or Item Category by setting a default stack size. For more control you can set the stack size on the Item Categories, Item Definitions or Items directly using the attribute system. If the attributes name match the one specified it will overwrite the default stack size for that restriction.
Custom Item Restrictions
To create your own restrictions is very simple, simply create a component or class which inherits the interface “IItemRestriction”. And set it next to the Inventory component or use it inside an Item Restriction Object.
During the Initialization phase the Inventory will find all the restriction components on its gameobject and combine them with the ones set in the inspector.
When the Inventory “Can Add Item” function is called it will check all restrictions to see if it passes all the conditions before the item can be added or removed.
/// <summary>
/// Interface for item collection restrictions.
/// </summary>
public interface IItemRestriction
{
    /// <summary>
    /// Initialize the item collection.
    /// </summary>
    /// <param name="inventory">The inventory.</param>
    /// <param name="force">Force to initialize.</param>
    void Initialize(IInventory inventory, bool force);
    /// <summary>
    /// Can the item be added to the item
    /// </summary>
    /// <param name="itemInfo">The item info to add.</param>
    /// <param name="receivingCollection">The receiving item Collection.</param>
    /// <returns>The itemInfo that can be added (can be null).</returns>
    ItemInfo? AddCondition(ItemInfo itemInfo, ItemCollection receivingCollection);
    /// <summary>
    /// Can the item be removed from the itemCollection.
    /// </summary>
    /// <param name="itemInfo">The item info to remove (contains the itemCollection).</param>
    /// <returns>The item info that can be removed (can be null).</returns>
    ItemInfo? RemoveCondition(ItemInfo itemInfo);
}
Events
When an item is added but it does not fit because of restrictions an event is executed. That event is called “c_Inventory_OnAddItemRejected_ItemInfoToAdd_ItemInfoAdded_ItemInfoRejected”. To learn more about events go the the Events page.
- The Item Info To Add is the original Item Info that you tried to add to the Item Collection. It might contain the Item Collection where the item originally came from.
- The Item Info Added is the Item Info that was added to the Item Collection if the item amount was partially added. That happens when only some of the item but not all amount could fit in the collection.
- The Item Info Rejected has the amount of items that could not be added.
Use this combination of information to deal with item rejection.
private Start(){
	EventHandler.RegisterEvent<ItemInfo, ItemInfo, ItemInfo>(m_Inventory, EventNames.c_Inventory_OnAddItemRejected_ItemInfoToAdd_ItemInfoAdded_ItemInfoRejected, HandleItemRejection);
}

private HandleItemRejection(ItemInfo itemInfoToAdd, ItemInfo itemInfoAdded, ItemInfo itemInfoRejected){
	// Handle the rejection by dropping the item, or printing a message.
}