Input
The built-in input uses the Input Manager for its input which has mouse, keyboard, and limited controller support. You may install the required Inputs for the Ultimate Inventory System by going to the Setup Manager in the Editor.
If your project makes use of controllers it is highly recommend that you use an asset dedicated to controller support such as Rewired, InControl or the new Unity Input System. The Ultimate Inventory System is integrated with each of these assets and the integration can be downloaded here.
The Ultimate Inventory System uses the default Unity Navigation system for all UI inputs. Therefore the Inventory UI works out of the box with any input system. To customize the UI input please refer to the documentation of your input system. By default that would be the Event System and the Standard Input Module components: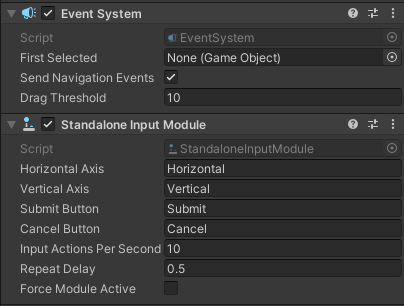
In addition to UI input the Inventory System the following button/input names by default:
- “Action”: specified on the “Inventory Interactor” component on the player character. This input is used to interact with interactables.
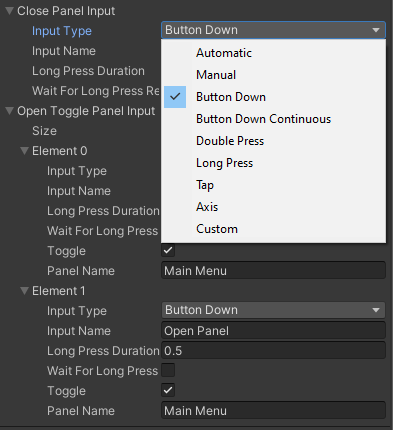
- “Close Panel” & “Open Panel”: specified on the “Display Panel Manager Handler” usually on the Canvas. These inputs are used to open the Main Panel and Close the currently selected panel.
- “Next” & “Previous” : specified on the “Item Info Grid” usually on an Inventory Grid. These inputs are used to switch pages/tabs in a grid
The Inputs are usually serialized a “Simple Inputs” which allow to choose the Input Type (Use Manual or Custom to control the input by code)
The Player Input component is base component that the Unity Input and integration components derive from. By using the Player Input component any new input can be added by just swapping out the component and the rest of the code does not need to change. This component is usually placed on the player character next to the Inventory component.
Enable Disable Input
The Inventory System cannot Enable and Disable Input completely because it requires some of the inputs to still be active while the Inventory Menu is opened. The way Input is disabled is by having all components that check for input listen to the “OnEnableGamePlayInput” event such that they can choose whether to enable or disable to input themselves.
The “EnableDisableInventoryInput” component can be used to easily enable and disable GameplayInput with having to write any code.
If you use the Opsive Unity Input component to check for input make sure to think about when that input will be used and if it should be disabled when the GameplayInput is disabled. If so you will be required to listen to the “OnEnableGamePlayInput” event to disable that component manually.
Events
The “OnEnableGameplayInput” event can be sent if you’d like to disable (or enable) character input. As an example the following will disable the input on the character specified by m_Character:
EventHandler.ExecuteEvent(m_Character, "OnEnableGameplayInput", false);
The Opsive.Shared.Events namespace must be included for the EventHandler class to be found.
using UnityEngine;
using Opsive.Shared.Events;

public class MyObject : MonoBehaviour
{
    [Tooltip("A reference to the Ultimate Character Controller character.")]
    [SerializeField] private GameObject m_Character;

    /// <summary>
    /// Disable the input.
    /// </summary>
    private void Start()
    {
        EventHandler.ExecuteEvent(m_Character, "OnEnableGameplayInput", false);
    }
}
API
The PlayerInput API follows the same standard as Unity’s input class with GetButton, GetButtonDown, GetButtonUp, and GetAxis methods. This component also allows for double press or long press detection with GetDoublePress and GetLongPress.
As an example the following code will check if the “Jump” button is down:
using UnityEngine;
using Opsive.UltimateCharacterController.Input;

public class MyObject : MonoBehaviour
{
    [Tooltip("A reference to the Ultimate Character Controller character.")]
    [SerializeField] private GameObject m_Character;

    /// <summary>
    /// Initialize a reference to PlayerInput.
    /// </summary>
    private void Awake()
    {
        m_PlayerInput = m_Character.GetComponent<PlayerInput>();
    }

    /// <summary>
    /// Check for the jump button press.
    /// </summary>
    private void Update()
    {
        if (m_PlayerInput.GetButtonDown("Jump")) {
            // Do Jump.
        }
    }
}
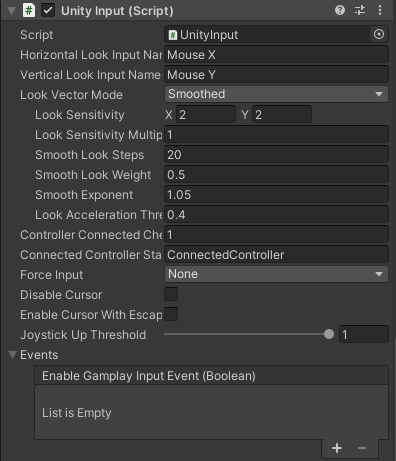
Inspected Fields
Horizontal Look Input Name
The name of the horizontal camera input mapping.
Vertical Look Input Name
The name of the vertical camera input mapping.
Look Vector Mode
Specifies how the look vector is assigned. If a mouse is being used then the look vector will almost always be based on the mouse movement. If a controller is used then the controller will supply the look input.
- Smoothed: Apply a smoothing to the look vector. This smoothing interpolates the input over several frames to reduce jerky player input.
- Unity Smoothed: Uses the input’s direct value.
- Raw: Use the input’s direct (raw) value.
- Manual: The look vector is assigned manually. This is useful for VR head movement.
Look Sensitivity
If using look smoothing, specifies how sensitive the mouse is. The higher the value to more sensitive.
Look Sensitivity Multiplier
If using look smoothing, specifies a multiplier to apply to the LookSensitivity value.
Smooth Look Steps
If using look smoothing, the amount of history to store of previous look values.
Smooth Look Weight
If using look smoothing, specifies how much weight each element should have on the total smoothed value (range 0-1). Reducing the weight to 0 is similar to setting the Look Vector Mode to Raw. A value of 1 will cause the result to be a simple average of all of the recently sampled smooth steps (and will feel very laggy).
Smooth Exponent
If using look smoothing, specifies an exponent to give a smoother feel with smaller inputs.
Look Acceleration Threshold
If using look smoothing, specifies a maximum acceleration value of the smoothed look value (0 to disable).
Controller Connected Check Rate
The rate (in seconds) the component checks to determine if a controller is connected. The only way to check if a controller is connected in Unity generates garbage so this value should be set to 0 if you do not plan on supporting controllers.
Connected Controller State
The state that should be activated when the controller is connected.
Force Input
Specifies if any input type should be forced. By default the controller will enable the virtual buttons for a mobile platform but this field allows you to force standalone input on a mobile platform. Virtual input can also be forced for a platform that normally does not use virtual controls.
Disable Cursor
Should the cursor be disabled?
Enable Cursor with Escape
Should the cursor be enabled when the escape key is pressed?
Prevent Look Vector Changes
If the cursor is enabled with escape should the look vector be prevented from updating?