Getting Started
Importing
Since version 1.3.0 Ultimate Inventory System is now a package. It imports within the Package folder, and all relevant scripts and assets can be found inside the folder:
Packages/Opsive Ultimate Inventory System
Sample Demo Scenes
After the Ultimate Inventory System has imported it is recommended that you take a look at the included sample demo scene to see how everything works.
You may import the sample scenes by going to the Set Up window:
Tools -> Opsive -> Ultimate Inventory System -> Main Manager -> Setup.

Once imported, the main demo scene is located at
Assets/Samples/Opsive UltimateInventorySystem/1.3.0/Demo/Demo.unity
Some Additional demo scene focused on showcasing and explaining specific features are located in the folder:
Assets/Samples/Opsive UltimateInventorySystem/1.3.0/Demo/_FeatureDemos
I highly recommend you skim through ALL feature scenes to get an idea of where to look for working examples
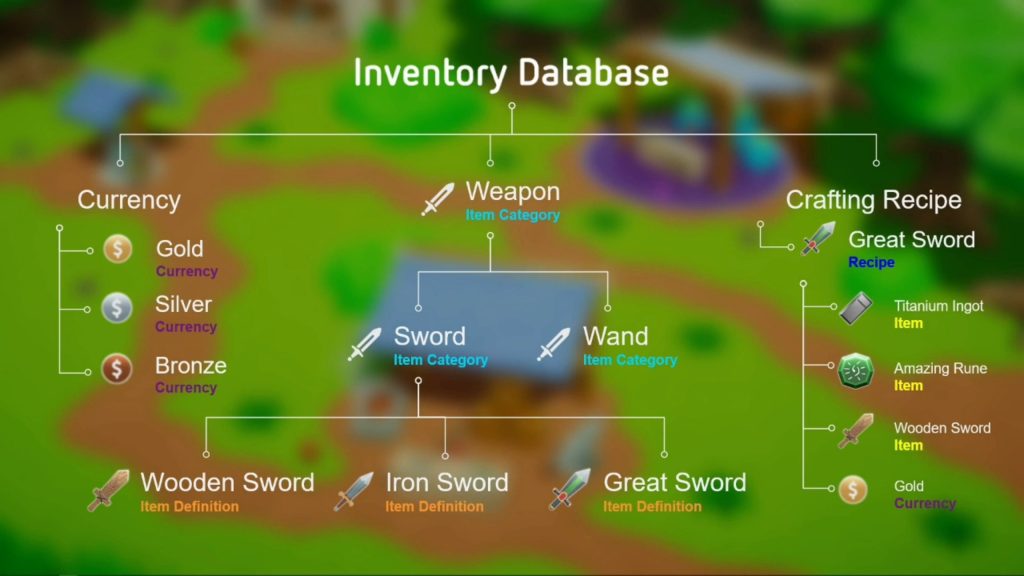
New Inventory Database
After you have gone through the demo scene it is recommend that you get started by duplicating the demo Inventory Database or by creating a new one. The database can be created from the Setup Manager located within the Inventory Manager editor. The Inventory Manager can be accessed through the Tools -> Opsive -> Ultimate Inventory System -> Main Manager.

Note: A prompt will ask if you wish to dupplicate the prefabs referenced by the database. This is useful in case you plan on reusing many of the prefab assets from the demo scene in your project. Having dupplicating them will stop referencing the original demo prefabs, meaning updaing the Ultimate Inventory System package won’t override the prefabs you duplicated.
Note: All the demo prefabs, scriptable objects and scene will still reference the DemoInventoryDatabase. The assets in the project that references the demo database can be updated to use a new database. This can be done by right-clicking a folder, prefab, scene, and or scriptable object and going to Ultimate Inventory System -> Replace Database Objects. It is important to note that any assets created and or modified under the Opsive folder can and will be overwritten when the inventory system is imported again. As a result it is recommended to avoid using the original demo prefabs/scriptable objects in your personal projects.
Databases can be duplicated from the cog button:

Important: Creating the parent folder of the database within the OS file explorer while creating a database may cause a “Missing Parent Folder” error. Simply create the parent folder first and then press the “New” or “Duplicate” button.
For tips on creating a new database from scratch go here.
Scene Setup
The Ultimate Inventory System requires a set of singleton components in order to function properly. These components must be added to the scene during edit time. These components can be added with the “Add Components” button under the Scene Setup section.
This will add a “Game” game object. One of the added components on that game object is the “Inventory System Manager” which will reference the Inventory Database. It will serve as a hub to get and create items and much much more.

Character Setup
The Inventory component can be used for any game object not just the player. The player Inventory will most likely have a few additional components which are extremely useful:
- Inventory : The component which holds the items
- Currency Owner : holds the character currency
- Item User: the component that lets you use items in ItemActions
- Inventory Standard Input : The new input component that handles input for using items and interacting with the UI.
- Inventory Interactor: Allows components that are interacted with to get a reference to the inventory.
- Inventory Identifier: Allows you to register your inventory game object in the Inventory System Manager singleton such that it can be accessed from anywhere.
It is recommended to Tag the character as “Player” as some of the editor manager will use that tag to automatically fill in some fields.

Save Setup
The Inventory comes with a built-in save system. It works by adding “Saver” components next to the components you would like to save. The Save System Manager can use those saver components to save and load data.
Therefore the save setup adds the the Save System Manager on the “Game” gameobject if it does not exist. It also adds the matching Saver components to the object specified in the field. For example if the object has the components:
- Inventory -> Inventory Saver
- Currency Owner -> Currency Owner Saver

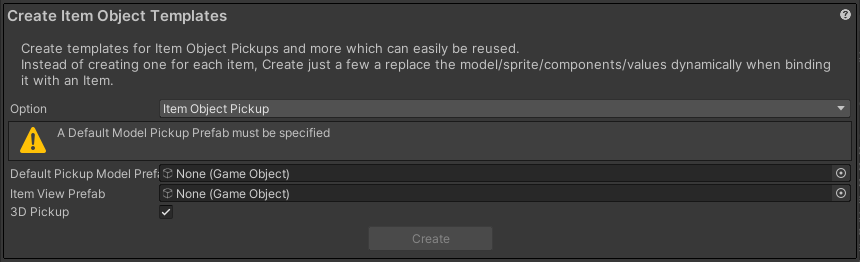
Create Item Object Templates
This section lets you create an Item Pickup Template, for 2D or 3D games. Once the template is created, edit it and save it as a prefab which you can reuse. Simply set the Item on the Item Object component at edit or runtime.
The item pickup can be pooled for reuse.
UI Setup with UI Designer
Open the UI Designer Manager to start adding UI to your scene.
In the Setup tab under the “Create Canvas Managers” Click “Setup”, This will spawn the canvas and Display Panel Manager required by the UI system.

Then under the UI Designer Schema section select a schema you like and duplicate it by pressing “Duplicate”. You won’t be able to use UI Designer until you duplicate the schema. This is to make sure that you will have your very own collection of prefabs in case you make changes.
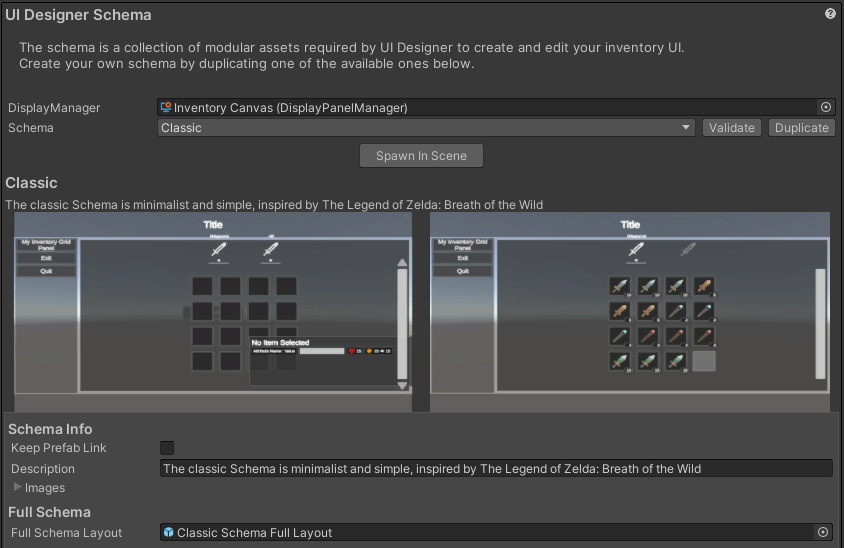
Once you have duplicated the schema press the “Spawn In Scene” button to quickly setup a basic menu for the schema.
From there the other tabs will be available to you and you may use them to create, find and edit your UI.
Where to go from there
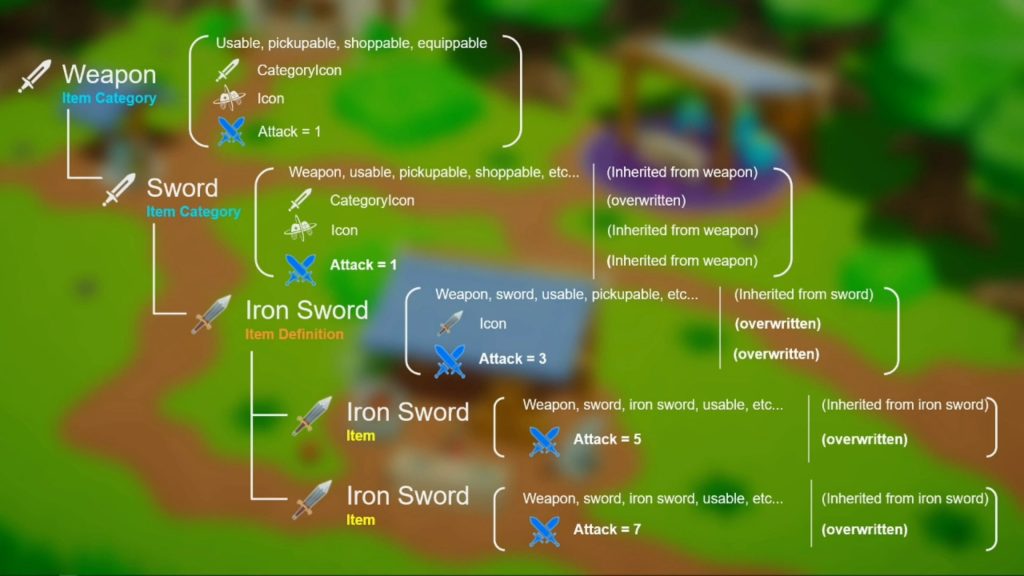
From that point you should have a completely working Inventory in your game. You may start by adding object to your Inventory Database, start small and simple. For tips on the Attributes to use for your Items head to the Attribute section of the documentation.
Once the Inventory database has some items, currencies and/or recipes. try them out in your scene by adding them to Inventories, Currency Owners, and Crafters respectively.
Make sure to read the Documentation thoroughly and watch the video tutorials. If you wish to know more or have questions or feature requests, please head to the forum where we will personally help you in any way we can.