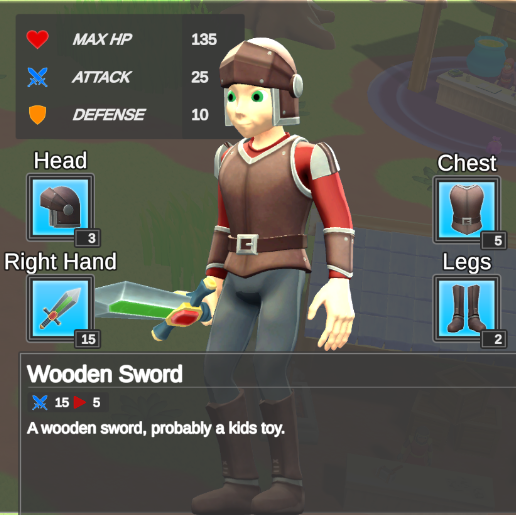
Use the UI Designer Equipment tab to create an Item Slot Collection View with one visible Item View Slot for each entry in an Item Slot Set. The view binds to the player’s Equipment Item Collection and applies the same category restrictions, so a Weapon slot can accept Iron Sword while rejecting Health Potion.

The Equipment panel displays and moves Items. An Equipper is a separate runtime component that spawns the corresponding equipment visuals on the character.

Before you begin

Confirm that:

  • the intended Inventory System Database is selected in Main Manager > Setup;
  • UI Designer Canvas Managers and a duplicated schema have been created;
  • Spawn In Scene has created the schema’s canvas and managers;
  • the player Inventory has Bag and Equipment Item Collections;
  • Equipment is an Item Slot Collection; and
  • Iron Sword uses Weapon while Health Potion uses Consumable.

The Equipment Item Collection, Item Slot Collection View, and Equipper must use the same Item Slot Set when all three participate in the workflow.

Prepare the Item Slot Set

  1. In the Project window, choose Create > Ultimate Inventory System > Inventory > Item Slot Set.
  2. Give the asset a descriptive project name, such as Humanoid Equipment.
  3. Add a slot named Right Hand.
  4. Set its Item Category to Weapon and its size limit to 1.
  5. Add any other slots the game needs, using the narrowest category that accurately describes each destination.
  6. Assign this Item Slot Set to the player’s Equipment Item Slot Collection.

The Item Slot Set is the source of truth for slot names, accepted Item Categories, and size limits. For the standard example, Right Hand accepts one Iron Sword or Fire Wand because both use Weapon, but rejects Health Potion because Consumable does not inherit from Weapon.

Create the Equipment panel

  1. Open Tools > Opsive > Ultimate Inventory System > UI Designer and select Equipment.
  2. In Create, choose the intended parent or panel for the generated view.
  3. Assign the same Item Slot Set used by the player’s Equipment Item Collection.
  4. Create the Item Slot Collection View.
  5. On the generated view, set Item Collection ID to Equipment.
  6. Confirm that every entry under Item Slots > Item View Slots points to the corresponding generated visible slot.
  7. Enable Set Item View Slot Restriction so each visible slot receives the Item Category restriction defined by the Item Slot Set.

The generated result should contain one visible slot per Item Slot Set entry. Use Equipment Options in UI Designer to select a generated Item View Slot in the hierarchy or add another restriction when the UI needs a narrower rule than the collection itself.

The generated Equipment panel displaying dedicated Item View Slots for different equipment categories.

Connect the Inventory and Item Views

The Item Slot Collection View resolves its runtime collection through Item Collection ID. That destination must be an Item Slot Collection using the same Item Slot Set as the view.

Configure the shared Item View Slots Container options after the basic binding works:

  1. Confirm that the Item View Drawer uses Use View Slots.
  2. Assign a Category Item View Set that can resolve Weapon Items.
  3. Set the drawer’s Content to the transform containing the generated Item View Slots.
  4. Add a Description binding if selecting Iron Sword should update an Item Description panel.
  5. Add the intended Item Action binding if players equip or unequip through an action menu.
  6. Configure drag and drop when Items should move directly between Bag and Equipment.

At this editor checkpoint, the generated Right Hand view should map to the Right Hand entry in the shared Item Slot Set, resolve the Equipment collection, and visibly reject Items outside Weapon.

Understand the runtime flow

When an Item is moved into Equipment:

  1. The Item Slot Collection checks the Item against the Item Slot Set.
  2. The Item is placed only in a compatible slot with sufficient size.
  3. The Item Slot Collection View redraws the corresponding visible Item View Slot.
  4. If an Equipper watches that collection, it updates the character’s equipment visual.

When a compatible Item replaces an occupied slot, the Item Slot Collection handles the displaced Item according to the Inventory’s main-collection setup. In the standard Bag and Equipment workflow, confirm that the displaced weapon returns to Bag.

The Equipment UI does not automatically change character statistics. Stats, attacks, and other game-specific effects belong to the project’s equipment or Item logic.

Choose slot restrictions deliberately

Goal Item Slot Set choice Runtime result
Accept any equippable Item in one slot Use Equippable Iron Sword and other descendants of Equippable are valid.
Accept only weapons Use Weapon Iron Sword and Fire Wand are valid; Health Potion is rejected.
Allow only one Item Set the size limit to 1 A second compatible Item replaces or is handled against the occupied slot.
Add a UI-only constraint Add an Item View Slot Restriction in Equipment Options The visible destination can reject an Item before a move is submitted.

Keep the Item Slot Set and visible restrictions aligned. A UI slot that appears to accept an Item while the runtime collection rejects it creates confusing drag-and-drop feedback.

Editor checkpoints

Before entering Play Mode, confirm that:

  • Equipment is an Item Slot Collection in the player Inventory.
  • The Equipment Item Collection, Item Slot Collection View, and Equipper use the same Item Slot Set.
  • Item Collection ID resolves the Equipment collection rather than Bag or another collection.
  • Every Item Slot Set entry maps to the intended generated Item View Slot.
  • Set Item View Slot Restriction is enabled when the UI should mirror the set’s category rules.
  • Right Hand accepts Weapon with a size limit of 1.
  • Iron Sword and Fire Wand use Weapon, while Health Potion uses Consumable.
  • The Item View Drawer can resolve Weapon and uses the generated slots’ content transform.
  • Optional Item Actions, Item Description, and drag-and-drop components reference the Equipment view.

Verify in Play Mode

  1. Open Bag and Equipment with Iron Sword and Health Potion initially in Bag.
  2. Equip or drag Iron Sword into Right Hand and confirm that it leaves Bag and appears in the Equipment slot.
  3. If an Equipper is configured, confirm that the Iron Sword equipment visual appears on the character.
  4. Try to move Health Potion into Right Hand and confirm that the Weapon restriction rejects it without removing it from Bag.
  5. Move Fire Wand into the occupied Right Hand slot and confirm that the configured replacement behavior returns Iron Sword to Bag.
  6. Unequip the current weapon and confirm that both Bag and Equipment redraw correctly.
  7. If Item Description or Item Actions are configured, select an equipped Item and confirm that the connected panel updates.
  8. Test every supported pointer, keyboard, or controller path and confirm that focus and restrictions behave consistently.

Troubleshooting

  • The Equipment tab is unavailable: Check that a database is selected, Canvas Managers were created, a schema was duplicated, and Spawn In Scene completed.
  • The wrong number of slots is generated: Check the Item Slot Set selected in UI Designer, update the set first, then recreate or edit the view.
  • Equipment stays empty: Check Item Collection ID and confirm that it resolves an Item Slot Collection on the bound Inventory.
  • Iron Sword is rejected: Check that Iron Sword uses Weapon, Right Hand accepts Weapon, and the view and collection use the same Item Slot Set.
  • Health Potion can enter the Weapon slot: Check the Item Slot Set category and enable Set Item View Slot Restriction on the view.
  • An Item moves into Equipment but its icon does not appear: Check the Item View Slot mapping, Item View Drawer, Category Item View Set, and Content transform.
  • The icon appears but no character visual is equipped: Check the Equipper, its Equipment collection reference, its Item Slot Set, and the Item’s equipment-prefab data.
  • Replacing a weapon loses or misroutes the old Item: Check which Item Collection is configured as the Inventory’s main destination and confirm that it is the intended Bag collection.
  • Drag and drop does nothing: Check the Cursor Manager, drag handler, drop handler, destination restriction, and configured drop action set.
  • UI and runtime acceptance disagree: Compare the Item Slot Set assigned to the collection and view, then inspect any additional Item View Slot Restrictions.