
UI Customization
Export
Customize the inventory UI by changing the generated prefabs, category mappings, and small View Module components rather than rebuilding item display and interaction logic for every panel. This workflow creates a Bag view for Health Potion and Iron Sword Items, then connects an Equipment view for equipped weapons.
Before you begin
Confirm that:
- The project Inventory System Database is selected in Main Manager > Setup.
- Health Potion uses Consumable, and Iron Sword uses Weapon and Equippable through inheritance.
- Both definitions have the
IconandDescriptionattributes used by the sample views. - The player has an Inventory with Bag and Equipment Item Collections. For verification, Bag should contain at least one Health Potion and one Iron Sword.
UI Designer schemas are Scriptable Objects containing the prefabs and assets used to create the UI. Duplicate a schema before customization so the project owns the generated assets and package updates do not replace the edits.
Create the UI foundation
- Open Tools > Opsive > Ultimate Inventory System > UI Designer.
- In Setup, find Create Canvas Managers and select Setup. This creates the canvas and manager components required by the UIS panels.
- In UI Designer Schema, select a starting schema and choose Duplicate.
- Select Spawn In Scene to create the schema’s basic menu and enable the remaining UI Designer tabs.
- In the scene hierarchy, confirm that the generated canvas contains a Display Panel Manager and the main menu or gameplay panel created by the schema.
Most UI Designer tabs have Create and Edit sections. Use Parent Transform in Create to choose where a new panel should be placed. In Edit, use Find Available Targets in Scene or drag the intended component into the target field before changing it.
Create the Bag and Equipment views
Bag Inventory Grid
- Open the Inventory Grid tab in UI Designer.
- Set Parent Transform to the intended main-menu content transform.
- Choose the appropriate Panel Option. Use Main Menu when the grid belongs inside the generated main menu.
- Set Panel Name and Inventory Grid Name to clear project names such as Bag.
- Assign the player’s Inventory.
- Choose Grid or List under Grid Options, then set the grid size and layout for the number of visible slots.
- Add an Item Info Item Collection Filter to the grid’s default filters and configure it to show Bag.
The Bag view should now be present in the hierarchy, target the player Inventory, and limit its contents to the Bag collection. A tab can apply the same collection filter if the panel needs to switch between several collections.
Equipment Item Slot Collection View
- Open the Equipment tab in UI Designer.
- Assign the Item Slot Set that defines the equipment slots and their allowed Item Categories.
- Choose the parent panel and create the view.
- On the generated Item Slot Collection View, set Item Collection ID to Equipment. Confirm that it uses the same Item Slot Set as the Equipment collection and that its weapon slot accepts the Weapon category.
At this checkpoint, Health Potion and Iron Sword can both appear in Bag, while the Equipment view has a valid destination for Iron Sword.
Choose the display and interaction pattern
Inventory Grid or List
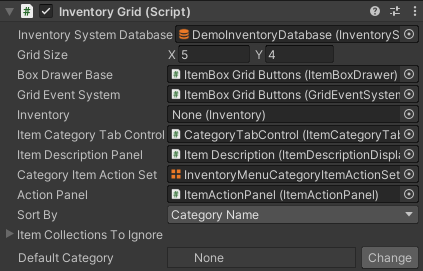
Use an Inventory Grid when the player should scan icons spatially. Use the List option when names or longer rows are more important. Both use the Inventory Grid component and the same Item View Slot interaction system.

The generated object includes the Inventory Grid and related grid components. Important choices include the assigned Inventory, grid size, layout group, navigation, filters, sorters, and whether tabs change the active filter.
Item Shape Grid
Use an Item Shape Grid only when an Item must occupy more than one grid cell. A conventional Health Potion and Iron Sword Bag normally needs a regular Inventory Grid; a shape grid is useful for a spatial backpack design where the sword covers several cells.

The Item Shape Grid component controls the shape-based placement and must match the intended grid dimensions and item-shape data.

Item Actions by Category
Use Item Actions for choices performed from the inventory UI. Map a Consume action to Consumable for Health Potion and an Equip action to Equippable for Iron Sword.

An Item Action Set groups actions for one Item Category. A Category Item Action Set combines those sets, and an Item View Slots Container Category Item Action Set Binding connects the result to the selected Item in the Bag grid.

Item Views and Category Item View Sets
An Item View prefab controls the visual content inside a slot. Add focused Item View Modules for values such as Icon, name, quantity, selection, or rarity instead of creating one large display component.

Use a Category Item View Set to map Item Categories to Item View prefabs. Create one from Create > Ultimate Inventory System > UI > Category Item View Set, then map Consumable and Weapon to the appropriate prefabs.

Item View Drawer
The Item View Drawer uses the Category Item View Set to choose a prefab for each Item. Assign the set on the drawer used by the Bag Inventory Grid, and confirm that its Content field uses the same transform as the Inventory Grid’s Content field.

Item Description and Attribute Views
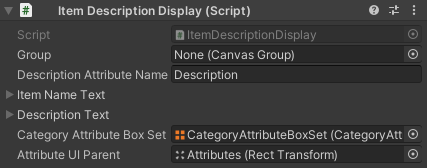
Use an Item Description when the selected Item needs a larger panel containing its Icon, Description, and attributes. An Iron Sword description can show Attack and Durability, while a Health Potion can show its description and quantity.

Add an Item View Slots Container Description Binding beside the Bag grid so selection updates the description. The Item Description can use Item View Modules, including a Category Attribute View Set Item View Module, to choose which attributes appear for each Item Category.
Editor checkpoints
Before entering Play Mode, confirm that:
- The generated canvas has its Display Panel Manager and main menu panels.
- The Bag Inventory Grid references the player Inventory and has an Item View Drawer.
- The Equipment view references the Equipment collection and a compatible Item Slot Set.
- The Item View Drawer references the intended Category Item View Set.
- The Category Item Action Set includes Consumable and Equippable mappings and is connected through the category action-set binding.
- The Item Description is connected to the Bag grid through its description binding.
Verify in Play Mode
- Open the inventory menu and confirm that Health Potion and Iron Sword appear in Bag with the correct Item View prefabs.
- Navigate with the project’s supported pointer, keyboard, or controller input and confirm that selection remains visible.
- Select Health Potion and confirm that its Item Description updates and its Consume action is available.
- Select Iron Sword and confirm that its weapon attributes and Equip action are available.
- Equip Iron Sword and confirm that the Bag and Equipment views refresh to show the new owning collection.
- If drag and drop is enabled, move Iron Sword between compatible slots, then try to place Health Potion in the weapon slot and confirm that the restriction rejects it.
Troubleshooting
- UI Designer tabs are unavailable: Check that a database is selected, Canvas Managers were created, and a schema was duplicated and spawned.
- The Bag grid is empty: Check the Inventory assigned directly or through its panel binding, then confirm that the player Inventory contains Items in the expected collection.
- An Item uses the wrong prefab: Check the Category Item View Set mapping and the Item View Drawer reference. Use the most specific intended category mapping.
- The action list is empty: Check the Item’s Categories, the Item Action Sets inside the Category Item Action Set, and the Item View Slots Container Category Item Action Set Binding.
- The description does not update: Check that the Item View Slots Container Description Binding references the Bag grid and the intended Item Description.
- Drag and drop fails or accepts the wrong Item: Check the source and destination Item View Slot restrictions, the Equipment Item Slot Set, and any move-action conditions.
- A grid is clipped or navigates in the wrong direction: Check Grid Size, the Unity layout group, and the Layout Group Navigation configuration in UI Designer.