Part 1 : Introduction + Editor basics
Hello Everyone,
It took a while but I am back with an update on the progress of the inventory system. We have now pretty much locked down the core framework design. As stated before, this is a stand-alone asset, which means it will be usable on its own and will compete with the other inventory solutions on the asset store. We are bringing a solution that we believe is powerful, flexible and scalable while still being extremely easy to use, even with minimal programming knowledge. When it comes to items and their attribute values we believe that iteration time must be reduced to a minimum as it allows the creators to spend more time on the creative parts instead of tweaking values in multiple places.
Once again I would appreciate your feedback on the framework design, component namings, and on the Editor UI. Please let me know of any of your concerns on the subject and the limitations you encountered on other systems, which you would like to be addressed here.
Note that we have not started the integration with the character controllers yet. This will come after we polish the framework, write the in-game UI scripts and create the demo scenes. We will release the framework after we do all that, so you can expect it to still take a while.
If you read the first post you will see that we have made some changes to the requirements and goals. Be advised that any of the following statements can and will most likely change, but the main idea will stay the same.
There is so much content that I want to show you that it couldn’t fit in one post. It will take 4 posts.
- Introduction + Editor window basics
- Advanced concepts + Editor examples
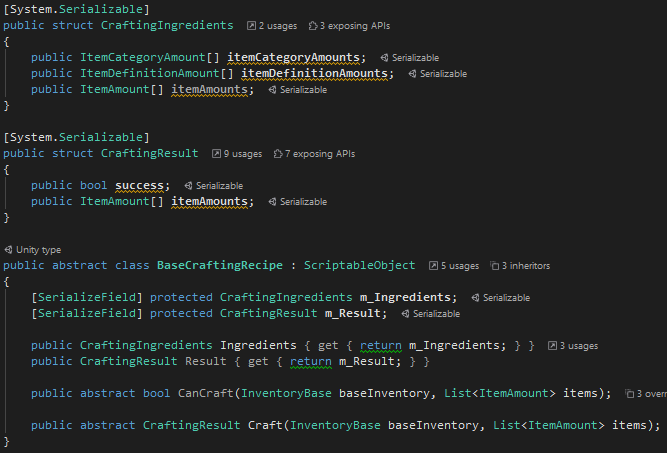
- Item Action & crafting + more details on Attributes
- Conclusion and what’s next
With that out of the way please let me introduce the Inventory System plan V0.2:
Inventory System
The Inventory system is an asset made by Opsive that will help developers create their own inventory system for their game. Inventories can vastly change from one game to another. We do not plan on creating all possible inventory systems, instead we give a powerful modular and scalable framework that can enable anyone to make a complex inventory system in no time.
Key information
Our goal:
Make an inventory framework that is modular and scalable. We are aiming at enabling our customers to create all types of inventories with ease. The asset should be usable by non-programmers to create standard inventories you find in popular games. But the true value comes from being able to extend the framework to create your very own unique inventory system.
I believe the best way to achieve this goal is to create a powerful core framework and polish it by creating a few mini-game demos and inventory UI templates of popular game genre. This will ensure that the framework is flexible, modular and scalable. I truly believe that the only way to know that a tool is good is by using it in multiple real-world scenarios.
Target audience :
Non-programmers for people who want to create any types of items while taking advantage of the templates to create interesting inventories.
Experienced programmers and beginner programmers who are dedicated to reading our documentation and follow our tutorials to extend a template or write their own from scratch using the inventory system framework.
Unity Version :
*Important* The minimum version will be 2019.1. We have decided to take advantage of the new Editor UI, UIElements, to create the editor window, it did not make sense to create the Editor UI twice just so it could be used on older Unity versions. Especially since by the time we release this tool, most developers will have moved to 2019.X-2020.X
Our Core (subject to change):
The only way to make a scalable and flexible inventory system that is coherent and rigid is by adding some rules. These rules are there to make sure the items are organized in a structured and logical way. The way we achieve that is with the following.
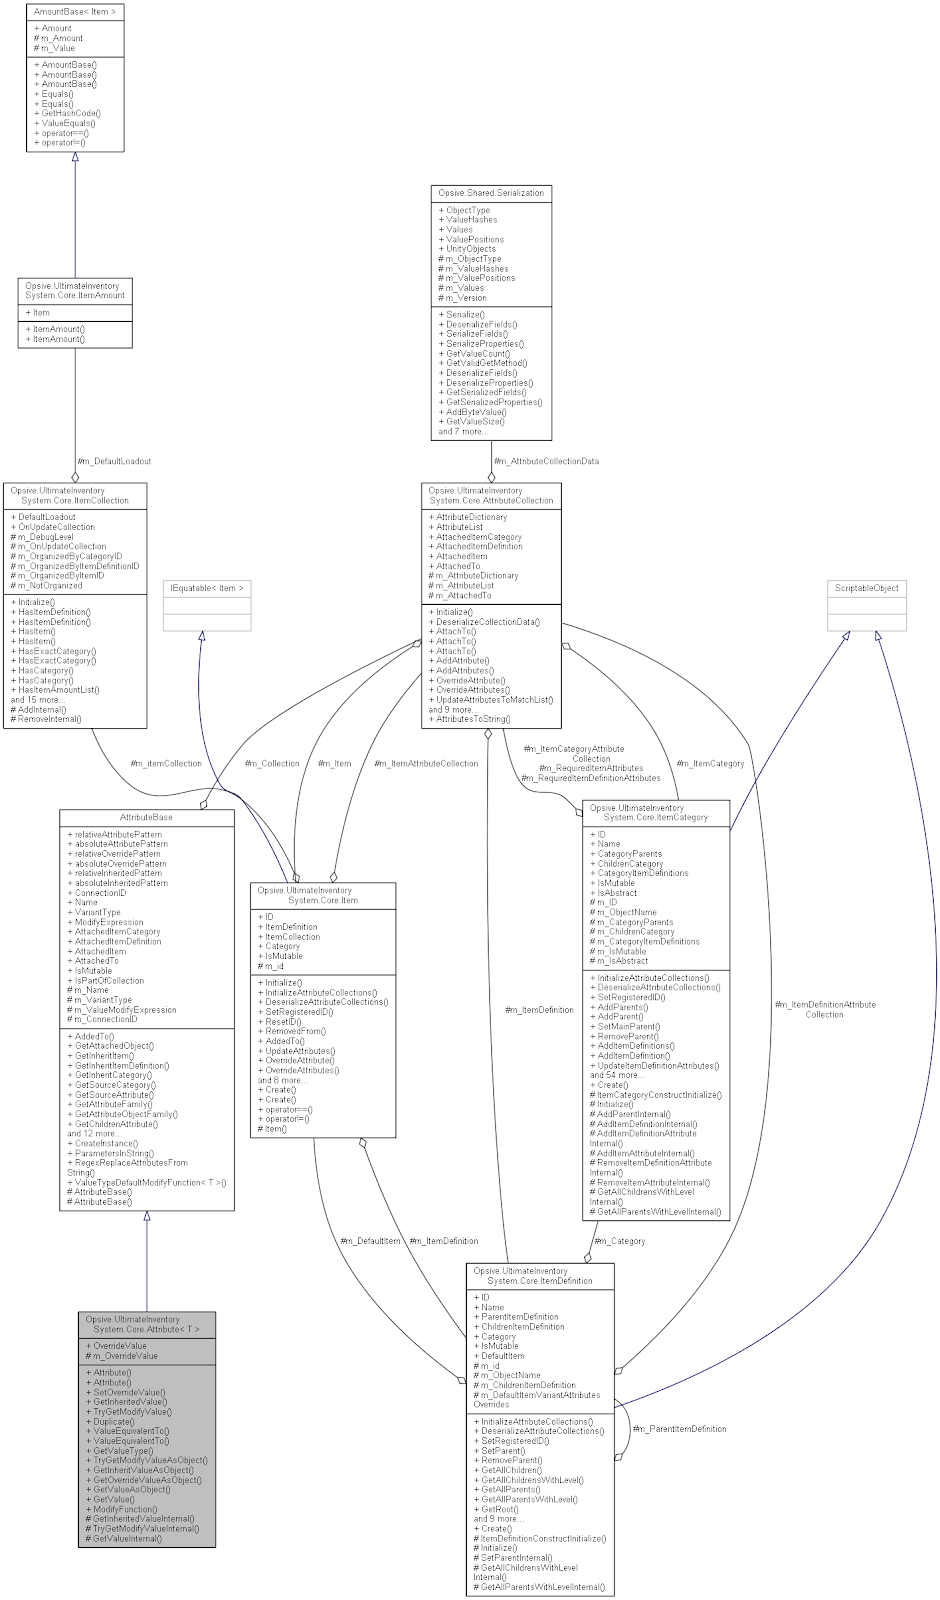
We have a hierarchy of three components that will shape the item. These are the
ItemCategory, the
ItemDefinition and the
Item itself. This is all possible thanks to a system we call the
Attribute system
An
Attribute is simply a name and a value of any type. Think of it as a member of a class, where the class is the item. The power of the attribute is being able to inherit, override or modify another attribute value.
First, the
ItemCategory is used to define the attributes that are available on all the items that will be part of that category
Second, the
ItemDefinition creates a template for an item. It assigns values to the attributes that are defined by its category.
Third, the
Item is created from the ItemDefinition and can override any of the attribute values to make it completely unique
A simple example of creating two potions with different values could be done this way:
- ItemCategory: “Consumable” category with a “healAmount” attribute
- ItemDefintion: “Potion” definition with “healAmount” of 5
- Item 1: potion with “healAmount” of 5
- Item 2: potion with “healAmount” of 6
Let us see how it works in the Editor
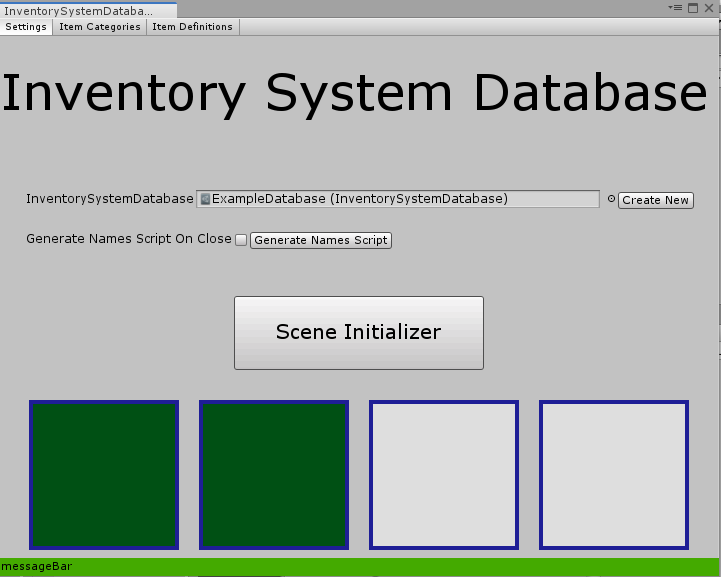
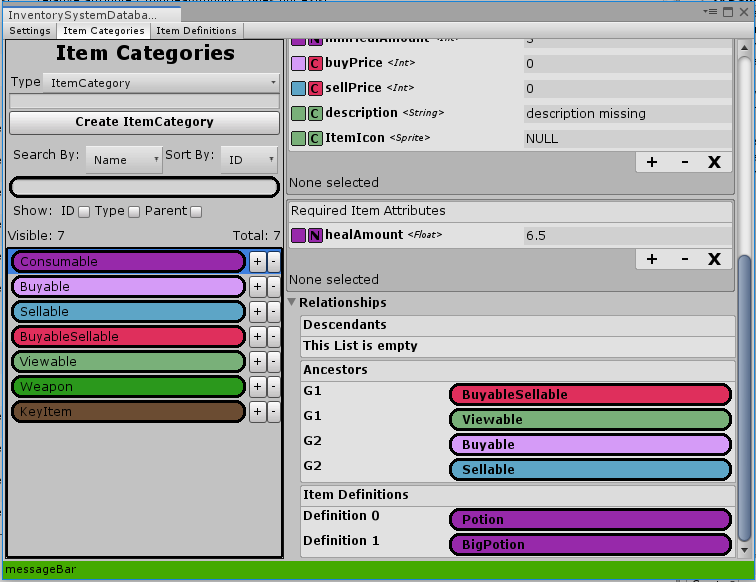
The Inventory Database Editor
The first step is to create a new Inventory System Database asset. This will store the references to all the categories and ItemDefinitions that you create in the editor. Normally you should have a single database asset per project.
Now that the database is created and selected, the next step is to create a category. Here we create a Consumable category with a “Required” Item Attribute “healAmount”. We set the default value of this attribute to 3.
Note that there are three different attribute Lists.
- The Category attribute List is used for attributes that are common for all items in this category. An example would be a Sprite image, a color or anything that can differentiate it from other categories of items
- The Required ItemDefinition Attributes are attributes that are required to exist on all the ItemDefinitions in that category. The value of the attribute can be set directly on the ItemDefinition. An example of an ItemDefinition Attribute is a fixed value for all items with that ItemDefinition, meaning a “baseDamage” or “buyPrice”
- The Required Item Attribute are attributes that are required on the item itself. The item attributes can be set directly in the inspector and if the Category is set to mutable to Item attributes are even allowed to change values at runtime. In our example we will use “healAmount” as an ItemAttribute
With the Category Created we can make the “Potion” ItemDefinition. We can also override the healAmount to set its default value to 5.
Note that there are two different attribute Lists.
- The ItemDefinitionAttributes List will have the Required ItemDefinition Attributes which are defined on the Category of the ItemDefinition. You can override the value of these attributes if you wish so, by default the attributes will inherit the value that was set in the category.
- The Default Item Attributes List will have the Required Item Attributes which are defined on the Category of the ItemDefinition. Note the specified “Default” that’s because any item that is created at runtime can override these “default” values. When an Item is created at runtime it will by default inherit the attribute values of the ItemDefinition Default Item.
Now that we have our potion created we can add it to an inventory default loadout. We add two potions. One with the “healAmount” overridden to a new value of 6. And the other which simply inherits its value 5 from the Default Item of the ItemDefinition.
With this we have successfully added Items in an inventory. Note that since the second potion inherits its value from the default Item, changing the DefaultItem “healAmount” value will, as you would expect, change the second potion “healAmount” value.
So with the basics out of the way lets see some cool features of this framework with some examples.